Category Archives: Privacy

Encrypting Your Stuff – Create Very Strong Passwords

There’s no sense in encrypting your personal files and folders if you don’t secure them with a strong password. Today, we’re going to show you how to do just that. You’ll create an easy to remember password that will lock your material tighter than Fort Knox.

1. There are some prerequisites to this course. In order to create this special password, you have to use a number pad, either the one on the right side of your full-size keyboard or the numbers you can access using the FN key on a laptop, for instance. Yes, there are numbers across the top of every keyboard but those are not the ones we want to use here. If you always use a full-size keyboard, make sure the NumLock key is pressed down. If not, figure out how to use the ‘other’ numbers, usually on the top of certain keys, like this:
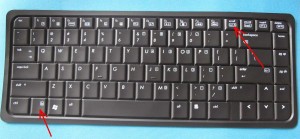
Photo of Character Map Passwords   1
See the small numbers on top of some keys, even on top of number keys?

On this keyboard, you would press the FN key and the J or K or L key, etc. The normal number keys on the top row are not what you would use, except for 7, 8 and 9 with the FN key.

2. Ok, once you’re clear on that, let’s bring out the Character Map. Click on start, down on the bottom left of your taskbar, then type ‘charmap’ into the slot. Charmap.exe should show up but, if it doesn’t, type charmap.exe and press enter.
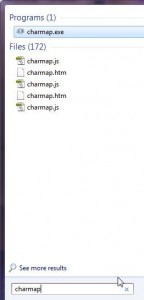
Photo of Character Map Passwords   2
It’s up at the top there, but you may have to type the full charmap.exe.


3. Welcome to Character Map! Here’s what you should see when you hit Enter:
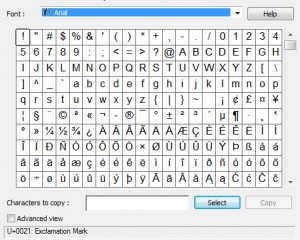
Photo of Character Map Passwords   3
This is known as Character Map.

With this handy part of Windows, you can pretty much type any letter in just about any language. Symbols, archaic letters, they’re all here.

4. The default typeface for us is Arial. Your default typeface may be different. Here are some of our choices:
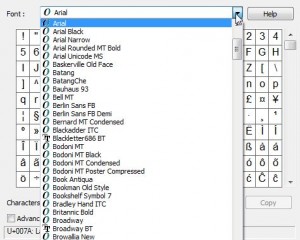
Photo of Character Map Passwords   3
Lots of choices here but make sure you remember which one you choose.

Whichever one you choose to create your password, make sure you remember it. Each selection here has a completely different set of characters. You can make a password out of any of them but you must remember which typeface you chose.

5. Once you make a selection, click on one of the letters/symbols. This is an example:
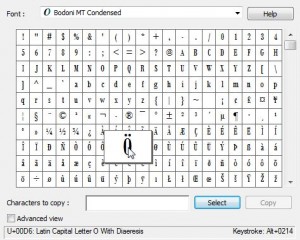
Photo of Character Map Passwords   5
This is an O, sort of, with two dots on top. See the keystroke on the bottom right?

This letter, according to Character Map is ‘U+OOD6: Latin Capital Letter O with Diaeresis’. Phew! Forget that, it’s not important. What is important are the words on the bottom right corner: Keystroke: Alt+0214.

6. Open Notepad. Use Notepad not Word or Wordpad. Notepad doesn’t mess with letters, it just shows what you type, nothing else. Once Notepad is open, Press the Alt key down and keep it down. On your number pad, type 0124 then let up on the Alt key. Like magic, this Ö appears. Practice in Notepad until you get it right.

Note: Not every letter or symbol has an ‘alt+number’ shortcut. Obviously you would choose ones with a shortcut, otherwise you have to copy and paste the symbol which wouldn’t be as easy. What we want here is to be able to type the symbol/letter without opening Character Map, right?

7. Now it’s time to play a little memory game. You can do this a few ways but here’s a suggestion. Look for a symbol that has a familiar number shortcut. In our example above, the shortcut is Alt+0214. Maybe 0214 are the last four digits of your phone number. Get it? Look for a combination that rings a bell and is something you can never forget; your age, your address, your shoe size, whatever. Once you have that symbol, you’re on your way to a very secure password.

8. The hard part is done. You have a symbol that pretty much locks up your password from anyone who doesn’t know your secret. You could still use something simple for the rest of the password but once you insert that symbol, it is very, very secure.

9. Here’s an example of an unbreakable password:     !pass0214ÖBod

For fun, we’ve put both the typeface we used, Bodoni, and the number you have to use with the Alt key to create the special character, Ö.

These are the basics and we’re sure you can create very strong passwords using this technique. Have fun with this and make sure you comment if you have questions about this.

TIP: Character Map is for reference only. You only need it to find the character you want to use and the numbers that create it with the Alt key. Character Map does not have to be open when you are typing the character.


Thanks for reading!


Security Questions – Don’t tell the truth!

Besides a good password, security questions are another way to keep your different online accounts safe. This is a good thing, isn’t it? Well, it is a good thing if you select the answers to those questions carefully. Remember, you don’t have to tell the truth when you choose an answer. Lie a little.

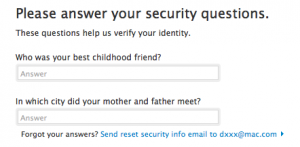
Here’s an example that you might see on the Internet when signing up for a new service:


Photo of Security Questions
Anyone who knows you might be able to answer these questions.

These are typical security questions. Before you simply plunk in ‘Benji’ and ‘Sheboygan’, think about it. Who knows where your parents met? You and anyone that you’ve told the story to.  Maybe your childhood friend is still a friend. Maybe he’s your husband! Here’s where you can lie a little, just to keep your accounts a bit safer.

For any security question, use completely different answers, ones that aren’t guessable. For your first car, you could put the answer as ‘123’. Mother’s maiden name? Tokyo. First pet’s name? Smith (assuming it wasn’t named Smith!).

When you use a series of numbers or names or words that don’t match any of the questions, your account is completely secured from anyone who happens to guess your password. Sure, they may have your password solved but they won’t be able to get past your security questions.  We showed you last time how to create a strong and secure password using mnemonics. This technique is somewhat similar, using easy to remember words that have no relation to the questions being asked. There are no rule books as far as security questions go. You’re dealing with a computer, not a real person, so you can say anything you want. Lock up your accounts with a good password and crazy answers to security questions and you’ll be a whole lot safer online. Good luck!

Thanks for reading! Why not like us on Faceboo? Here’s the link: Computers Made Simple on Facebook 

Passwords – How to create a good one

No visuals today, just common sense. As you know by now, about the only people you can keep out of your email and social networking accounts are your friends and hackers. Hackers in this case means people not associated with your government or your local authorities. The key to keeping your online accounts safe is a good password. The longer a password is, the stronger it is. The problem with this is that long passwords are hard to remember, right? Here’s how you can create a unique, reasonably hack-proof password.

1. Today we’ll use something named a mnemonic which will help you remember your new password. Mnemonics are easy ways to remember things, sometimes they are visual, sometimes they are simply bits of information that you remember easily because they are part of your everyday life.

Photo of Mnemonics 1
What a post about mnemonics without Keanu Reeves?

2. Let’s run through some things that are easy to remember. Your birthday, year of birth, address, first phone number, cell number, height, weight, first teacher’s name, first pet’s color, etc.

3. On your keyboard, each number and many letters type something different when you press the Shift key. Additionally, some numbers resemble letters. 3, for instance, could be an E or a zero could be an ‘o’. Let’s see if we can make something out of all of this:

Birth date: 1972

Height: 172

Street Address: 102 Moxley

Pet’s name: Ginger

If we mix and mingle these stray thoughts, we could come up with something like:  19!)@Mox&@Gin

How did we come up with this string of gibberish? 19 is obvious, first two numbers of the birth date. !)@ is 102 but typed with the shift key pressed.  Mox is obvious. &@ is the leftover part of the birth date while Gin is clearly part of the pet’s name.

Why not try this technique for one of your email accounts? Make sure it’s one that you have a second means of access, in other words one that has a security email account that will be contacted if you forget your password. Better yet, write the password down in Notepad and mail it to yourself at another email account. Use a clue word, something like pizza to search for. Don’t use ‘password’ since this is a dead give-away for anyone searching through your emails.

After you’ve created the password, try typing it a few times while running the original sources through your mind. You may see it as 19102Moxley72Ginger but don’t worry about it. Just remember to shorten the things that have to be shortened and use the shift key where necessary. It will begin to be like a rhyme, something that you won’t be able to forget if you wanted to! Our example is 13 digits, plenty long enough to stump even the smartest normal hacker out there. It would take a very long time for an average computer using brute force to crack it. Email providers and social networking sites lock your account anyway if you try the wrong password several times in a row.

Good luck and let us know if you’re got similar suggestions for a secure email.

Thanks for reading!


Encrypt Your Emails – Part Two

In our last post, we described how to encrypt an email using JavaScrypt, a simple but effective way to hide your personal information from prying eyes. That post is here: Encrypt Your Emails For Free. Today’s post assumes that you’ve read the linked one so, if you haven’t read it yet, head over and check it out. We’ll wait…

Back? OK, here we go. The message that we used yesterday was very simple but the encoded message was obviously encrypted. What if we still wanted to encrypt a message but didn’t want it to look as if it was in code? It’s pretty clear that an encrypted message would raise suspicions about its content, even if that content was completely innocent. Here’s how to solve that problem.

Steganography is the term for this process, hiding something in plain sight. There are several ways to do it but, for now, let’s stick with what we learned yesterday. To accomplish this task, you must have two browser windows open. First, open up the link from yesterday’s post. Here it is: JavaScrypt Encryption.

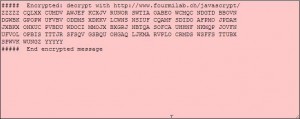
When the page opens, run through the same process as we described previously, generate a code, write a simple message and then encrypt it. You’ll end up with something that looks like this:

Photo of Steganography 1
Gobbledy guck, mishmash, pure Blarney, right?


It’s painfully obvious that this is an encrypted message. Let’s make it look like bad poetry. Open this page: Stego! Text Steganography. Both pages are by the same person, more on him later, so they look very similar. What we’re going to do here is simply copying and pasting from one browser window to the other. Our aim is to hide the encrypted message in text that looks vaguely normal, in other words ‘words’. Let’s get going:

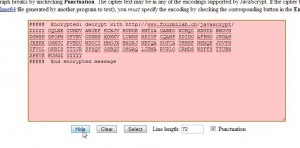
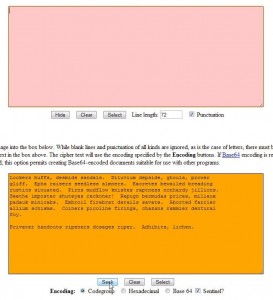
1. We will use the encrypted message in the photo above. Highlight it then right click and choose Copy. Go to the Stego page (link just above this), click in the pink box, right click and  choose Paste. Under the pink box is the word Hide. Click it.

Photo of Steganography    2
Click the Hide button.


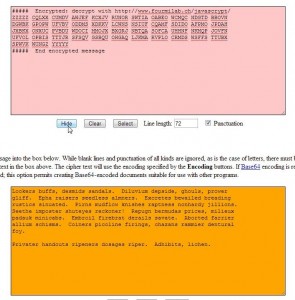
2. Once you click the Hide button, a new message appears in the orange box at the bottom.

Photo of Steganography    3
What’s this? Some gibberish?


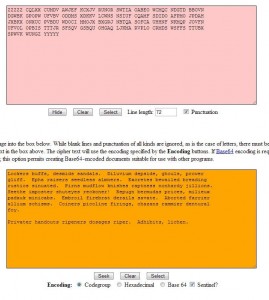
3. What we have now is an encrypted message that has been transformed into something that looks a bit less intimidating and a whole lot less suspicious. What do we do now? We can’t decrypt this gibberish, not directly anyway. We have to ‘unhide’ it. Normally you would have to copy the words from an email then paste them into the orange box. For now, just erase the encrypted message in the pink window and leave the words in the bottom window. Like this:

Photo of Steganography    4
Empty the top box and click the word Seek.


4. Click Seek and the original encrypted message will appear in the top box again.

Photo of Steganography    5
Voilà! It’s back again.


This two page, multi-step process takes an email, or any text document for that matter, encrypts it, then changes the encrypted message into something that resembles normal English. If this text happened to be buried in a much longer document, there’s a good chance that it wouldn’t be noticed. While this whole thing takes a bit of extra time, we think you’re more likely to slip beneath the radar, if you know what we mean.

TIP: In order to use this system, all of the settings have to be the same for the encryption and the decryption as well as for the ‘hiding’ and ‘seeking’. Each page of the site gives you ample information to change the settings to your own specifications but be sure to make a record of those settings if you want to have a problem-free experience.

The site that we’ve linked to here belong to John Walker, co-creator of the Autodesk company and its software (AutoCad). Both pages that we’ve mentioned can be downloaded and run on your computer, no Internet connection is necessary. In other words, you could perform all of your encryption/decryption tasks ‘offline’.

Should you encrypt your emails? That’s up to you. We don’t but we sleep a bit better knowing that, if the need arises, we could. If you think the process described here is new, it’s not. The two pages we’ve mentioned were created in 2005. We are not naive enough to think that this simple encryption process is invincible to decryption by a third party and neither should you. What we have described here will keep your private information out of the hands of people who shouldn’t be snooping in your stuff anyway. Besides, it’s fun to experiment with this and it makes very interesting chatter at the dinner table, right?

Thanks for reading! Like us on Facebook and you’ll be able to keep up with our latest news and posts: Computer Made Simple on Facebook.


Welcome to Your Facebook Interview!

Hi! Glad you could make it. Hey, before we begin, give me your real name and email address. Yes, it has to be a real email address and, yes, you must give us your real name. OK good, thanks. Now, tell us about yourself. Here’s what we need to know:

1. How old are you?

2. Are you male or female?

3. What is your current location? Yes, we need city, state and country.

4. For security purposes only, we need your phone number. Better give us your cell number too.

5. Where did you go to school? Try to list every school that you attended…ever.

6. Where have you worked in the past? Yes, we need a complete history.

7. Now we need a recent photo of you, your family and friends, your home…anything to make you more interesting to us. If you have a bikini photo, even better. We ask guys if they have a photo where they’re not wearing a shirt. We love that kind of thing. What was that? Yes, we will use your photos for our own promotions and we won’t tell you about it. OK? Privacy? Well…we have some privacy settings but they’re really hard to figure out and we keep changing them, almost every month. Better leave your stuff open to the public. It’s better that way.

8. What do you like? Yes, we know. There are so many things to like in the world, right? Well, we’ve broken everything up into categories. Music, video, hobbies…all laid out for you. Why do we need these? It’s simple really. We sell your information to advertisers. Once you tell us everything about yourself, we turn around and tune the ads that you see to your own demographic. Do you make any money from all of this? Certainly not! This is our company, not yours. We just use your information, we’re not about to pay you for anything. It’s a privilege to be with us, you should know that!

9. We also need some of your financial details…well, we would like them. Maybe you could give us your credit card number, simple things like that. Security? Oh yes, we have pretty good security here. What’s that? Well, we have been broken into a few times but not much was stolen. No, not much. Just a complete list of usernames and passwords, nothing major.

Photo of Facebook Logo
Look familiar!


We think you get the point. Share, reveal personal details, give out your personal information just like that, let complete strangers see your photos….it’s all there on Facebook. The point of this article is simply to make you think about what you’re doing. Hand all of this stuff out and let Facebook make money on it. Is that what you signed up for?

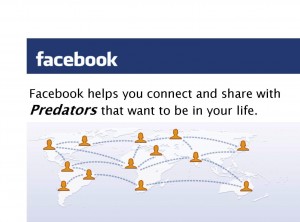
Photo of Facebook Warning
Facebook is very helpful, that’s for sure.

Sign up for Facebook and your profile photo might end up in a facepile somewhere. Anyone in the world could click on your photo and be taken directly to your Facebook profile page. Here’s an example:

Photo of Facepile
If you see something like this, click on a face and see what happens.


Make sure you set your privacy settings accordingly to avoid being seen on a website. You have no control over where Facebook posts things like this but you can control whether they can use your photo or not.

We’re simply trying to make you think. Be smart, learn all you can about Facebook privacy before you reveal too much of yourself to strangers.

Photo of Time Cover
This man is a billionaire because of your information.


Thanks for reading! Let us know if you have problems with anything on Facebook. We’ll try to help.