Category Archives: Privacy

Check Facebook Privacy Settings

Facebook recently changed the way that you can check who can see what you’re posted or been tagged in. Here’s a run-down of how you can quickly check your settings.

1. Start by clicking on the icon that looks like a padlock, up on the right of any Facebook page.


Photo of Facebook Activity Check  1
Click the padlock.


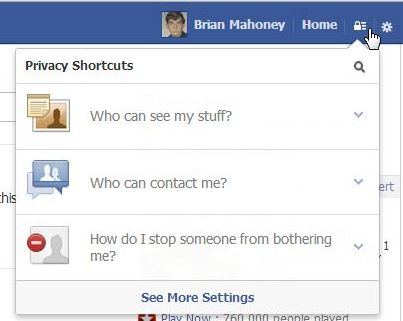
2. On the menu that pops down, click on ‘Who can see my stuff’.

Photo of Facebook Activity Check  2
Click on ‘Who can see my stuff?’


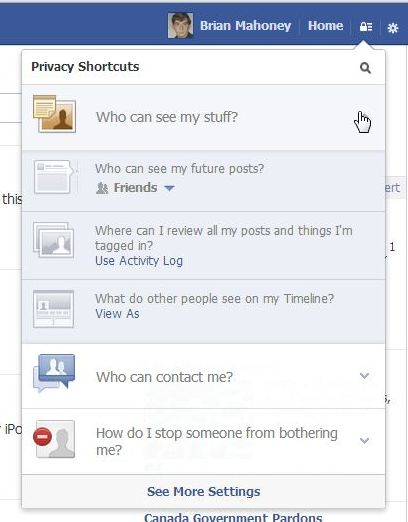
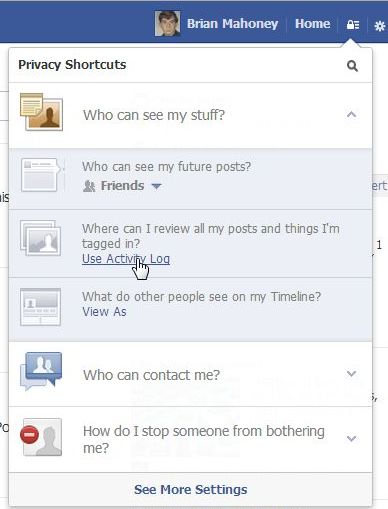
3. As the menu above spreads down a bit, click on ‘Use Activity Log’.

Photo of Facebook Activity Check  3
Click on ‘Use Activity Log’.


4. On the page that opens, everything that is possible to do on Facebook is on the left, everything that you can control is on the right.

Photo of Facebook Activity Check  4
Sort out your different activities from this single page.


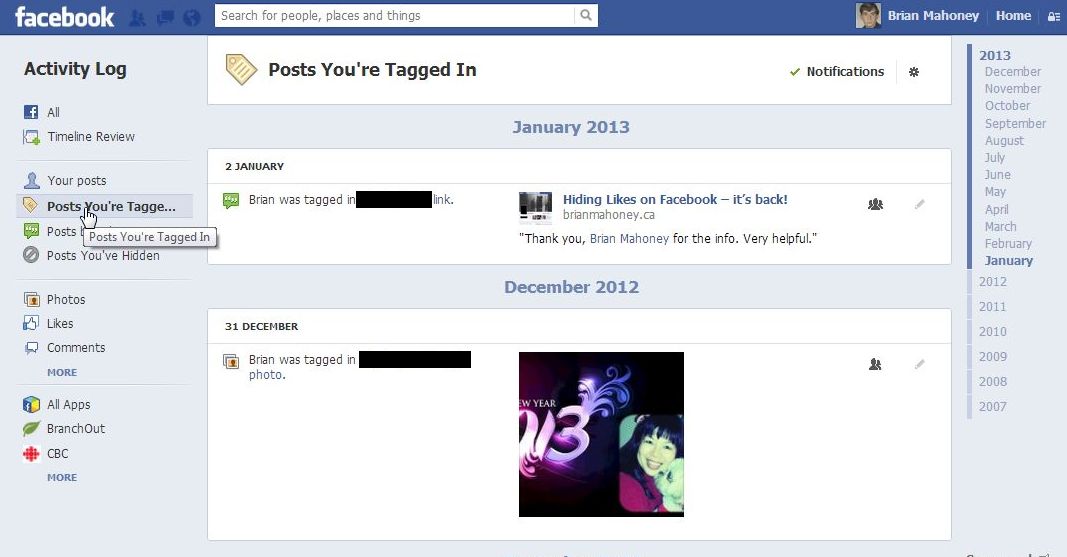
5. The first time you access these areas, Facebook will walk you through the changes. Basically, this is a complete list of everything that you’ve done on Facebook since time began…well, since  you joined Facebook anyway. Depending on how busy you’ve been, the different pages may take a long time to load. Choose an activity on the left side, then look on the right side to see who can see it. You can even choose activities that are set to ‘only me’.

Photo of Facebook Activity Check  5
The default setting doesn’t include ‘Only Me’ activity but you can set it to include it.


6. On this page, you can hide activity from your own Timeline. Remember that any post’s privacy settings are controlled by the original poster’s settings. You control your own posts, of course, but if you are tagged by someone else, you have the option of removing that activity from your timeline or removing the tag completely.

Photo of Facebook Activity Check  6
You can hide posts that you’re been tagged in.


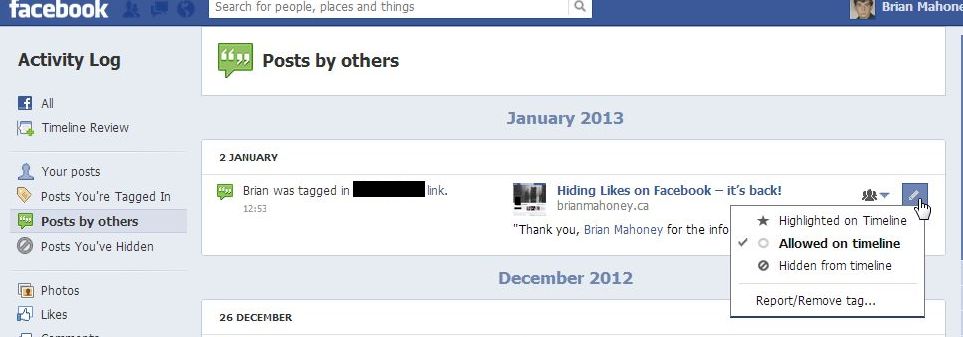
7. Once you get used to finding and using this page, we think you’ll appreciate its power. Each post, each activity has it’s own settings. You can hide things from your Timeline, limit the audience for things you post or share, all kinds of things. Don’t forget that you can set an audience for a post/comment/photo when you do it but you can always backtrack and change the settings here.


Play around with this page. If you find something cool, let us know. We think you’ll feel a bit better about controlling your own privacy now.

Thanks for reading!

Facebook Stalking – how to stop it


Even though you may have your Facebook contact info privacy settings for your phone number set to ‘friends only’ or ‘only me’, did you know that anyone can find you on Facebook using that phone number? Read that again. You’re right. It doesn’t make sense. But, that’s Facebook, right? Read on and we’ll tell you how to stop complete strangers from stalking you and finding you on Facebook.

1. Go to your privacy settings page. Here is how you get there:

Photo of Privacy Settings link
Down arrow, then click on Privacy Settings.


2. On the page that pops up, look for the words ‘How you connect’. This is where you edit the settings for how people search for you. If you don’t change the settings here, anyone can find you using your phone number, the one that you might have given Facebook, or your email address. This is how it looks:

Photo of Facebook Privacy settings page
How you connect, that’s what you’re looking for.


3. This ‘How you connect’ setting is not  overridden by your basic info settings. If you have your phone number listed in your basic info and if you have that set to ‘friends only’ or only me’, anyone can still search for you using that phone number. Sad but very true. Here are the settings that we suggest:

Photo of Facebook search settings.
We suggest that you set this to ‘Friends’.


4. If your friends happen to know your phone number, they can find you on Facebook. If they know your email address, they can find you. Then again, if anyone knows your phone number or email, they can find you on Facebook…unless you change this setting. Sure, anyone can search for your real name and they may or may not find you, depending on how many other people share your name and whether you used your real name or your nickname when you signed up. In other words, people can still find you, old school friends, ex-lovers, whoever, but they won’t be able to link up your phone number to your Facebook account. Change it now!


Working backwards here, your friends won’t be able to see your phone number on Facebook if you have this particular privacy setting:

Photo of Phone Number privacy settings
You decide…Only me or Friends or whatever you want.

OK, if your friends already know your phone number, that’s fine. With your phone number privacy set to ‘only me’ , at least they won’t be able to find the number on Facebook. If you set this to ‘friends’, then they can find your number here. Either way, using the privacy settings outlined above, no one will be able to search for you using your phone number.

Are we chock full of paranoia? Not really. Consider this scenario: You apply for a job. Obviously, you have to provide a telephone contact number. If that number is linked to your Facebook account, the person who is hiring you can search for you on Facebook using that number. Like it or not, they can find out quite a bit about you, depending on your privacy settings. If you remove your email and your phone number from your search settings (unfortunately you can’t separate them), then no one can find you that way.

Lastly, should Facebook even have your phone number? Think about that for a while. Sure, they say that they need it in case your account is compromised. Hmmmm, really? Your phone number is a direct link to you and/or your home. Mull that over for a while.

Thanks for reading!


Protect Your Privacy with TrueCrypt – Part 3


In our last post, we created an encrypted volume using Truecrypt. This volume could be thought of as a folder but it’s a bit more than that. If you think of this thing that you created as a separate drive on your computer, you will have a better picture of what it really is. When you add a new hard drive to your computer, you have to mount it before you can use it. Before you can use your newly created folder, you also have to mount it. Using Truecrypt, we’ll show you how to mount the new volume in order to make use of it. 1. The new volume (folder) should be on your desktop. It may or may not have a three digit file-type  designation, depending on how you chose to name it. If you didn’t use a three letter name, such as .avi or .mp3, Windows will not use an icon to give you an idea of what it thinks it is. Here’s what our volume looks like:

Photo of Truecrypt   folder
Windows knows there is something there, it just doesn’t know what.

Just a simple, generic page icon. Windows does not associate a program with this volume/folder. You can’t double-click it to open it, right? Don’t forget that. Open Truecrypt now.   2. When Truecrypt is open, you’ll see this screen:

Photo of Truecrypt   opening menu
You are looking for ‘Select File’ then ‘Mount’.

This is a standard Windows dialogue/menu, nothing different from most other programs. You open the program first, then use it to open a file that it can handle. Click on Select File, find the volume that you created then click Open to go back to the menu shown below.   3. Here is what you should see next :

Photo of Truecrypt  menu
The path to the file is there in the window and a drive letter may or may not be highlighted in blue.

You will see a number of drive letters in this menu, everything from G to Z. Choose a letter that isn’t currently being used by your computer. You’re pretty safe with anything past O or P. We have chosen T for this drive. Click on the word ‘Mount’ on the lower left of the menu.   4. Make sure you have the password that you used to create this volume. Truecrypt will prompt you for the password:

Photo of Truecrypt password menu.
Type in the password that you used to create this volume.

If you forget your password, there is nothing that you can do to retrieve it. Whatever volume you created is lost for good. Don’t lose your password. You’ve been warned.   5. Once you enter the correct password, Truecrypt will mount the volume. In other words, it will allow you to access it. It’s not open yet but it is accessible. This is what you should have on your screen now:

Photo of mounted Truecrypt   drive.
There it is by the letter T. Note the size difference of the folder.

This drive is now accessible in two different ways. You can either double-click it now on the Truecrypt  menu or navigate to it through Windows Explorer. In our case, it is listed as ‘Local Disk T’. Once you open the drive/volume/folder, drag and drop something into it. We chose to keep our encrypted text password document in ours. In this way, our passwords are protected by two walls, one through Notepad ++’s encryption and the other through Truecrypt ‘s. TIP: After you put the files into this volume/folder/drive, make sure that you dismount it before you close down Truecrypt. The process is this: Mount the drive, add or subtract files into it, dismount it. You can’t open the volume without mounting it and you should not close it without dismounting it. This is the only way that Truecrypt can guarantee to keep its contents safe. Two long and fairly convoluted posts, right? Keeping your data safe isn’t simple but we feel that using Truecrypt doesn’t require much tech savvy. If you follow our simple step-by-step instructions, you’ll be fine. What’s next? Moving this folder around inside of Dropbox. One more post on this topic and we’re done. Thanks for reading!

Protect Your Privacy with TrueCrypt – Part 2


In this post, we’ll describe how to encrypt a small folder using TrueCrypt, a free and very powerful encryption tool. You can put anything you want in this folder, of course, but the point of this exercise is to have something that is extremely safe from prying eyes that will allow you to keep your passwords or online account numbers private. Once you create this folder, you can put text files, documents…basically whatever you want to, as long as the total size is not larger than the folder you create. We’ll explain that later.

1. Download and install Truecrypt. You can install Truecrypt or run it from a folder. You could even keep the Truecrypt folder inside your Dropbox folder in order to make it available on every computer that you access Dropbox with.

2. Run Truecrypt. Here is the window that comes up at the start:

Photo of TrueCrypt menu
Click on the Create Volume button or click on Volumes then Create New Volume.

A volume is something that only Truecrypt can open. As you will notice later on, there is no three letter file designation to the folder/file/volume that you create. No other program will recognize it, not Windows, not Notepad, only Truecrypt.


3. 

Menu for TrueCrypt
For the next few screens, you’ll just accept the default settings. Here, choose ‘Create an encrypted file container’ then click Next.


4. 

Menu for TrueCrypt  3
Click Next to start creating a Standard TrueCrypt volume.


5. 

Menu for TrueCrypt
This menu looks complicated but it’s not. Click on the Select File and the standard Windows dialogue will open up.


6. 

Menu for TrueCrypt
You do not actually choose a folder, you are making one. Type in a name, we’ve used Test Folder for TrueCrypt.

Don’t get confused here. You’re not choosing a file or folder, you are really creating a volume somewhere you are on your computer. We chose our Desktop but you’re on your own here. All you do in this menu is simply type in a name, make up anything you want. You can even use a three letter file name to make this Truecrypt volume look like another kind of file. The default program for that type of file, .avi or .mp3 for instance, will NOT be able to open it, remember? Only Truecrypt can open this file.


7. 

Photo of TrueCrypt menu
This menu just confirms the file location. Click Next. 


8. 

Photo of TrueCrypt  menu.
Just click Next here. The default AES algorithm is fine.


9. 

Photo of TrueCrypt
You’re on your own here but we chose a 1 MB file, lots of room for our password text file.


10. 

Photo of TrueCrypt  menu
Choose your password. If you make it less than 20 characters, Truecrypt will give you a nudge. Whatever you do, don’t forget the password you use. You can’t open this volume without it, no matter what you do.


11. 

Photo of TrueCrypt menu.
Your password is too short! Don’t worry about this. You’re not protecting state secrets, right? If you can remember a 20 digit password, however, use one.


12. 

Photo of TrueCrypt menu
We would normally choose NTFS for the filesytem but our volume is only 1 MB so NTFS isn’t available. Move your mouse over this screen in a random order to create a very strong encryption.

Move your mouse all over this menu for a minute or two then click Format. Truecrypt will then format the volume that you just made, creating, more or less, a separate drive on your computer. That drive is controlled by Truecrypt, nothing else. Windows doesn’t know anything about it, other than it takes up space. It cannot open the volume and will not even suggest a program that might open it.


13. 

Photo of TrueCrypt menu.
Success! Click OK and you’re done.


14. 

Photo of TrueCrypt menu
Click Exit to end this part of the lesson.


That’s it for now. This post is long enough but we’ve accomplished a lot. You now know how to create a locked volume that can be opened only by you. Even if someone gets access to your computer or your cloud folder, they will not be able to see what is inside this folder. Cool huh?

Next time, we’ll show you how to use this volume. Basically, you just mount it using your password, open it then drop files into it and then dismount it. Once you dismount it, it is locked again.

Thanks for reading!

Check out our Facebook page. Like and follow our updates. Here’s the link:  https://www.facebook.com/ComputersMadeSimple


Protect Your Qzone from Strangers


QQ is a chat application from China, created by Tencent Inc. Whole most users are Chinese, QQ is slowly spreading around the world. Many Westerners, including some of us here at Computers Made Simple, have used it for years.

QQ is free, of course, and with every account comes a few gigabytes of space to share photos, stories, etc. with your friends. By default, your zone is open to everyone but it’s probably a wise move to keep your Qzone somewhat private. You can lock your photo albums but if you want to lock your whole Qzone to strangers, here is how you do it.

1. Head to your Qzone. If you are using the International (English) version, the chat interface will be in English but your Qzone will be in Chinese. With the latest version, you have to add the Qzone app first, then you can go to  your zone.

2. On the main page, look for the gear up on the top, just to the right of your profile pic:

Photo of the gear to change your Qzone settings
The gear is where you can set your privacy limits.

3. Hover your cursor (mouse) over the gear to bring up this menu:

Photo showing dropdown menu
The one you want is the third choice, highlighted here.

4. Choose the third group of symbols. This will bring up this page:

Photo of Qzone privacy menu
All the settings you need are here.

5. At this point, this zone is open only to friends. The choice on the left will make it open to everyone, the right one means it’s locked to everyone except the user and the middle one has its own internal settings.

TIP: If you use QQ for a while, you’ll receive many requests to be friends. Some users are looking for partners, some are looking for English speakers and some are just looking for friends. Before you can use the next set of privacy limits, create a new group in your friend list. Name it Strangers or whatever you want, but put all new requests that you accept in this group until you know more about the person you care chatting with. Don’t worry, there is substantially more spam and fake ‘hot girls’ on Yahoo than there are on QQ.

6. If you have made sub-groups inside your list of Friends, this is where you can choose which groups have access to your zone. Hover over the light brown string of symbols, in this case they are just to the right of the 0/6. This menu will come up:

Photo showing which groups can see your Qzone.
Every group selected here will be able to enter your zone.

7. What you’re doing in this menu is selecting the groups that can enter your zone. Each group that you select by clicking in the box beside the name, will be able to enter your Qzone. In this example none of the groups can enter this person’s Qzone.

8. Once you have finalized your group selection, make sure you click the Save button at the bottom, the one that looks like this:

Photo showing the Chinese symbols for 'save changes'
Look for the button that looks like this. Click it to save your changes.

9. Once you click this button, your choices will be saved for you. That’s it! Your Qzone is now private.

Thanks for reading!