Category Archives: Dropbox

Best Free Software – 10 products you need

Short and sweet today. We just set up a new computer and realized that we haven’t done a ’10 Best’ free software post in a while. If you’re a regular reader, you’ll know that we love free! There’s no need to pay for any software these days, believe it or not, other than a basic version of Windows or iOS. Heck, you can even get a free OS by downloading Ubuntu. If you go that route, Linux has hundreds of very cool, very free apps but that’s another story. Today, let’s move on to free software for Windows.

1. Irfanview 

Photo of Free Software    1
Irfanview


We’ve written many posts about Irfanview. Here’s one, complete with links: Post on Irfanview . We use Irfanview EVERY day for viewing pics, doing screen caps as well as bulk renaming and resizing PLUS making PDFS. You’ll wonder what you ever did without it. Make sure you get the main program as well as the plugins. Install Irfanview first, then the plugins.

2. VLC Media Player

Photo of Free Software    2
VLC Media Player


VLC will play any video file there is, hands down. Again, we use it every day. VLC will do more than play videos but the other things it does can get quite complicated. We prefer to use it as a player as opposed to a video tool. Here’s the link to the homepage: VLC Media Player

3. Windows Movie Maker

When we’re going to upload a video to Youtube, WMM is what we use to create it. Forget about using the Youtube tools, they’re not worth trying. Download WMM, get to know the easy interface, then create your masterpieces with it. It’s free but it’s powerful too. If you’re not into video, use WMM to create slideshows from your holiday pics. Here’s the link: Windows Movie Maker (If you have downloaded the old MSN Live Essentials, you should have WMM already. If not use the link.)

4. The GIMP

The Gnu Image Manipulation Program is just as powerful as Adobe Photoshop but it’s free. This powerful tool will take your plain pics and turn them into works of art, all the adjustments are at your fingertips. Here’s the link: GIMP

5. Burnaware

Archiving data to DVDs is simple and fast with Burnaware. The GUI is very intuitive, point and click and you’re soon creating DVDs (both normal and BluRay) in minutes. Get it here: Burnaware

6. Dropbox 
Photo of Free Software    3
Dropbox…you need it.


This should be number one on your list. We use Dropbox on every computer we own, and we have lots, keeping all of our current projects synced from on each one. Here is a link to one of our many posts on Dropbox:

Dropbox – 6 reasons why you should be using it now.  Don’t risk losing your data/pics/files to a hard drive that fails. Start using Dropbox now.

7. LibreOffice

Although not completely compatible with Microsoft Office, LibreOffice is extremely robust…and free. With six components (Writer, Calc, Impress, Draw, Math and Base), LibreOffice has all of your office suite bases covered. Here’s where you can get it: LibreOffice 

8. Recuva 

If you’ve accidentally deleted data from a flash drive or an external hard drive, download Recuva and get it back. Read the instructions, they’re simple, and copy the deleted files to another drive.  You’ll be breathing easier in no time. Get it and learn to use it now so you’ll be an expert when you need to be. Recuva 

9. 7-Zip

Windows has its own zip utility which is pretty good and only a right click away but, and this is a big but, it doesn’t have a password locking feature, at least not an easy one. If you have a file(s) that you need to keep private, 7-Zip is quick, free and easy to use. 7-Zip site

10. Calibre 
Photo of Free Software    4
Calibre – Ebook management.


If you are into Ebooks, you need Calibre to manage them.  This software catalogues all the ebooks on your computer, no matter which folder they’re in, then changes everything into a format that your reader can use when the time comes to upload them to your device. You can also use Calibre as an ereader, too. iTunes works fine as far as getting books to your Apple device, but you still need Calibra to get those books into the format that your reader can handle. It’s a big download but it’s worth it. Calibre – Ebook Managment

That’s our ten. What do you use that is indispensable? Let us know in a comment or on our Facebook page: Computers Made Simple on Facebook 

Thanks for reading!


Encrypting Your Stuff – Create a TrueCrypt container for DropBox Part Two

This is the last post on encryption for a while. Today we’re going to show you how to lock up your DropBox storage folder, both online and on your computer.

(In case you don’t know about DropBox, you should really check it out. We’ve written several posts on this free and very cool service so search our site or head over here and sign up for your free 2 gigs of space. Here’s how DropBox works:  Post 1  Post 2   We’ve also written about how Dropbox can ‘save your bacon’. It really can! Here’s  a link to that post: How DropBox can Save Your Bacon)

Photo of Dropbox
DropBox – Make sure you encrypt your stuff.

In spite of what DropBox says about its encryption and the safety of your files in its Cloud, don’t believe it. At the drop of a hat, DropBox will open up your private files to anyone who asks. Anyone with a badge that is. What’s the problem with that? We’re all for law and order but we don’t think anyone should be able to go through your personal files without you knowing about it. Even if no one in authority has an interest in your stuff, the employees of DropBox can and do sift through your files on a regular basis. Microsoft does this too, this kind of thing is not limited to DropBox. Let’s just say that everyone does the same thing.

Once you’re clear on that, here’s how to keep your information private. You made an encrypted container right? We showed you how to do that in our last post. Here’s the link in case you missed it: Encrypting Your Stuff – Create a TrueCrypt container for DropBox. You should make more than one container. Instead of putting everything in one locked volume, consider making several. Let’s say you make one for passwords, one for personal photos, one for videos, one for financial information, etc. That way, you don’t have to upload a massive folder every time you do some work on the things in that folder. We’ll explain that next.

DropBox keeps your stuff online AND on your computer(s). The beauty of DropBox is that you can access your material from any computer anywhere in the world. Sometimes you will access your online folder using a browser. Other times, when you’re on one of your own computers, you will access your stuff in the folder that is on your hard drive. DropBox automatically syncs that folder every time you go online. If you access your folder in a browser, DropBox syncs any changes that you made with the folder that’s on all or any of your computers the next time you go online. You don’t have to worry about any of this, it’s all done automatically.

All you have to do is make sure that your encrypted containers/volumes/folders are in the DropBox folder on your computer. As soon as you put the encrypted volumes there, DropBox syncs everything automatically, any time there are changes. It really is that simple.

Knowing all of this, you’ll probably agree that this is the best way to hide your personal information online and on your own computer(s). If your house is broken into or if you lose your laptop, anyone can access that information if it’s not encrypted. Don’t wait for that to happen, do it now! Don’t keep the TrueCrypt password on your computers, that’s kind of obvious but we thought we’d mention it.

Photo of Encryption poster
Not just your email. Encrypt everything!

TIP: Use several small containers instead of one large one. That makes syncing much faster. As mentioned above, encrypt a few 10 MB containers and label them accordingly. If you do need a larger container for a video, for example, you probably won’t change it too much so syncing time won’t be an issue.

That’s it for now. If you have questions, comments, suggestions, please let us know.

Thanks for reading! Why not Like us on Facebook? Here’s the link: Computers Made Simple on Facebook 


Encrypting Your Stuff – Create a TrueCrypt container for DropBox

In our last post we talked about containers. If you think about a container as a large box that you put things in, you’ll have the right idea. Today, let’s lock that box up tight using TrueCrypt.

We’ve written about TrueCrypt before but it’s certainly worth another post. First, it’s free and, second, it’s the easiest encryption tool we’ve ever used. Download it here: TrueCrypt

Point A. TrueCrypt can be installed on your computer or you can run it from a folder on your desktop (or anywhere else for that matter). It’s self-contained, in other words, able to run without being installed on your computer.

Tip: You can carry a copy of TrueCrypt around on a flash drive with your container. You would use TrueCrypt to open the container, interact with the contents then lock it up again.

Point B. Basically, you will create a folder, name it, encrypt it and use a password to lock it. TrueCrypt is very simple to use but we’ll run through the steps using screen captures, just so you don’t screw things up. In reality, the only thing you have to worry about is forgetting your password. If you do, everything in the encrypted folder is lost for good. That’s how powerful TrueCrypt is.

Here we go:

1.

Photo of TrueCrypt Container   1
The TrueCrypt opening menu. You want to click on ‘Create Volume’.


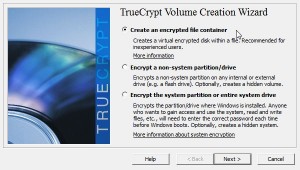
2. TrueCrypt has a few options to choose from but we want to do the simplest set-up here.

Photo of TrueCrypt Container   2
Choose the first one, ‘Create an encrypted file container.’


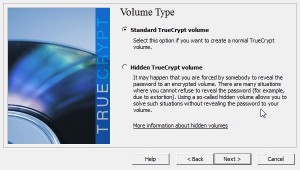
3. Again, stick with the simplest volume (container):

Photo of TrueCrypt Container   3
We just want a Standard TrueCrypt volume here, nothing fancy.

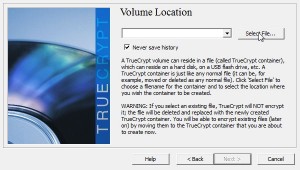
4. The next menu is a bit confusing. Take a look:

Photo of TrueCrypt Container   4
This is the most confusing part. Read our description of this menu.

This menu seems to be asking you to choose a file/container, as if you have already created one. You haven’t created one yet but you will now. Don’t type anything in the space, just click the ‘Select File’ button. When the file menu opens, navigate to your Desktop. You can put the new file anywhere but we find it easier if it’s right in front of us, right there on our desktop. Read the warning! Do not choose an existing file. TrueCrypt will delete it and create a new file using the same name. Repeat, do NOT choose an existing file. Read step 5. 

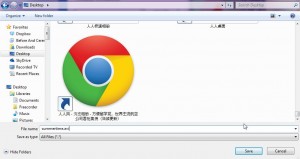
5. After you have navigated to your desktop, your next job is to type a name  in the slot. You could name your new file Mary, Joe, Sparky, whatever you want. You can simply use a name or a number or an obscure combination of letters and numbers, it doesn’t matter. We would suggest, however, using a name and a file type. Why? We want a file type because someone who is looking for a hidden file would probably not look for a photo or video file, right? That’s why we named our file, ‘summertime.avi’. It’s not really an ‘avi’ file, though. It can’t be opened by any program other than TrueCrypt.

Photo of TrueCrypt Container   5
We chose to use ‘avi’ as the file type but you can use .txt or .docx or .dll, whatever.

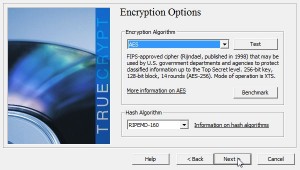
5. Once you click Save, TrueCrypt knows that the file it creates will be named, in our case, summertime.avi. Next, TrueCrypt will ask you what kind of encryption algorithm you want to use. Go with the defaults here unless you know what you’re doing.

Photo of TrueCrypt Container   6
Go with the flow, use the default settings here.

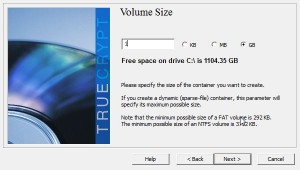
6. How big should your container be? Only you know that. For our example, we set it to 1 gigabyte in size.

Photo of TrueCrypt Container   7
Don’t make it too small, use a decent size.

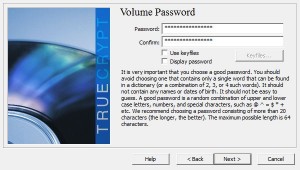
7. Next comes the password. Use a good one. Make sure you don’t forget it. Read the tips that TrueCrypt gives here. You can always change the password later on, no worries.

Photo of TrueCrypt Container   8
A good password is vital.

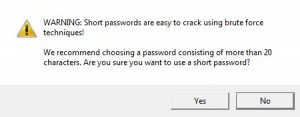
8. If your password is too short, TrueCrypt warns you about it.

Photo of TrueCrypt Container   9
Danger Will Robinson!

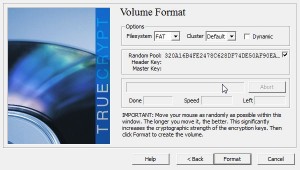
9. Now comes the fun part. You’ll never see this anywhere else. You are now creating the encryption key as you move your mouse over this menu box. Take your time and do what the instructions tell you. Once you’re bored of darting back and forth, click Format and TrueCrypt will create the volume/container for you.

Photo of TrueCrypt menu
Move your mouse up and down, around and around, back and forth.

10. This is what you should see next:

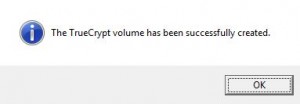
Photo of TrueCrypt Container   10
Success! If you don’t see this, you screwed up somewhere but we think you’ll be fine.

11. OK, you’ve created the container. It’s sitting on your desktop waiting to be used. How do you open it?

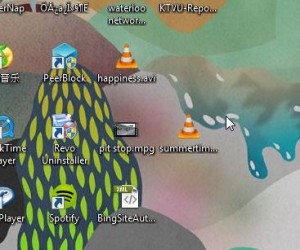
Photo of TrueCrypt Container   11
There is our ‘summertime.avi’ file on the desktop.

Well, you won’t open that file with anything but TrueCrypt.

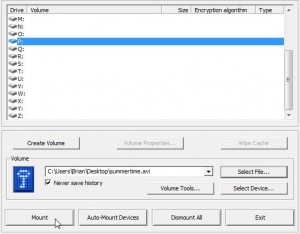
12. Using the same technique as before, navigate to the file on your desktop. What you want to do now is to tell TrueCrypt to ‘mount’ the container you just created. (Container, volume, file, all the same thing.)

Photo of TrueCrypt Container   12
When you get to the file, click Mount to open it.

13. TrueCrypt will ask for your password. Again, don’t forget it.

Photo of TrueCrypt Container   13
Don’t ‘Cache passwords and keyfiles in memory’ OK?

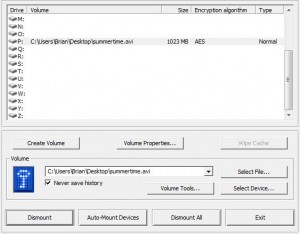
14. Click OK and the file is shown in the TrueCrypt window:


Photo of TrueCrypt Container   14
There is ‘summertime’avi’ waiting to be opened. Double click on it now.

15. You’ve managed to create an encrypted container that is locked with a strong password. Now it’s time to fill it with your stuff:

Photo of TrueCrypt Container   15
Drag and drop files into this folder/container/volume up to the limit of room it has in it.

16. When you have finished adding files, make sure you click Dismount All before  you close TrueCrypt. You mount the volume, enter the password, add or look at the files in it, then close the folder then dismount it in TrueCrypt. Don’t forget the last part.


This is a long post, next time we’ll explain the DropBox part of it. Thanks for sticking with us so far!


Setting Up a New Computer – Part Four

One of the final steps in setting up your new computer should be to install and use Dropbox. We’ve written about Dropbox before, here are some links:

Dropbox 1 – Six reasons to use it. 

Dropbox 2 – How Dropbox can save your bacon

Photo of Dropbox logo
This free site/software is compulsory for your new computer.

Even if you only use one computer, Dropbox (or something similar) should be part of your daily routine. Here’s an explanation of the concept, just in case you don’t know about this handy piece of free software.

Imagine for a moment that you lost your purse or your wallet. Big stress moment, right? What if you had an exact duplicate of that purse or wallet in another room? What if you had an exact duplicate in another pocket or drawer? We think the stress would be substantially lowered. When we say ‘exact duplicate’, we mean just that. A perfect copy of your lost item, down to the old pennies at the bottom and the fluff in the corners.

Dropbox keeps duplicate copies of one folder, the Dropbox folder, on your computer and on the Dropbox website. If you have another computer at work or at the cottage,  your Dropbox folder is synchronized as soon as you fire up that computer. No matter what kind of computer, even a tablet, Dropbox keeps track of everything that’s in the folder and syncs them all almost instantly, you only need an Internet connection.

What if your wallet had ten dollars in it before you lost it? Let’s say you find your wallet and the ten dollars is missing. No worries. The duplicate copies still have the ten dollars in them, wherever they may be. Dropbox keeps records of your current files as well as previous copies of those files in an archive folder online. If you accidentally delete an important file from one of your Dropbox folders, that file will still be available in the Dropbox archive folder. You’ll need to access your online folder to get it but that’s easy to do. Read the link above, the one about ‘saving bacon’, to get an idea of how important this is.

Dropbox gives you 2 gigs of free storage, more if you refer a friend to the site. 2 gigs is more than enough to store your documents, important photo files and family videos. Once you archive those files to a DVD, you can delete them from Dropbox. Any current documents should be saved to Dropbox in order to access them from any computer anywhere in the world that you have an Internet connection.

You can also share files with other people. There is a public folder that you can share as easily as sending an email. Dropbox has a complete set of easy-to-follow instructions which explain all of its features. Trust us, don’t use a computer without it. Dropbox is worth its weight in gold…but it’s free, of course!

Thanks for reading!
 

Protect Your Privacy with TrueCrypt – Part 3


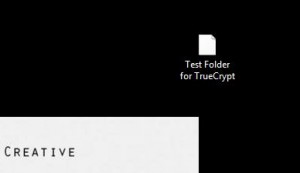
In our last post, we created an encrypted volume using Truecrypt. This volume could be thought of as a folder but it’s a bit more than that. If you think of this thing that you created as a separate drive on your computer, you will have a better picture of what it really is. When you add a new hard drive to your computer, you have to mount it before you can use it. Before you can use your newly created folder, you also have to mount it. Using Truecrypt, we’ll show you how to mount the new volume in order to make use of it. 1. The new volume (folder) should be on your desktop. It may or may not have a three digit file-type  designation, depending on how you chose to name it. If you didn’t use a three letter name, such as .avi or .mp3, Windows will not use an icon to give you an idea of what it thinks it is. Here’s what our volume looks like:

Photo of Truecrypt   folder
Windows knows there is something there, it just doesn’t know what.

Just a simple, generic page icon. Windows does not associate a program with this volume/folder. You can’t double-click it to open it, right? Don’t forget that. Open Truecrypt now.   2. When Truecrypt is open, you’ll see this screen:

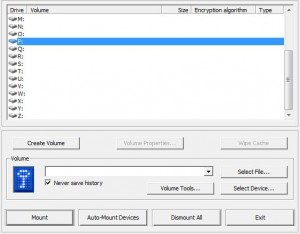
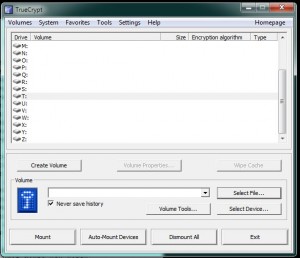
Photo of Truecrypt   opening menu
You are looking for ‘Select File’ then ‘Mount’.

This is a standard Windows dialogue/menu, nothing different from most other programs. You open the program first, then use it to open a file that it can handle. Click on Select File, find the volume that you created then click Open to go back to the menu shown below.   3. Here is what you should see next :

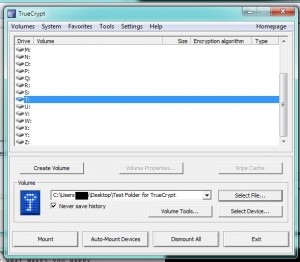
Photo of Truecrypt  menu
The path to the file is there in the window and a drive letter may or may not be highlighted in blue.

You will see a number of drive letters in this menu, everything from G to Z. Choose a letter that isn’t currently being used by your computer. You’re pretty safe with anything past O or P. We have chosen T for this drive. Click on the word ‘Mount’ on the lower left of the menu.   4. Make sure you have the password that you used to create this volume. Truecrypt will prompt you for the password:

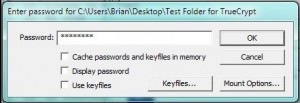
Photo of Truecrypt password menu.
Type in the password that you used to create this volume.

If you forget your password, there is nothing that you can do to retrieve it. Whatever volume you created is lost for good. Don’t lose your password. You’ve been warned.   5. Once you enter the correct password, Truecrypt will mount the volume. In other words, it will allow you to access it. It’s not open yet but it is accessible. This is what you should have on your screen now:

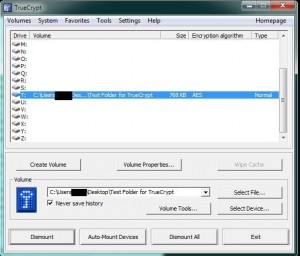
Photo of mounted Truecrypt   drive.
There it is by the letter T. Note the size difference of the folder.

This drive is now accessible in two different ways. You can either double-click it now on the Truecrypt  menu or navigate to it through Windows Explorer. In our case, it is listed as ‘Local Disk T’. Once you open the drive/volume/folder, drag and drop something into it. We chose to keep our encrypted text password document in ours. In this way, our passwords are protected by two walls, one through Notepad ++’s encryption and the other through Truecrypt ‘s. TIP: After you put the files into this volume/folder/drive, make sure that you dismount it before you close down Truecrypt. The process is this: Mount the drive, add or subtract files into it, dismount it. You can’t open the volume without mounting it and you should not close it without dismounting it. This is the only way that Truecrypt can guarantee to keep its contents safe. Two long and fairly convoluted posts, right? Keeping your data safe isn’t simple but we feel that using Truecrypt doesn’t require much tech savvy. If you follow our simple step-by-step instructions, you’ll be fine. What’s next? Moving this folder around inside of Dropbox. One more post on this topic and we’re done. Thanks for reading!