For some reason, maybe it’s a problem with the latest WordPress update, links in comment replies are NOT working. This was written on March 11, 2013 and the problem may be fixed by the time you read this but if it isn’t, here’s how to repair the problem.
1. When you reply to a comment on your WordPress blog, you are actually writing in HTML, more or less. All of the HTML codes are shown, unlike the normal WordPress window which shows a kind of Word window, completely void of HTML coding. (Yes, you can work in HTML if you want but most people don’t.) In other words, the comment reply window is not WYSIWYG (what you see is what you get).
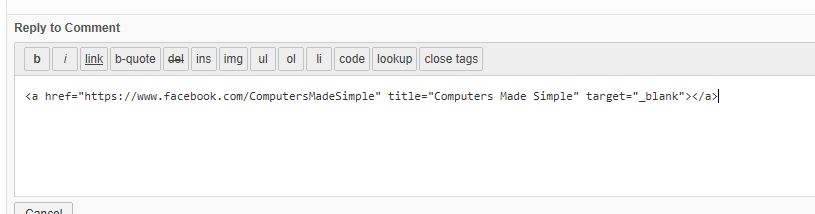
2. The comment reply window looks like this:
An example of faulty HTML code.
3. In the example above, we have pasted in the URL of our Facebook page and have asked WordPress to give us the HTML code which would show the link AND open it in a new window. Unfortunately, WordPress has given us faulty code.
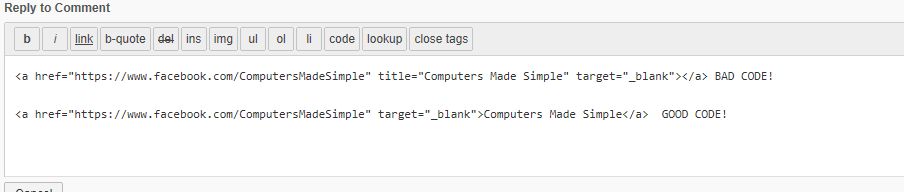
4. Here is what the code should be:
Bad code on top, good code on the bottom.
We’ve put both codes in to show you the fine difference between the two.
5. Here is the correct HTML code that you can copy and paste. Make sure you change the URL and the title before you use this:
<a href=”https://www.facebook.com/ComputersMadeSimple” target=”_blank”>Computers Made Simple</a>
You can change it this way:
<a href=”insert the URL between the two quotation marks” target=”_blank”>Put the name of the link here. This will be visible in the reply.</a>
That’s it! A simple fix for a frustrating problem. Hopefully WordPress will fix this situation in a future update.
We’ve just added comment reply notification to our WordPress installation here at Computers Made Simple. Yes, we should have had it before but we thought it was already part of WordPress. Silly us, right?
Adding the plugin named ‘Comment Reply Notification’ was very simple, as was the one step set-up. You can either download the app then upload it to your site or, as we did, simply install it from the plug-in section of your WordPress Dashboard. That’s what we will do today. Follow our photo flowchart to get this important feature on your own site.
Here we go:
Step 1:
Head to your Dashboard then hover over the word Plugins on the left then choose Add New.
Step 2.
In the search box, type in ‘comment reply notification’
Step 3.
1.4 is the latest version. Click on ‘Install Now’.
1.4 is the latest version. Click on ‘Install Now’.
Step 4.
Accept the message from the webpage by clicking ‘OK’.
Step 5.
Once the Plugin is installed, click on ‘Activate Plugin’. You’re not done yet but this will start the activation process.
Step 6.
Hover over the word Settings on the left side and choose Comment Reply Notification.
Step 7.
Select ‘Commenter choose to do so (default checked)’. Look at the other choices but that is the best one, in our opinion. Click on Update Options.
TIP: Don’t forget to click on Update Options or the plugin won’t work.
Step 8.
Make sure that you see the words ‘Options Saved’ before you leave this page.
You’re done! Now, whenever someone makes a comment and you reply to it, they will be notified of your reply. They can then head back to the page, using the link in the email, and read your reply.
Tip: This process is the same, pretty much, for all WordPress plugins. Some have more complicated set-up processes but the actual installation is the same. Be sure to check the settings page which applies to the plugin you choose to install.
If you want to copy and paste your current blog into another website, here’s how you do it using the WordPress export feature.
The beauty of WorPress is that everything works better than you’d expect. WordPress is free so you’d think it would be kind of wonky, kind of unprofessional but it’s not. It’s smooth as silk. One of the best features, one that we’ve just discovered here at Computers Made Simple, is the ability to export your current blog to a completely different site. In our last post, we showed you how to export your blog to your computer. This is a good way to back-up your current blog. The post is here:
In order to copy your blog, use the steps in the last post to get the xml file from your current onto your computer. Follow the steps and remember them. You’ll be using some of them to do the copying.
You’ll need another website, obviously, with WordPress already installed. You can find how to set up WordPress and new websites on this blog. Once you’ve got that done, go to your Tools menu in the WordPress installation that you want to copy the file into. It’s on the left, follow the steps in the post above to get to that menu.
This time you will choose to Import instead of Export. Here are the steps to accomplish the import.
1. Once you click on Import, WordPress will ask you what kind of blog you want to import. Since we are talking about WordPress here, we chose WordPress but you can choose any of the other blogs if you are currently using them.
We chose WordPress but there are others to select.
The various selections are listed above.
Next, you will have to install the plugin for the type of blog you want to import. Here’s what you’ll see:
Click on the Install Now bar if you are importing a WordPress blog.
TIP: Before you install any plugin, make sure it’s compatible with your version of WordPress. If you haven’t updated your WordPress installation, do it now. Keeping up with WordPress updates is vitally important as far as the security of your blog is concerned.
Once you click the Install Now bar, WordPress downloads the plugin and installs it. You will be taken to your plugin page where you must activate the plugin. Once you do that, you might have to clear your page cache but that’s just a simple click on the notice that comes up. The plugin activation menu will look like this:
Click on the words Activate Plugin and Run Importer
Once you click on the link shown, this menu will pop up:
If you know where the xml file is, find it with the Choose File button now. If not, find the file using Windows Explorer and then copy it to your desktop. Then you can use this menu.
Once you click on Choose File and find the file on your computer, WordPress will proceed to import everything in that file; all posts, comments and photos. Once that is done, you’ll have to adjust your user settings to account for the new posts. Go to your Users page and the various names of the posters for the new material will be there. Adjust their access limits there or, which is what we did, change the name of the poster to reflect something other than the user account holder. Why? Because if the poster’s name shown to the public is the same as the name on the user account, hackers are already halfway to getting access to your site. All they have to do is figure out the password since they know the username already. That’s why you should not leave the admin account open. Change the admin privileges to an unidentified user and always login with that name but always post under another name. This last paragraph is important. Make sure you read it a few times if you don’t get it right away. Ask us if you need clarification.
OK! You’re done. WordPress has worked its magic once again and you have a completely new blog on a new site that is exactly the same as the one you copied. Let us know if any of these steps confused you.
Backing up a WordPress blog isn’t as difficult as you might think. Sure, there are many plug-ins available which will back-up your WordPress databases but if you just want to keep a copy of your posts, here’s how to do it.
Head to your WordPress blog and click on the word Tools on the left hand side of the page. You’ll either see a pop-out on the right if you just hover the mouse over the word Tools or you will see this if you click the word:
We’re looking to Export here so click on that.
Since we’re trying to keep a record of our posts, we’ll choose Export. If we wanted to insert these posts into the blog, we would choose Import. This is what you’ll see next:
You can choose to back up everything or just your posts and/or pages.
You can choose to download All Content or just your posts. Whichever you choose, WordPress will quickly get an .xml file ready for you and it will automatically download that file to your computer, usually to your Download folder or the folder you have chosen for downloads. Once there, you can open the file with whatever program Windows has set up to deal with .xml files. Here, Adobe Dreamweaver opens them but you could use Safari or Chrome or even Notepad. The file you download is full of ‘markup’ language, hence the name, but you will be able to find all of your words very easily.
Once you have the file saved, you don’t have to do anything with it. It’s a back up. Your site is still running, your WordPress installation is still working perfectly but now you can relax, knowing that all of your posts have been saved. They won’t get lost in a server crash. If, god forbid, that ever happens, you’ll be able to copy and paste all of your posts into your new WordPress blog. You’ll have to do them one by one but, hey, at least you won’t have to rewrite every post.
Now don’t misunderstand us. We use plug-ins to back-up our databases and, of course, our hosting company saves back-ups as well. We were looking for an easy way to save all of our posts and this works very well. Try it, you’ll rest easy knowing that nothing is lost.
This morning I received an email from this site telling me that someone had registered as a user. Needless to say I was surprised. I wasn’t quite sure what damage a new user could do to my site but I logged in, deleted him and changed my settings. When WordPress asked me to confirm the deletion, it also asked me if I wanted to delete any links that the new user had put up here. I said yes, of course, but that made me think about my settings on my other sites. The default WordPress settings make it very easy for anyone to subscribe to your site AND to post links. Here’s how you can protect your site before this happens to you.
Head over to Settings, second last link on the left side of your Dashboard window. Once you are there, you should be on the General Settings page but make sure that this is where you are.
Halfway down you’ll see ‘Membership’ with a box that is, probably, checked. If it is checked then ‘Anyone can register’ which isn’t what you want. You want to un-check that box to prevent people from adding themselves as users. You can still add users but you have to be logged in as admin in order to do that.
The second thing you want to do, now that we are on this subject, is to limit comments on your posts. Yes, you want comments but you don’t want spam. There are two ways to prevent this. The first is to go to Settings then to Discussion Settings. What you are looking for there is ‘Email me whenever’ and ‘Before a comment appears’. In the second one, make sure that the box is checked beside ‘An administrator must always approve the comment’. Then, in the section above, make sure that you get an email when someone makes a comment and when one is held for approval.
If you have your WordPress installation set up this way, you won’t get surprised by someone adding themselves to your user list AND you won’t get spam comments showing up unannounced, either. Sure, you will get spam but you can check the comments and delete them. How can you prevent spam completely? You can’t. But you can add a plugin that will put check all comments and automatically put the ones that are spam into the proper folder. Here’s how.
Akismet is a standard plugin that you get with WordPress. To get it working, you need to activate it. To activate Akismet, you have to register and then get what they call an ‘API Key’. Don’t worry, it’s free. All of the links are there on your WordPress Plugins page. The key is the only thing you need before Akismet roots out spam for you. It won’t send an email but it will hold all the comments that it thinks are spam, and it is never wrong, until you show up to delete them.
There are other ways to secure your WordPress installation, these are only two. WordPress is probably the most documented bit of brilliance on the ‘net. Keep learning and keep safe, people.
Thanks for reading!
a little bit of hi-tech, a little bit of common sense and a lot of fun