Category Archives: Backing up your computer

How to Rescue Your Hard Drive

We just ran into a situation at Computers Made Simple that looked like helpful topic for a post. One of our laptops died. It wasn’t a slow death either. One day it worked, the next it appeared dead. Nothing showed up on the screen, the Caps Lock key blinked slowly and the normal boot-up noises just weren’t there. After a few minutes of trying to get it to boot, we decided to simply buy a new laptop. Here’s how we rescued the information from the old hard drive.

1. Most laptops allow you to get at the hard drive bay quickly and easily. Find the model number and search on Google using terms such as  ‘CQ42 remove hard drive’. That worked for us and in a matter of minutes, the hard drive was out of the laptop. Since most hard drives have moving parts inside, they shouldn’t be dropped or bumped, specially when they are being used.

2. We have quite a selection of computer tools in the office but one of these tools is absolutely essential if you’re going to attempt to recover information from a hard drive. Here’s what this tool looks like:

Photo of Hard Drive Recovery Kit
It looks confusing but really isn’t. Connect some of the pieces to the drive, connect the drive to your computer and you’re away.

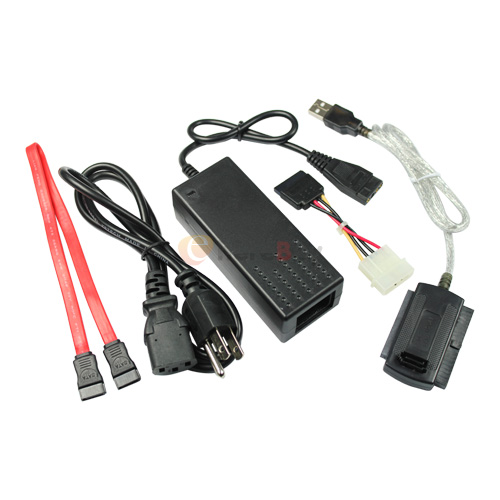
Ours isn’t exactly like this but they are all pretty much the same. There is a power supply that connects to the power connector on the hard drive. The other connectors, in this case the red one, connects to the data port on the drive. Once that is in place, the unit is linked to the computer through a USB port. Two separate things are going on here. The first is a power feed to the drive. The second is a data stream. Once you get this set up properly, the hard drive will appear in Windows Explorer, allowing you to sort through the information on it. At that point you simply copy and paste that information onto your computer.

3. When you find the drive in Windows Explorer, click on it. If the old laptop had a password, Windows detects that you’re probably not the owner of the drive. A menu pops up that says something like ‘you don’t have access (or permission)’ to complete this action. It will have a Continue button, just press that.

4. Windows will slowly open the drive which allows you to see the contents of it, just be patient. All of this depends on which version of Windows you are using. If your old hard drove had Windows Vista on it, the process is much more complicated. This post is about Windows 7 and/or Windows 8. Vista requires you to change the permission for each folder and sub-folder, a daunting job even for an expert.

5. Once you can see the old hard drive in Windows Explorer, right click the icon of a folder down on your taskbar and choose ‘File Explorer’. This will open another instance of Windows Explorer. Navigate to your desktop, then right click in the open space on the right side of your screen and choose ‘New Folder’. Give it a name, something like ‘Files from Old Laptop Drive’ or something similar. Hit enter to set the new name then hit enter again to open the new folder.

6. Your job now is to copy and paste your data from the old hard drive to the new folder. Remember that you can search for files using universal parameters, we’re talking about ‘*.jpg’ for instance. If you type *.jpg into the search slot, Windows will find every jpg file (photo file) on the drive or folder you are searching. *.doc or *.docx works the same way. The asterisk represents ‘any’ and the letters after the period represent the type of file you want to search for.

7. Alternatively, you could copy complete folders from one drive to the other. The problem with number 6 above is that Windows stores some files in two places. Inside of Windows/File Explorer files with the same name will appear. In any other folder in Windows, you cannot have two files of the same name; separate folders yes, same folder no. If you copy all of your photos from the old drive, you will most likely run into a filename conflict. In that case choose to keep both files but let Windows rename one. If there are hundreds, and there often is, put a check in the little space that reads ‘do the same for the next 300 conflicts’. That will save you lots of time, believe us.

8. If you think about where you store data on your computer, it is easy to find that data and transfer it. There are some key files to look for: photos, documents, music and video. Remember that all of these types of data may have different file types. You may be searching for MP3s thinking that all of your music is in that format. iTunes, however, stores its music as MP4s. If you’re not sure what you’re doing here, get some help or simply ask Google ‘where are my music files in iTunes’, for example.

Good luck! Remember that we are always here to help. Use the form below to ask questions. We usually get back to you in a day or two.

Lastly, this whole post assumes that your old hard drive is still functional. We’ve written other posts on what to do if the drive itself is dying and/or dead. Our next post will tell you how to diagnose laptop problems. Stay tuned for that and thanks for reading!


How to Undelete a File – even if you’ve permanently deleted it.

Even if you have never heard of it, Windows System Recovery works silently in the background as you use your computer. It’s a small but very powerful tool that you can use to rescue a file that you have accidentally deleted, even if you have permanently deleted it. Here’s how it works:

1. Windows System Recovery is turned on by default when you install Windows. Unless you have specifically turned it off, it’s running now. Check this by clicking Start then right clicking Computer and choosing Properties. Click on System Protection and you will very likely see that System Restore is on.

2. Next, you must know the exact name of the file that you deleted. It doesn’t matter what kind of file it is, Windows can recover it. However, you must know the exact name of the file, including what kind of file it was. The last three letters, whether they be .txt or .avi or .jpg, etc.,  are important here.

3. The file can’t be something that you just saved and then deleted. There has to be a restore point in between the time you created the file and the time that you deleted it. Go back to Computer and check how often Windows creates a restore point. Restore points can be created manually but won’t be any good after you have accidentally deleted a file.

4. Here’s the fun part. Windows Notepad can save a file as anything, it doesn’t have to save something as a .txt file. What we’re going to do is create a phony file then ask Windows to find an older version of that file.

5. Go to the folder where the file was when you deleted it. In this example, we will use a file that was accidentally deleted from our desktop.

6. Open Notepad and type a couple of letters in the window that opens up. Next, click up on the top left to bring down the Save As menu:

Photo of Windows Restore   menu
Click on Save As.


7. Once the next menu comes up, click on the line at the bottom to get to ‘All files’. Like this:

Photo of Windows Restore  Menu 2
Make sure that All Files is highlighted.


8. We don’t want to save the file we just created as a text file, unless it was a text file that you accidentally deleted, right? Let’s make this file a Word document. We will type in the name and the file type, separated by a period, in the slot. This is what you want to see:

Photo of Windows Restore  Menu 3
We used ‘resume.docx’ for this example.


9. We saved that file to our desktop as a .docx file, even though it is really a simple .txt file. Here’s how it looks on our desktop, complete with the Word icon:

Photo of Windows Restore  Menu 4
Although the file is a text file, Windows thinks it is a Word document.


10. The file that you create doesn’t have to be a word or text based file. With Notepad, you can create any type of file that you want. Of course, the file you create isn’t a real version of that file type, it’s just identified or named as that. In other words, if you create a video or photo file, let’s say an ‘.avi’ file, Windows will think it is an .avi file but it won’t be able to open it. We made an .avi file, just to show you that it can be done:

Photo of Windows Restore  Menu 5
We told Windows that this is an an .avi video file, even though it isn’t.

Here is how this phony .avi file looks on our desktop:

Photo of Windows Restore  6
We use the VLC player for our videos, hence the icon.


11. Now for the trick. If we had deleted that hawaii.avi file, all we have to do to get it back again is right click it and choose ‘Restore previous versions’. Right click the file and you’ll see this:

Photo of Windows Restore  Menue 7
We just want one old version but Windows might have a few available.

Depending on how old the file is and how often Windows has created a restore point, you may have a few version of the same file available for restoration. No problem. You can copy any file in the vault to any place on your computer. Once you click ‘Restore previous version’, this menu pops up:

Photo of Windows Restore  Menu 8
There is only one version of this particular file available.

In this case, the file hasn’t been changed since August 13, 2012. If it had been changed, there would be several other versions of the same file available. All you’d have to do is to copy the one with the correct date and paste it into any folder on your computer. If you aren’t sure of what the correct date is, copy each file and put each one in a different folder. Remember that you can’t have two files with the same name in the same folder.


12. Highlight the file you want. You can open it to see if it’s the right one, copy it to another folder or ‘Restore’ it to the folder where we created the phony file.  In this example, we would choose “Restore’ and Windows would then replace the file we created with the version of that file which was stored in its System Recovery folder.


TIP: This procedure will work for files or folders. If you have deleted just about anything, and you have a restore point between the date the file was created and the date you deleted the file, you can get it back…even if you permanently deleted that file.


This exercise is relatively simple but it’s worth trying out before you get stuck. Sometimes if you accidentally delete something, you panic. If you’ve run through this demo step by step, there will be no need to panic when things go bad. We hope this helps you someday. Questions and comments are welcome.

Thanks for reading!


The Click of Death – Another reason to back up your computer


We turn our computers off at night. To us, there is no sense to keep them running, even though some people leave theirs running 24/7. When we started our main server this morning, we heard a click. Now, computers make all kinds of little noises but a click is one of the scary, alarm signals that you really don’t want to hear. Usually a click means that a hard drive is on the way out. It could be a sticky platter (the things that store the information) or it could be one of the heads (the things that suck up and put down the data). Whatever it is, it spurred us on to back up our drives.

We have a new 3 T (terabyte) external drive from Western Digital. Here’s what it looks like:

Photo of WD External Drive
3 T of space.


This is what we’re using for the backup. Once the data is safe, we’ll probably burn it all to BluRay data discs, just to make sure it is even more secure from hardware failure.


We’ve discussed backing up your computer before. Here the some of the posts: Back up 1, back up 2 . There are others, too, so check around the site.

Backing up your computer isn’t necessarily to save things that you have downloaded. Those items are going to be around for a while, they won’t disappear tomorrow. The thing you don’t want to lose are things that are irreplaceable. Those would include family photos, family videos, things you’ve written, etc.

The click of death that we heard may be nothing but we’re not taking the chance. You shouldn’t either. Back up your computer now. Schedule weekly backups or use the software that is included with the My Book Essential drive. The drives are not expensive, ours was under $130 CDN. This isn’t much when you consider how bad you’d feel if you lost all of the memories on your computer.

Thanks for reading!

How to Back Up a Netbook


Netbooks are cool little computers, aren’t they? We’ve had one around for well over two years and it still runs perfectly. Here’s a pic of a netbook like ours:

Photo of a netbook
Small screen and keyboard but still a very functional computer.

The problem is, how to back it up? Netbooks don’t come with optical (CD/DVD) drives and you can’t just hook one up to your computer with a USB cable. You can do that with a tablet but not with a netbook. (OK, there are ways but they are too complicated for most people and require a special cable from Microsoft.) Here’s how we back up our netbook:

1. You need either an external DVD/CD drive such as this generic one:

Photo of external DVD burner
This is one of the things you can use.

External DVD burners are not proprietary. As long as you have a USB socket, you can use any external burner that you can find. You can even get a Blu-Ray player that burns regular CDs and DVDs. Pricing is as low as $15.00 for a new one. Only buy new, by the way. A used optical drive is probably a gamble and at the price they are new, what’s the point?

2. Or you need a flash drive, such as this:

Photo of flash drive
These are now cheap and hold many gigs of data.

Flash drives are a lot cheaper than they used to be. 32 gig drives are available now for well under $20.00.

3.  You’ll also need a copy of Burnaware. Burnaware is free, at least the basic version is, and very reliable. You can get it here: Burnware free burning software  Once you download and install it, Burnaware takes the chore of burning a DVD into something as simple as drag and drop, point and click. We’ve used it for years. Here is a link to learn how to use it: Using Burnaware. 


That’s all you need. Either you are going to drag and drop the files into Burnaware and burn a DVD in the external burner OR you’re going to drag and drop the files onto a flash drive, transfer them to your main computer and burn the DVD on it. Either way, you have to gather the files together, decide what you’re going to keep and transfer them to optical media.

Remember,  transferring your data to another hard drive is not the same as backing the data up. Why? Because hard drives fail without a moment’s notice. All of your data could be gone in a flash, never to be recovered. Just the way that fire or water used to damage photographs in a photo album, digital photos and movies can be lost should the hard drive they are on fail. Even a sharp bump or a power surge can ruin a drive. Don’t wait, do it now.

Here is a link to backing up your files: Backing up your computer.    This is part one of a three part series we wrote a few months ago. Read it over and dive in. If you have questions, please ask.

Thanks for reading!


Burn a CD – or DVD or BluRay


We’re always on about backing up your computer here at Computers Made Simple. For some people, that’s probably easier said than done. Since CMS (Computers Made Simple) tries to simplify difficult things, we’re going to explain how to burn a CD.

TIP: Burn is a word that means write. There is no real burning done, no temperature change at all. A digital image is written to a blank piece of media (CD, DVD or BluRay disk) using a laser. You don’t have to know how it’s done, just that it’s easy to do.

1. You need blank media, of course. We tend to use DVDs here at CMS. They are cheap and each one holds over four gigabytes of data. We buy sleeves of them at around $20 for 100. BluRay disks, which require a different burner, hold twenty-five gigs and cost a bit more, around $1 per disk.

2. You need a burner of some kind. Every computer sold in the last five years or so has a CD/DVD burner already installed. That applies to all computers except the small notebooks. For a notebook, you’ll have to buy an external writer for around $35. The benefit of an external writer is that you can write to disks, of course, but you can also play DVDs or listen to CDs on your notebook. Win win!

3. Lastly, you need a piece of software that will take care of the burning for you. We love Burnaware and use it exclusively. It’s simple, reliable and, yay, free! Here’s the link to download Burnaware: http://www.burnaware.com/downloads.html

TIP: There are some unscrupulous sites that charge you to download free software. If you read about a piece of software on our site that we say is free, it is totally free. Free to use and free to download. Use our links to get the the correct sites. If you can’t find what you want, search TUCOWS to find it. TUCOWS has been around for years and doesn’t charge for the free software it hosts. (Not all of the software on TUCOWS is free, of course, but there is a ton of free stuff there.)

4. Install Burnaware. Run it. It should ask to run on the final installation screen.

4.5 Put a blank disk in the drive. This is obvious but maybe it isn’t to first time users. Also, the disk goes shiny side down. Any words that are on the disk should be facing up. Before the disks are written, they have a distinctive smoothness that disappears when data is written on them. Compare the before and after disks and you’ll see what we mean.

5. Here is the first screen you will see:

Photo of Burnaware main menu
This is where you choose what kind of disc you want to burn.

Choose whether you are burning a CD or a DVD, then choose what type. For most backups you would use the data choice. The choices here are quite straightforward, but you need to know the terms. For backups, just choose data CD or data DVD, depending on what disk you have in the drive.

6. There are two ways to get data into Burnaware so it can be written to the disk. You can ‘drag and drop items into this menu:

Photo of Add File Menu in Burnaware
Drag and drop files here or use the Browse button to locate them on your computer.

Or you can use the Add Files button which opens up Windows Explorer. Then you highlight the files and choose ‘Open’ to add them to Burnaware. The files are like ink in a pen. You need a pen with ink in it in order to write with it. The pen is the writer, the paper is your blank disk and the two can’t work together until you get some ink (files) to burn.

These days, you’ll probably be backing up photos. Make different folders by clicking on the Make Folder button shown here:

Photo of Burnaware New Folder menu
New Folder Button

Instead of having a thousand photos in the root directory (folder) of your disk, make new folders to arrange the photos in date or subject order. That will make finding the photos much easier later on.

7. Once you’ve got everything on the disk that you want to back up, and Burnaware will always tell you how much room you have left, change the default numerical name to something you will remember. Here we have typed Trial Disk so you can see where to change the name:

Photo of Disk Name Changed
Use dates or words that will let you know what’s on the disk.

If this is a backup disk, put the date where we have typed Trial Disk. Use your own system but be sure to change the name. The default numbers will mean nothing in a few months.

8. Once you’ve added the files and changed the name, press the red button to burn the disk. It’s better to stop using the computer at this point unless you have the latest and greatest model. Burning a disk takes a fair bit of computing power but, thankfully, it doesn’t take too long to complete. Go make a coffee or do some exercises while you wait.

9. The last step is the most important one so far. After Burnaware is finished, the CD/DVD tray will pop out. Push it back in and see if you can read what’s on the disk. Try it on another computer, if you have one, just to be sure that the disk is good and can be read. Once you’re sure that you can use the disk, you can either delete the files on your computer or put them in a folder that is marked ‘BURNED’ so that you know it’s already been backed-up.

10. If you are making duplicates for friends or families, take the burnt disk out, insert a new one, click ‘Advance” in Burnaware and burn the new disk. If your data is priceless photos of kids or pets or family or travel, make a few copies for your own peace of mind.

Thanks for reading!