Category Archives: Back ups

How to Undelete a File – even if you’ve permanently deleted it.

Even if you have never heard of it, Windows System Recovery works silently in the background as you use your computer. It’s a small but very powerful tool that you can use to rescue a file that you have accidentally deleted, even if you have permanently deleted it. Here’s how it works:

1. Windows System Recovery is turned on by default when you install Windows. Unless you have specifically turned it off, it’s running now. Check this by clicking Start then right clicking Computer and choosing Properties. Click on System Protection and you will very likely see that System Restore is on.

2. Next, you must know the exact name of the file that you deleted. It doesn’t matter what kind of file it is, Windows can recover it. However, you must know the exact name of the file, including what kind of file it was. The last three letters, whether they be .txt or .avi or .jpg, etc.,  are important here.

3. The file can’t be something that you just saved and then deleted. There has to be a restore point in between the time you created the file and the time that you deleted it. Go back to Computer and check how often Windows creates a restore point. Restore points can be created manually but won’t be any good after you have accidentally deleted a file.

4. Here’s the fun part. Windows Notepad can save a file as anything, it doesn’t have to save something as a .txt file. What we’re going to do is create a phony file then ask Windows to find an older version of that file.

5. Go to the folder where the file was when you deleted it. In this example, we will use a file that was accidentally deleted from our desktop.

6. Open Notepad and type a couple of letters in the window that opens up. Next, click up on the top left to bring down the Save As menu:
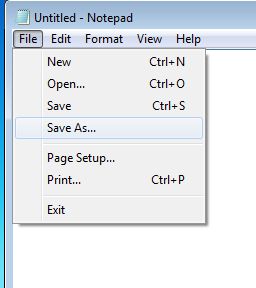
Photo of Windows Restore   menu
Click on Save As.


7. Once the next menu comes up, click on the line at the bottom to get to ‘All files’. Like this:
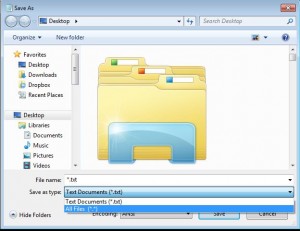
Photo of Windows Restore  Menu 2
Make sure that All Files is highlighted.


8. We don’t want to save the file we just created as a text file, unless it was a text file that you accidentally deleted, right? Let’s make this file a Word document. We will type in the name and the file type, separated by a period, in the slot. This is what you want to see:
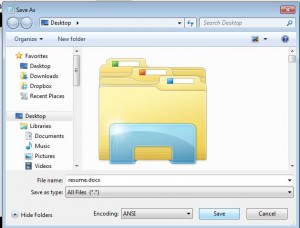
Photo of Windows Restore  Menu 3
We used ‘resume.docx’ for this example.


9. We saved that file to our desktop as a .docx file, even though it is really a simple .txt file. Here’s how it looks on our desktop, complete with the Word icon:

Photo of Windows Restore  Menu 4
Although the file is a text file, Windows thinks it is a Word document.


10. The file that you create doesn’t have to be a word or text based file. With Notepad, you can create any type of file that you want. Of course, the file you create isn’t a real version of that file type, it’s just identified or named as that. In other words, if you create a video or photo file, let’s say an ‘.avi’ file, Windows will think it is an .avi file but it won’t be able to open it. We made an .avi file, just to show you that it can be done:
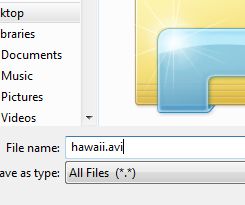
Photo of Windows Restore  Menu 5
We told Windows that this is an an .avi video file, even though it isn’t.

Here is how this phony .avi file looks on our desktop:

Photo of Windows Restore  6
We use the VLC player for our videos, hence the icon.


11. Now for the trick. If we had deleted that hawaii.avi file, all we have to do to get it back again is right click it and choose ‘Restore previous versions’. Right click the file and you’ll see this:
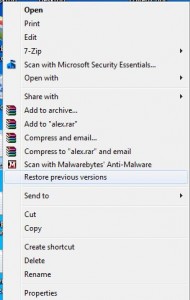
Photo of Windows Restore  Menue 7
We just want one old version but Windows might have a few available.

Depending on how old the file is and how often Windows has created a restore point, you may have a few version of the same file available for restoration. No problem. You can copy any file in the vault to any place on your computer. Once you click ‘Restore previous version’, this menu pops up:
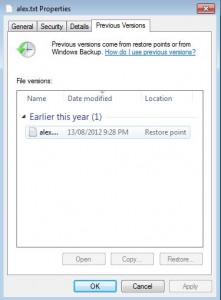
Photo of Windows Restore  Menu 8
There is only one version of this particular file available.

In this case, the file hasn’t been changed since August 13, 2012. If it had been changed, there would be several other versions of the same file available. All you’d have to do is to copy the one with the correct date and paste it into any folder on your computer. If you aren’t sure of what the correct date is, copy each file and put each one in a different folder. Remember that you can’t have two files with the same name in the same folder.


12. Highlight the file you want. You can open it to see if it’s the right one, copy it to another folder or ‘Restore’ it to the folder where we created the phony file.  In this example, we would choose “Restore’ and Windows would then replace the file we created with the version of that file which was stored in its System Recovery folder.


TIP: This procedure will work for files or folders. If you have deleted just about anything, and you have a restore point between the date the file was created and the date you deleted the file, you can get it back…even if you permanently deleted that file.


This exercise is relatively simple but it’s worth trying out before you get stuck. Sometimes if you accidentally delete something, you panic. If you’ve run through this demo step by step, there will be no need to panic when things go bad. We hope this helps you someday. Questions and comments are welcome.

Thanks for reading!


Back Up Your Bookmarks


Yesterday we had a slight disaster here at Computers Made Simple. As  you can guess, we install and delete software about as often as most people change their TV channel. Last week we tried out a torrent app, you know, the ones that install everything else with the torrent downloader. Well, when we uninstalled the software, which will remain nameless in the hopes that no one else will install it, it deleted all of our Chrome bookmarks.

Thankfully, we had two separate copies of these bookmarks in two separate places. One was in a desktop folder, the other in our Dropbox folder. Thank heavens for Dropbox…we keep saying that and, hopefully, you will make use of it. Dropbox really can save your from losing important data, photos, writing, videos and, yes, bookmarks. Here’s how to back up your bookmarks to save the annoyance of losing them.

We’re only dealing with Chrome here, what we feel is the best, safest, fastest and most streamlined browser out there. Your browser of choice may be different but the steps we explain here will be somewhat similar.

The bookmarks themselves are most likely a data file that Chrome accesses when you need it. When you export the bookmarks, which is what we will be doing today, you are asking Chrome to create a webpage or HTML document which will act as your backup. When you want to use those bookmarks again, whether it’s on your current computer because you’ve lost them or on another computer, you ask Chrome to import that same HTML file.

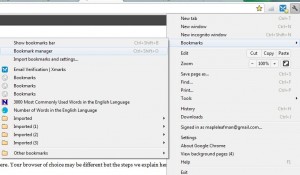
Head to the wrench up on the top right of your screen, click it and look for Bookmarks. Run your mouse down to the word Bookmarks and a side menu will open up. Look for the words Bookmark Manager. This is what all of that looks like:

Wrench to Bookmarks to Bookmark Manager
Bookmark Manager is what you're looking for on this menu.

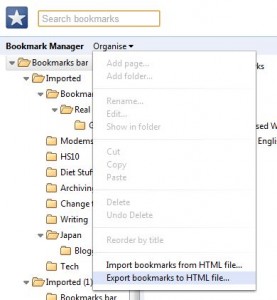
Once you open the Bookmark Manager, which is essentially a webpage, look for Organize then Export bookmarks to HTML file. This is what you’re looking for:

Export your bookmarks on this menu.
Choose Export now, Import when you want to restore the bookmarks.

Once you click on Export, you’ll be asked where you want to put the file. We would advise you to use your Dropbox folder but that’s up to you. As long as you save a copy of the file on a flash drive or CD/DVD, you’ll be fine. Don’t forget to make backing up your bookmarks a part of your normal back up routine.

Thanks for reading!


How do I back up my computer? Part 3


Once you have figured out where all of your stuff is, including documents, photos and videos, it’s time to sort it all out and back it up. Sure, you could dump everything onto one or more DVDs but it makes more sense to organize things a bit beforehand. In this case, photos are more important to arrange than anything else because the files names are arbitrary unless you rename every one. Once you have the various folders in one place, you can sort them out by date, naming the separate folders by when you took the photos or by subject, if all of the photos in a folder can be identified by a few words.

Videos can be named or arranged by date but taking a bit of time now to rename each avi file will make it easier to find what you are looking for at some point down the road. If you have recorded any HDTV shows that you want to save, make sure you convert them to XVID files using Format Factory or  Handbrake to save storage room. Both programs do a fine job of transferring recorded video files to the DIVX or XVID format. The file choice is optional, of course. Use the type of file that you’ve had experience with and works best with your other hardware.

We should mention now that some programs save their files in places other than My Documents. CamStudio, for instance, saves its avi files in the CamStudio main folder. There is a link to those files in My Documents but that is only a shortcut. The files themselves are kept somewhere else. This also applies to Audacity. When you have been working on an audio file in Audacity and you haven’t completed your work, it’s a good idea to back up all of the Audacity files BEFORE you lose them in a hardware crash. Once you export your files in Audacity, you can choose the format and, if you are satisfied with your efforts, you can get rid of the working files. But if you are still working on the files, save them. You’ll find them in the main Audacity folder, not in My Documents.

If you’ve been diligent about telling each program where you want it to save your work, your job is much easier when it comes to backing up your computer.

What’s next? Well, we use Burnaware to make backup DVDs. Burnaware is fast, stable and free. Since DVDs are relatively cheap, we can get 100 for less than $20, you might even want to make backups of backups for important files. Keep each backup in a separate place, maybe even distributing family memories to various relatives. Mark the disks with a Sharpie and put them in a protective package which is also clearly marked with the date and some descriptive words.

Lastly, think about backing up any material that’s ‘in the cloud’. Dropbox is about as secure as you can get but who knows what their financial status is? Backup the Dropbox folder on your computer whenever you back up everything else. That backup isn’t dynamic, of course, so be sure to only use it as a backup in case of emergency. Don’t try to integrate the old files with your current Dropbox files at some date later on. Saving old files over newer files never works.

We can’t hold your hand all the way through but we’re here to help. If you have questions, ask us. Comments are welcome, yays or nays, it doesn’t matter.

Thanks for reading!

How do I back up my computer? Part 2


When it comes to backing up your computer, what exactly are you backing up? Well, pretty much everything that you have added to it. This includes, but is not limited to, documents you’re written, photos you’ve taken as well as anything that you’ve downloaded from the Internet such as videos, photos, audio files, Etc. What you aren’t able to back up are all of the Windows files, the program files nor any of the browsers or apps that you use. There isn’t a way to back these last things up anyway, unless you want to copy your whole drive. Even then, none of the programs would work. You’re backing up your stuff, not Windows or related stuff.

If you have purchased a new computer or laptop/netbook, it most likely didn’t come with any CDs or DVDs. These days, new computers don’t come with these system disks. You have to make them. Windows will prompt you to make new recovery disks and this is something you should do as soon as you can after purchase. If your computer fails, you can restore it to its original condition by using these disks. But, and this is a big but, creating the recovery disks has nothing to do with backing up your computer. When you create recovery disks, you are only backing up the original software that came with your computer, nothing that you have saved or created since you started using it. Remember that.

Where is all of your stuff? Nine times out of ten, everything you want to back up is in the My Documents folder. Windows automatically saves files to different folders in My Documents. Even the downloads from the Internet are saved there. This, however, doesn’t mean that everything is saved there. Some programs save your creations in completely different folders, ones that the program creates on its own. If you have things that are important to you on your computer, make sure you know where they are.

Windows Explorer, that folder on the bottom of your taskbar in Windows 7 or the ‘Explore’ program that comes up when you right click the start button and choose ‘explore’, is your friend. Get used to using it. All of the cool things on your computer can be found using Windows Explorer. Explorer is worth a blog entry on its own, it’s that important. Play around with it and see what you can find. I use it all the time and it’s one of the reasons I stick to Windows. The Mac OS has nothing like Explorer, that I have found anyway, and I get claustrophobia using OS X simply because I can’t find anything!

While we are discussing back ups, go back and read my post on WinDirStat . If you’re wondering where things are on your computer or if you simply want to know what’s taking up the room, read the post and you’ll be educated. WinDirStat is free and perfect for exploring your computer. Once you have the graphic up on your screen, run your cursor over it to see where everything is. As the cursor moves, the location of the file it’s resting on is shown. Some files, the Windows ones for instance, are huge but can’t be touched. Others, usually the blue ones, are your files and can be backed up.

That’s it for today. Tomorrow I’ll write more about actually performing the back up. It’s a step by step job that takes time but, ultimately, will save your bacon should your hard drive fail. Even if you only save precious family photos, it’s worth it, right? Some things that are lost are lost forever. That’s not a good feeling.

Thanks for reading!

How do I back up my computer? Part 1


Here we go again, folks. Last week I heard an interview with a relatively popular musician. He mentioned that he’d recently spilled a glass of rye on his laptop keyboard during a recording session. I’m not sure why he had a rye during the session but maybe that’s how he relaxes. The singer was relieved that he hadn’t lost all of his music, words and ideas but he came close. Believe it or not, the interviewer mentioned that he had recently done the same thing and almost lost the book he’d been writing. I listened and thought, “Wow! Two people who are creative but not too bright when it comes to common sense computing.”

First, if you have material on your computer that is important to you, sign up for Dropbox. It’s free, simple and ensures that nothing you create will be lost if something untoward occurs. Check out my post on Dropbox here:  Dropbox – 6 reasons why you should be using it now.  Briefly, if you save your work to your Dropbox folder, you can access it online from anywhere in the world. The free 1 gigabyte of storage is ample for most needs but if you need more, you can get up to 16 gigs through referrals or, more simply, pay a premium for more space. I’m a writer and I save everything I write to my box and I haven’t used more than a quarter of the space. Besides keeping your stuff safe, Dropbox saves old versions of your work, just in case you make a save error somewhere along the line. You can access these old versions by logging into your account online.

TIP: If you need more space, refer yourself a few times using your other email addresses. For each referral, you get another gig of space. Honestly though, I have lots of pics and articles in my folder and I still have 750 megs left open.

Next, a Dropbox account is a sensible part of backing up your computer but it’s not a complete solution. In the next few posts I will (again) run through the various steps that you need to perform in order to keep your creative efforts safe. If you’re an artist, a business type, teacher or just about any other profession, backing up your computer relieves stress and might just keep you employed.

Thanks for reading!

If you can’t wait, look for my older posts on backups here: How to back-up your computer Part 1   My next few posts will explain all of this using the latest software but the older posts are still effective.