In our last post we described how to use DVD Flick to ‘author’ a DVD video. When you author a DVD, you’re creating a set of files that you can burn to a normal DVD which will then be able to play on a standalone DVD player. It will play on your computer too, of course.
Today, we’re going to take those files which we created with DVD Flick, and burn them to a DVD. Here are the steps:
1. Pop a blank writable DVD into your DVD burner.
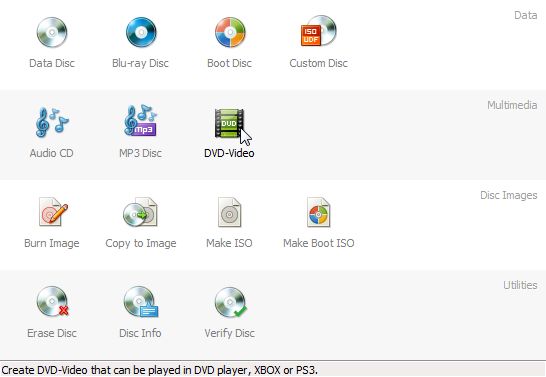
2. Open Burnaware, download it here: http://www.burnaware.com/ , and choose DVD Video on the main menu:
Click the DVD Video button.
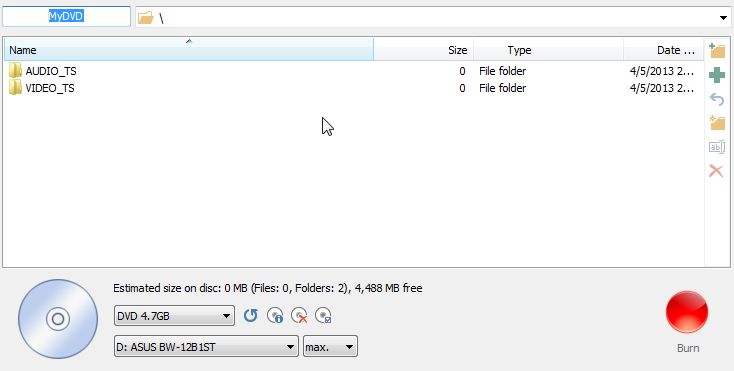
3. Burnaware then opens another menu, shown here:
Ignore the Audio_TS and VIdeo_TS folders that seem to be there now.
Burnaware knows that it needs to replace its current AUDIO_TS and VIDEO_TS folders (which are empty) with the AUDIO_TS and VIDEO_TS folders that we created using DVD Flick. Click on the green arrow up on the top right. This will open Window’s file menu. Search for the DVD folder in My Documents.
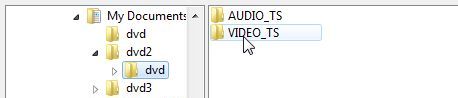
DVD Flick created the dvd folder when it authored the movie. That folder is on the left, you want the VIDEO_TS folder inside it.
DVD Flick has already made the folders you need, you just have to find them. Click on the VIDEO_TS folder and choose Add. (You only need to choose the VIDEO_TS folder. Since we made the video from an AVI file, sound and video are all in the VIDEO_TS folder. This is the way it will be for virtually every DVD you create this way.)
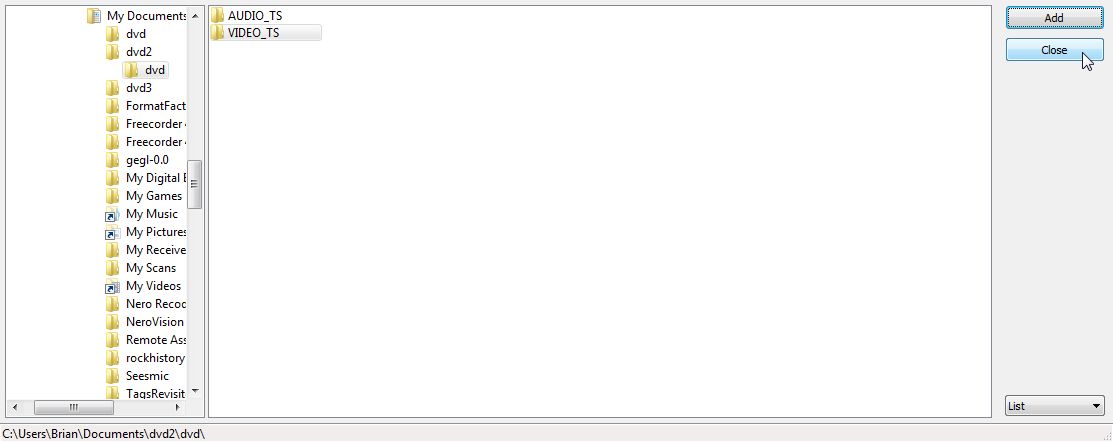
Remember when we said Burnaware had already placed two empty folders in its menu? When you try to add your own Video and Audio folders, this error menu comes up. That’s normal. Simply click ‘Replace’ and your full VIDEO_TS and AUDIO_TS folders will be replace the empty ones. Once you’ve added the folders, click Close:
Close this menu.
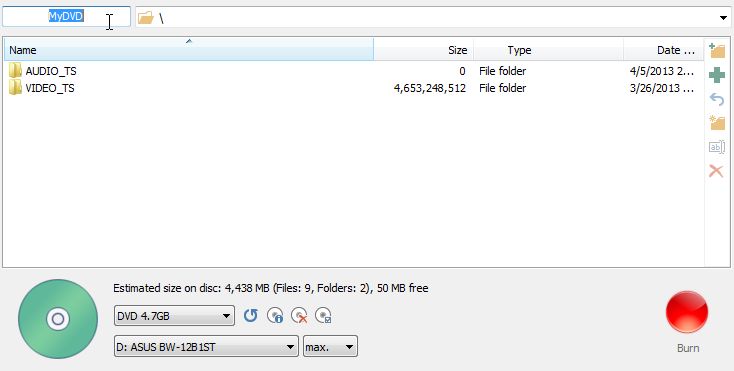
4. Back to the main menu again. This time, you’ll see that the VIDEO_TS file is full and the red burn button is lit. Don’t forget to make a title for the DVD. See the highlighted MYDVD in this photo?
Look for the blue MyDVD words.
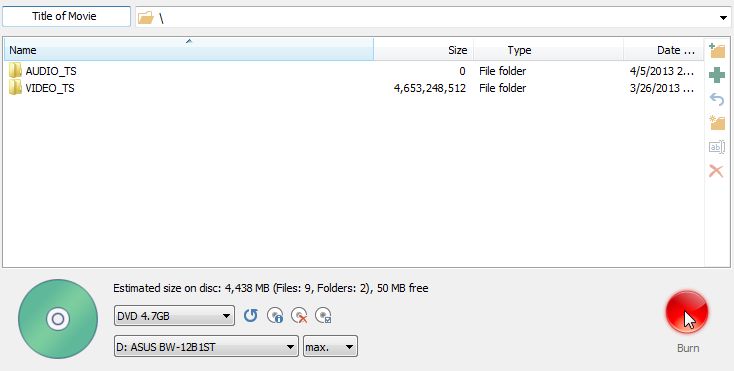
5. Name your movie by typing in that slot and then click the red Burn button:
Name the DVD and then burn it. You’re done!
The speed of the burning process depends on your computer’s speed, of course. Try to limit your computer use during the burning unless you have the latest and greatest computer out there. The burn takes a big chunk of your computer’s resources and you don’t want to make a ‘coaster’, right? Coaster is the old term for a ruined DVD.
That’s it! You’ve created a DVD that you can play anywhere, on your computer or on a standalone DVD player. Pat yourself on the back.
Thanks for reading! Questions and comments are welcome. Follow us on Facebook: Computers Made Simple
We’re always on about backing up your computer here at Computers Made Simple. For some people, that’s probably easier said than done. Since CMS (Computers Made Simple) tries to simplify difficult things, we’re going to explain how to burn a CD.
TIP: Burn is a word that means write. There is no real burning done, no temperature change at all. A digital image is written to a blank piece of media (CD, DVD or BluRay disk) using a laser. You don’t have to know how it’s done, just that it’s easy to do.
1. You need blank media, of course. We tend to use DVDs here at CMS. They are cheap and each one holds over four gigabytes of data. We buy sleeves of them at around $20 for 100. BluRay disks, which require a different burner, hold twenty-five gigs and cost a bit more, around $1 per disk.
2. You need a burner of some kind. Every computer sold in the last five years or so has a CD/DVD burner already installed. That applies to all computers except the small notebooks. For a notebook, you’ll have to buy an external writer for around $35. The benefit of an external writer is that you can write to disks, of course, but you can also play DVDs or listen to CDs on your notebook. Win win!
3. Lastly, you need a piece of software that will take care of the burning for you. We love Burnaware and use it exclusively. It’s simple, reliable and, yay, free! Here’s the link to download Burnaware: http://www.burnaware.com/downloads.html
TIP: There are some unscrupulous sites that charge you to download free software. If you read about a piece of software on our site that we say is free, it is totally free. Free to use and free to download. Use our links to get the the correct sites. If you can’t find what you want, search TUCOWS to find it. TUCOWS has been around for years and doesn’t charge for the free software it hosts. (Not all of the software on TUCOWS is free, of course, but there is a ton of free stuff there.)
4. Install Burnaware. Run it. It should ask to run on the final installation screen.
4.5 Put a blank disk in the drive. This is obvious but maybe it isn’t to first time users. Also, the disk goes shiny side down. Any words that are on the disk should be facing up. Before the disks are written, they have a distinctive smoothness that disappears when data is written on them. Compare the before and after disks and you’ll see what we mean.
5. Here is the first screen you will see:
This is where you choose what kind of disc you want to burn.
Choose whether you are burning a CD or a DVD, then choose what type. For most backups you would use the data choice. The choices here are quite straightforward, but you need to know the terms. For backups, just choose data CD or data DVD, depending on what disk you have in the drive.
6. There are two ways to get data into Burnaware so it can be written to the disk. You can ‘drag and drop items into this menu:
Drag and drop files here or use the Browse button to locate them on your computer.
Or you can use the Add Files button which opens up Windows Explorer. Then you highlight the files and choose ‘Open’ to add them to Burnaware. The files are like ink in a pen. You need a pen with ink in it in order to write with it. The pen is the writer, the paper is your blank disk and the two can’t work together until you get some ink (files) to burn.
These days, you’ll probably be backing up photos. Make different folders by clicking on the Make Folder button shown here:
New Folder Button
Instead of having a thousand photos in the root directory (folder) of your disk, make new folders to arrange the photos in date or subject order. That will make finding the photos much easier later on.
7. Once you’ve got everything on the disk that you want to back up, and Burnaware will always tell you how much room you have left, change the default numerical name to something you will remember. Here we have typed Trial Disk so you can see where to change the name:
Use dates or words that will let you know what’s on the disk.
If this is a backup disk, put the date where we have typed Trial Disk. Use your own system but be sure to change the name. The default numbers will mean nothing in a few months.
8. Once you’ve added the files and changed the name, press the red button to burn the disk. It’s better to stop using the computer at this point unless you have the latest and greatest model. Burning a disk takes a fair bit of computing power but, thankfully, it doesn’t take too long to complete. Go make a coffee or do some exercises while you wait.
9. The last step is the most important one so far. After Burnaware is finished, the CD/DVD tray will pop out. Push it back in and see if you can read what’s on the disk. Try it on another computer, if you have one, just to be sure that the disk is good and can be read. Once you’re sure that you can use the disk, you can either delete the files on your computer or put them in a folder that is marked ‘BURNED’ so that you know it’s already been backed-up.
10. If you are making duplicates for friends or families, take the burnt disk out, insert a new one, click ‘Advance” in Burnaware and burn the new disk. If your data is priceless photos of kids or pets or family or travel, make a few copies for your own peace of mind.
Thanks for reading!
a little bit of hi-tech, a little bit of common sense and a lot of fun