Tag Archives: Windows

How to Recover Taskbar Icons


Every now and then, we’re not sure why, we lose some or all of our taskbar icons. We use Windows computers here and it seems to be a fairly common problem. Here’s how to get them back….without rebooting (restarting) your computer.

1. Press these three keys at the same time: Ctrl Alt and Del   (Control Alternate Delete). This trick is sometimes called ‘The Three Finger Salute” by frustrated Windows users. Once you hit those three keys, the Task Manager screen will come up. It looks like this:
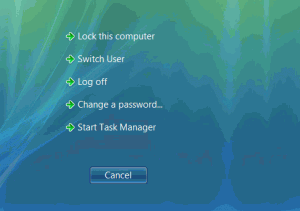
Photo of Task Manager Screen
Ctl/Alt/Del brings up this screen. Click on Start Task Manager.

See Start Task Manager down at the bottom? Click that.


2. Task Manager looks like this when it opens. Depending on how many programs or processes you have running, the list on your menu may vary from ours.
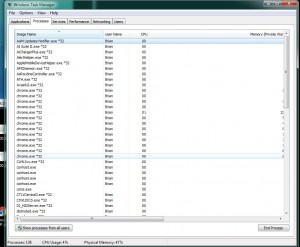
Photo of Task Manager
Task Manager opens with this screen.


3. Scroll down using your mouse wheel or grab the slider on the right side of the menu box until you find the words ‘explorer.exe’. Like this:
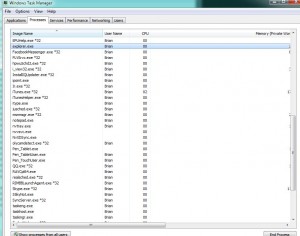
Photo of Task Manager
You’re looking for explorer.exe.

When you find it, click ONCE on it.


4. What you want to do is STOP explorer.exe from running. In other words, you want to ‘End Process’. See the button on the lower right? Once you have explorer.exe highlighted, click on the ‘End Process’ button. Here’s the button, just to make sure:
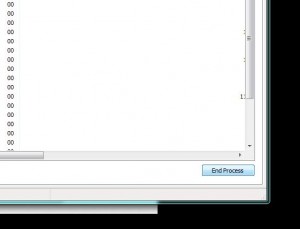
Photo of End Process Button
That’s it, down on the lower right. Click it.


5. Windows will warn you that it thinks this might be a bad idea. Ignore this warning:
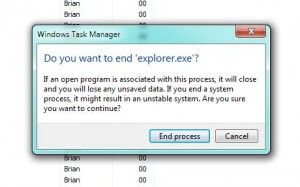
Photo of Windows warning menu.
Windows is just making sure that you know the risks (there aren’t any). Click End Process.


6. Once you click End Process, you will not have any icons across the bottom of your taskbar, assuming that your taskbar is at the bottom of your screen. It could be on any of the four sides of your monitor, right? Same thing, different spot. So far, we’ve been on the Processes menu tab. What we want next is the Applications tab. Click Applications now:
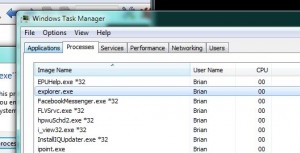
Photo of Processes Tab
Click on the tab to the left, Applications.


7. This is your Applications tab. What you are looking for now is the button that says ‘New Task’. Lower right, like this :
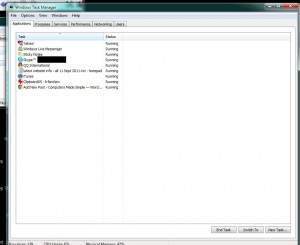
Photo of Applications Menu
Lower right, look for New Task.


8. After you click on the button “New Task”, this menu will pop up. If it doesn’t already have the words ‘explorer.exe’ in it, type them in, all small case and don’t forget the period between explorer and exe.
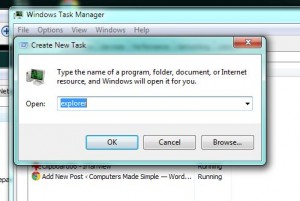
Photo of Small Menu
explorer.exe should be there already. If it’s not, type it in.


Wait for a second or two and voila! Your icons will be back on your taskbar. Run over this a couple of times to get it down pat and then you can use it yourself or teach others how to do it. You’ll be an expert in their eyes. Yay for you!

Thanks for reading! Check out our Facebook page. Like it and we’ll like you!   https://www.facebook.com/ComputersMadeSimple?ref=hl


Zip Folders – How to make them


What’s a zip folder? Before we make one, we should explain what it is. Let’s say you have 100 photos of your last trip and you want to send them to your Mom. You could send them one by one but that would take a long time and many emails. If you put them inside of a zip folder, you’d be able to send that folder attached to an email. It would be a bit smaller than the total size of the photos themselves. Zip folders compress data and package it in one unit. Consider them a suitcase. You could take your shirts and blouses on hangers or you could stuff them all into a suitcase, close the lid tight and carry one suitcase instead of dozens of pieces of clothings. Oh, the files don’t get wrinkled in a zip file.

OK, here we go. We’ll create a zip folder and then add photos to it. This will all take place on your desktop but you can do any of these steps inside any other folder on your computer. You can even create a zip folder on a flash drive, if you want.

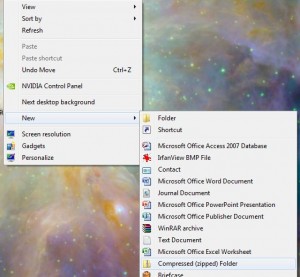
1. Right click your desktop. A menu will pop up. Scroll down to the word ‘New’ and let your cursor hover there until the second menu pops out. This is what you’ll see:

Photo of how to make a zip file 1
You won’t have all the same choices on the second menu but you will have Compressed (zipped) Folder.


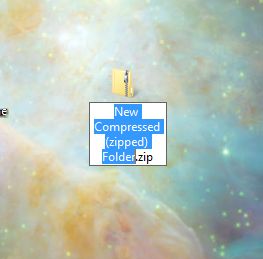
2. Click on the words ‘Compressed (zipped) Folder. A little icon of a folder with a zipper on it and the first words highlighted in blue will pop up. Like this:

Photo of How to make a zip file 2
The blue highlight means that you can change the name to something else. Just type ‘Desktop Stuff’ or whatever you want.


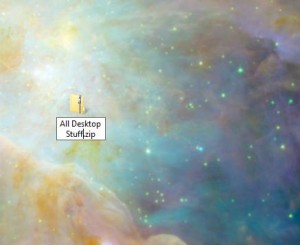
4. You can put anything you want into a zip folder. Every now and then we create one to hold all of the tiny bits of stuff, photos etc., on your desktop. We changed the name of that folder to ‘All Desktop Stuff’, like this:

Photo of How to make a zip file 3
Now you just have to drag and drop items into the zip file you just made.


The zip folder you created is empty. It’s nothing right now, zero bytes. You can drag and drop files into it or copy and paste, it’s the same thing. There are no size limits to a zip folder, so you can add anything you want to it. If you are planning to email the folder to someone, check with your email provider to find out what its size limitations are. With Hotmail, the size limit is 10 megabytes but with Gmail, it’s more. Do your homework and you’ll be fine.

Thanks for reading!

An alternative to bookmarking a page


Instead of bookmarking a website, you can drag the URL directly to your desktop. Bookmarks are great, don’t get us wrong, but sometimes you might want to keep a link handy in order to get to it quickly, without even having your browser open. Or, you might only want to keep that site around for a day or two and a bookmark seems too permanent. Either way, here’s how you do it:

Whatever browser you use, there is an address line across the top, the one that contains the URL of the website, basically the http://www.suchandsuch.com letters. In the far left corner of that line is some type of icon. All you have to do is drag that icon to your desktop. Once you do that, all you have to do is double click the icon to get to that site again. This is a picture of what you have to drag to your desktop:

Photo of the site/page icon
This will put a link to the page onto your desktop.

This is the same as a shortcut, just double click and the page will open in your default browser. This is a quick and easy way to get to a page almost instantly.

Thanks for reading!

Remove Windows 8 Dual Boot


Windows 8 is available on a demo basis right now. (Spring 2012) Installing the demo version as your main operating system isn’t a great idea, obviously. However you want to do it, make sure you install Windows 8 in a dual boot scenario, either on its own separate drive or on another partition of your main hard drive. If you can spring for an SSD, even better. You don’t have to worry about creating the dual boot option yourself, Windows does that for you.

The problem arises when you want to get rid of Windows 8. The dual boot menu still pops up every time you start up your computer. For me, this meant waiting around for the choice to come up then scrolling down to Windows 7. I couldn’t just push the start button on my computer and head off to make a coffee. Disaster!

After some searching, I came across a cool little program named EasyBCD by NeoSmart Technologies. (NeoSmart sounds like they weren’t smart before but are now, doesn’t it?) Their website is here: http://neosmart.net/  and you can check out some of their other software while you’re at it. EasyBCD is free as long as you are just a home user. If you’re using this commercially, cough up some bucks to buy it.

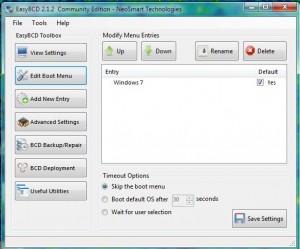
The software comes with ample online documentation but the main thrust of the whole thing is to show you which boot options you have (in my case there were two: Windows 7 and Windows 8). Using a small, efficient menu, EasyBCD displays your current options and allows you to remove the one(s) that you don’t want. The various options are on the left, as you see here:

The EasyBCD menu
I've already deleted the Windows 8 option, leaving only Windows 7.

I wasn’t planning to write a post on EasyBCD so I had already deleted the Windows 8 option. Basically, you do this:

1. Choose View Settings to see what your choices are.

2. Click Edit Boot Menu then highlight Windows 8 and choose Delete.

3. Highlight Windows 7 (or your normal operating system) and make it the default choice. Do that by clicking the box to the left of the word ‘Yes’.

4. Click the Save Settings box on the bottom right.

That’s it! EasyBCD  has other uses as well and you can investigate what they are using the Advanced Settings or the BCD Backup/Repair and Useful Utilities. I just used it to delete the dual boot option, however.

TIP: If you screw up your boot menu, you won’t be able to start your computer. That’s kind of obvious, right? If you are at all squeamish about doing stuff like this, ask a techie friend to help you out. I’m just here to tell you about EasyBCD and give you details on what worked for me.

Thanks for reading!


How do I back up my computer? Part 2


When it comes to backing up your computer, what exactly are you backing up? Well, pretty much everything that you have added to it. This includes, but is not limited to, documents you’re written, photos you’ve taken as well as anything that you’ve downloaded from the Internet such as videos, photos, audio files, Etc. What you aren’t able to back up are all of the Windows files, the program files nor any of the browsers or apps that you use. There isn’t a way to back these last things up anyway, unless you want to copy your whole drive. Even then, none of the programs would work. You’re backing up your stuff, not Windows or related stuff.

If you have purchased a new computer or laptop/netbook, it most likely didn’t come with any CDs or DVDs. These days, new computers don’t come with these system disks. You have to make them. Windows will prompt you to make new recovery disks and this is something you should do as soon as you can after purchase. If your computer fails, you can restore it to its original condition by using these disks. But, and this is a big but, creating the recovery disks has nothing to do with backing up your computer. When you create recovery disks, you are only backing up the original software that came with your computer, nothing that you have saved or created since you started using it. Remember that.

Where is all of your stuff? Nine times out of ten, everything you want to back up is in the My Documents folder. Windows automatically saves files to different folders in My Documents. Even the downloads from the Internet are saved there. This, however, doesn’t mean that everything is saved there. Some programs save your creations in completely different folders, ones that the program creates on its own. If you have things that are important to you on your computer, make sure you know where they are.

Windows Explorer, that folder on the bottom of your taskbar in Windows 7 or the ‘Explore’ program that comes up when you right click the start button and choose ‘explore’, is your friend. Get used to using it. All of the cool things on your computer can be found using Windows Explorer. Explorer is worth a blog entry on its own, it’s that important. Play around with it and see what you can find. I use it all the time and it’s one of the reasons I stick to Windows. The Mac OS has nothing like Explorer, that I have found anyway, and I get claustrophobia using OS X simply because I can’t find anything!

While we are discussing back ups, go back and read my post on WinDirStat . If you’re wondering where things are on your computer or if you simply want to know what’s taking up the room, read the post and you’ll be educated. WinDirStat is free and perfect for exploring your computer. Once you have the graphic up on your screen, run your cursor over it to see where everything is. As the cursor moves, the location of the file it’s resting on is shown. Some files, the Windows ones for instance, are huge but can’t be touched. Others, usually the blue ones, are your files and can be backed up.

That’s it for today. Tomorrow I’ll write more about actually performing the back up. It’s a step by step job that takes time but, ultimately, will save your bacon should your hard drive fail. Even if you only save precious family photos, it’s worth it, right? Some things that are lost are lost forever. That’s not a good feeling.

Thanks for reading!