Tag Archives: Windows

Computer Repair


There’s nothing like the feeling you get when your computer crashes or when something doesn’t work that used to work just fine. Frustration, stress, panic all add up to confuse what is usually a pretty simple issue. There is no quick and foolproof way to figure these problems out but here are some suggestions.

1. Don’t panic. Computer problems are often quite simple to resolve. Ask yourself some questions before you call for help:

a. What were you doing just before this happened?

b. Was there a recent power outage or storm?

c. Did you click on a link in an email?

d. Has anyone else but you used the computer lately?

e. Have you downloaded or installed new software?

f. Is your malware/anti-virus up to date and have you done a scan recently?

2. Troubleshooting a computer problem is a step-by-step process. You have to figure out what’s working and what isn’t. If the computer itself isn’t working, work through a process that includes your power supply, monitor (maybe your computer is on but you just can’t see it!), hard drive, DVD drive and so on. If you can’t power up, it could be a power cord, a power supply, a blown fuse or something as simple as a stick of RAM that has been jiggled out of place. Don’t assume that it’s a motherboard problem. When HP or BestBuy can’t figure out your problem in two easy steps, they will often say, “It’s your motherboard.” I’ve been around computers enough to know that this is rarely the case.

3. Rebooting your computer often gets rid of problems. Shut it down and wait for a few minutes before starting it up again. Assuming that your computer boots (starts), you can boot into safe mode for repairs if it doesn’t run properly in a normal environment. Safe mode is easy to start, check out how in this post.  It also helps to run your anti-virus or malware protection from Safe Mode.

4. If your computer was working well yesterday but isn’t today, consider using System Recovery to set everything back to yesterday’s settings. This is available in every Windows computer.

5. I know it sounds expensive and a waste of money but I think it’s a great idea to have at least two computers in your home, even if you are single. Why? Because you can use one computer to fix the other. Using Google to search for solutions has always helped me solve problems. Don’t underestimate the power of a $100 computer when you need to repair your $1000 laptop or desktop.

6. People are very helpful and you’ll find all kinds of assistance online. There are manufacturer’s forums, open forums, even Twitter to look for help.

7. Don’t assume that it’s user error. Sure, you may not know anything about computers but you’re not a complete idiot, either. Many tech people talk down to callers who seek help. Most of the time you can find the problem yourself without help and most of the time it’s not your fault. I learned about computers by breaking them, then fixing them. Let me tell you that you learn more when something doesn’t work than when everything runs smoothly. Life long learning, right?

Check out my brand new Facebook page. Feel free to like it and ask questions. I’ll do my best to answer you quickly.

Thanks for reading!


Email Encryption – Part 2


Email encryption is rapidly becoming more of a necessity than a whim. With governments constantly scanning virtually everything you do or say, even the simplest, most innocent email can sometimes lead to problems for the sender or receiver. What is the easiest way to encrypt an email? I described on fairly simple way in this post, and this time, I’ll tell you about something that might even be simpler.

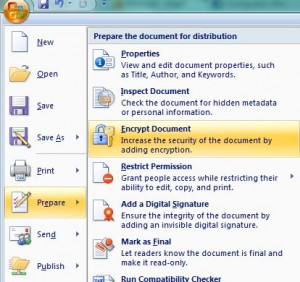
Microsoft Word includes the option to encrypt any document that you create. Here’s the menu where you choose to encrypt your document and lock it with a password:

The Menu for Word Encryption and Password
Choose 'Encrypt Document'

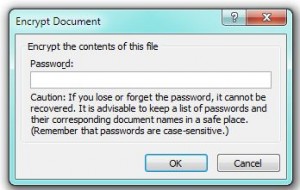
Once you have chosen to ‘Encrypt Document’, this is the menu that pops up:

The Password Entry Menu
This is where you type a strong password.

Make sure you do two things when you get to this point. First, make sure you create a strong password. Don’t use a word or a phrase, make sure it’s either mnemonic (sounds like something you would remember) or long. Always use both letters (caps and small), numbers as well as symbols. A 10-14 digit length is adequate.

Second, make sure you write it down somewhere AND encrypt that, too. If you lose the password, you’re out of luck as far as retrieving your document. Word doesn’t save your password somewhere, it just encrypts the file and encrypts the password too.

Is this a safe way to encrypt something? Well, unless you are a spy, this is about as good as it gets. As long as you choose a password that is at least 10 digits long AND use both upper and lower case letters, numbers and symbols, you’re safe.

OK, so this part is done. Just attach the encrypted document to your email and send it off. But, you ask, how do you send the password? Well, you can send several innocent emails with clues in them which would lead the recipient to the password or you could do that in person, on the phone or via SMS text messages. Whatever you do, make sure that you take as much care with transmitting the password as you do with encrypting the Word document.

If you use Notepad++, you can install the SecurePad plugin to encrypt and lock the whole document or parts of it with a password. Notepad++ is free and tiny to install. This seems like a good, free alternative, specially if your recipient doesn’t use Word.

Sending encrypted documents isn’t illegal…yet. Personally, I don’t like the idea of nameless government/police types reading what I write to my friends. Not only that, a lost laptop opens everything up to a thief (unless you’ve encrypted your whole hard drive), including all of your saved messages. For individuals concerned with privacy, encryption isn’t a luxury, it’s a necessity.

Thanks for reading! Feel free to comment or make suggestions.


Save/Rename Proxy Pictures


Sometimes when we save a complete web page, as suggested in a previous post, we get a series of proxy files instead of .jpg files. Sure, we can right click each picture and save it individually but if there are fifty photos on the page, that takes a lot of time. Here’s an example of a page that I would normally save, just to get the photos: http://www.howtobearetronaut.com/2011/09/polaroids-1970s-by-anthony-perkins/


This is from one of my favorite sites, full of interesting photos of very unique parts of our history. If you look at the page, you’ll see a string of family photos from Anthony Perkins, maybe ten or so. I could right click and save these in a short time but this is an example, just to show you what can be done if there are thirty, fifty or a hundred photos on a page.

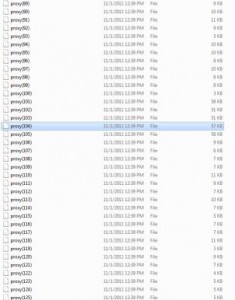
Instead of linking each photo to a .jpg file in a folder on the server, this page uses proxy files to feed the images. This is a more secure way to link pictures and their source on a website. Once you have downloaded this page, this is what you will see in the site folder on your computer:

A String of Proxy Files
Instead of .jpg files, you will see these proxy files.

Where you usually see .jpg files, in this case you will see proxy files. Actually, at this point, they aren’t even files since they don’t have any extension. Again, we could rename each one and add the .jpg file extension to it but you can see how long that would take. How can we rename and add a file extension more easily than that?

Yesterday, I wrote about adding a command window to our right click menu. That post is here.  These are the  steps that will make renaming and adding a file extension to all of these files a very simple job.

1. First, you need to separate the proxy files from the rest of the files in the folder. Create a new folder anywhere on your computer. Put one right on your desktop, if you want. Highlight all of the proxy files, right click them and choose copy. Paste them into the new folder that you created.

2. You will notice that there are far more proxy files in the folder than there were full size photos in the page. Don’t worry about that now.

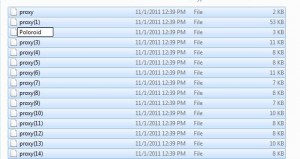
3. This will be a two step process, only one of which uses the command prompt. Open the new folder, if it isn’t already, and highlight all the proxy files. We’re going to rename all the files at once, changing the ‘proxy(x)’ to something like ‘Polaroidx’. Highlight all of the files using Control/A (select all). Right click the blue selection and choose ‘Rename’. One of the files will show a flashing menu where you can type Poloroid  like this:

Type Poloroid in the Box
This is the first step, type Polaroid in the box.

Hit enter and every file in the folder will be renamed Polaroid, Polaroid1, Polaroid2, etc. That was quick, right? You can do this with any folder that you have, renaming your DSC files to something that sounds friendlier, for example. OK, the files are now renamed but they are still useless to use since we can’t open them, right? Back out of this folder but keep it in front of you on the desktop.

3. Holding down the Shift key, right click the  folder and choose ‘open command window here’.

Right Click Command Window Choice
Hold the shift key, right click and this is what you see.

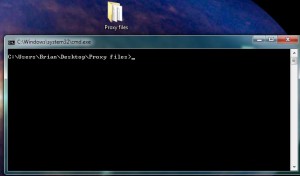
4. A black background window with some white type on it will pop up. This is your command window, a very powerful (and fast) tool, if you know what you’re doing. Here’s the menu you should be seeing:

Command Window Open
This is the command window (used to be DOS prompt)

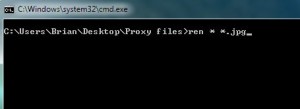
5. Here is where you can perform actions on the folder or everything in the folder. Click anywhere in the window to activate it, then type this:

ren * *.jpg       (like this: )

This is Where We Rename All of the Files
Type exactly what you see here.

OK, the ‘ren’ means ‘rename’. The ‘*’ means everything or all. The *.jpg means to rename everything that has a name before the period to the same name but add .jpg after the period. You can use ‘rename’ too but why bother?

5. Once you have typed EXACTLY what you see here, hit enter. The command window flashes and then sits quietly, waiting for more commands. Since we don’t need it anymore, close the window.

6. Open the folder and you’ll see this:

Renamed Files with File Extensions
Here is what we set out to do. Files are renamed and the .jpg extension has been added.

The next steps depend on what you’ve saved in the first place. In this case, some of the files are full-size, some are tiny. You’ll have to figure out which ones are the ones you want. Go up to the top right and change ‘details’ to ‘large icon’, then click each photo you want to save while holding the Control key. Once you’ve got them all selected, move them to another folder and delete the current folder.

TIP: If you know something about DOS, it would be easy to both rename the files and add the files extension in one step but I thought this would be less confusing. The simple ‘ren * *.jpg’ statement is far less confusing, in my opinion.

Thanks for reading!


Hidden Right Click Menu


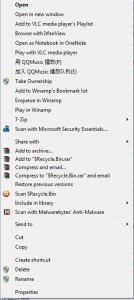
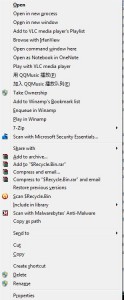
The right click menu allows you to do many things in Windows; rename files, send files somewhere else, copy, delete, cut, etc. Did you know that there is a hidden right click menu? Let’s take a look at what it does. Here’s what I see when I right click a menu normally on my computer. Yours should look the same:

Normal Right Click Menu in Windows
This is what I see normally when I right click a folder.

Your menu should look much like this, except for Take Ownership and some of the program affiliations. You’ll see that I have a couple of Chinese programs on my computer. QQ Music is a lot of fun, don’t know a similar one in English. It’s cool for karaoke!

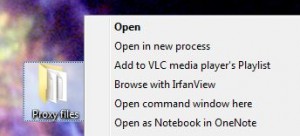
Here is the hidden right click menu. In order to get this menu, hold down the SHIFT key when you right click.

Windows Hidden Right Click Menu
Holding the shift key brings up this menu when you right click.

You’ll see that there are two different choices in the hidden menu, one of which adds enormous functionality which I will discuss tomorrow. ‘Open in new process’ and ‘Open command window here’ are the two additional choices.

Open in a new process – This opens the folder in a completely different part of Windows Explorer. If you have a folder open already, this will open it again in a new instance of Explorer, totally separate from the first, with a new place in your computer’s memory. If something happens in once instance, it won’t happen in the other since the two instances are completely separate. I would ignore this one for the time being. The next one is the important one here.

Open command window here – If any of you remember DOS or are used to using the command prompt for different purposes in Windows, Linux or OS X, you will know that this choice adds significantly more control. Consider this something like working on your computer’s brain or heart. There are many things that you can do in a command window that you can’t do normally in Windows.

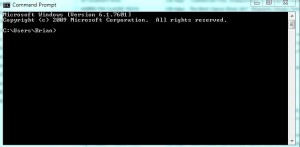
Windows itself, as well as any other GUI or Graphical User Interface, always uses the command window, it just doesn’t show it to you while it’s working. Opening a command window here in the hidden menu is a kind of time travel. This is where Windows thinks you should start your journey when you open a command prompt normally :

Usual Command Window Menu
C:\Users\(you)> this is where you start normally.

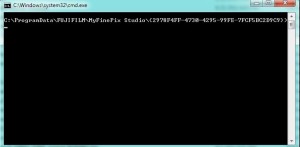
When you open a command window using the hidden menu, you are whisked off to the folder that you are looking at, not some outland post where you would have to navigate your way through a DOS-looking set of instructions to get to the same spot. You’ll see something like this, depending on which folder you right click on :

Hidden Right Click Command Prompt
There you are, right at the folder's source.

See the difference? Sure, you could use a type of code to get to this folder but you’d have to go back to your root directory, C:/, then sort your way through endless directories to get to where you are now.  It can be done but who wants to go through that? Not me.

Tomorrow, I’ll show you a cool trick using the command window. The trick will eliminate several little bits of software that you have to install to do exactly the same thing that you can do in a command window. Check it out tomorrow.

Thanks for reading. Follow me on Twitter: @_BrianMahoney