In my last post I described how to register a domain and set up a hosting account, preferably with two different companies. At this point you have a name and a host but you don’t have a website yet. Here’s how to direct ‘net traffic to your brand new site.
First, some basics. Every website is ‘served’ from a computer somewhere in the world. Although the actual mechanics of that are different from your computer’s setup, the basics are the same. When Windows starts a program, there is a path to that program on your computer. If you change the path, Windows can’t find the file that starts the program. Windows is smart but it’s not that smart.
This is the same with your website. If I want to go to abc123.com and there isn’t a path laid out, I won’t get to it. A ‘404’ page will come up that tells me that such and such a site can’t be found. Here’s how to set all of this up. We will work from the host out to the nameservers. Stay with me, it’s not rocket science.
1. On your hosting account, you have access to a root directory on one of the computers that serves your account. Everything that you upload that pertains to your site goes into a sub-folder in that directory, or a sub- directory in that directory. Folder and directory mean the same thing but you might be used to folder as opposed to directory because Windows uses that term. Root is the base, your files should be put into a sub- folder/sub-directory (f/d from now on) there. On your hosting account, go to the file manager. This is what you should see (different if you use C/Panel):
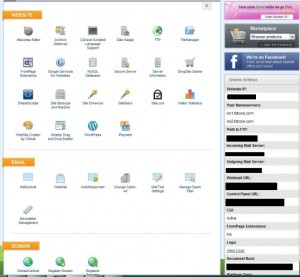
2. Click on the File Manager icon. On the left side is root f/d. Create a new f/d as shown here:
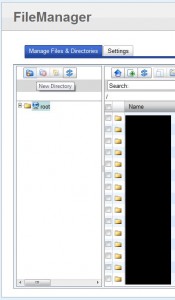
3. Name the f/d something that relates to your site but not exactly the name of your site. Use short-forms or code, it’s not that critical as long as you and your host know what’s in it. Once you name it, it will show up on the right side of the window.
4. Now you have a f/d that will feed your site’s files out to the world. Right now, your host doesn’t know the path, right? Let’s tell them what that path is.
5. Go back to the main menu and choose Domain Central (or something similar). You’ll see something like this:
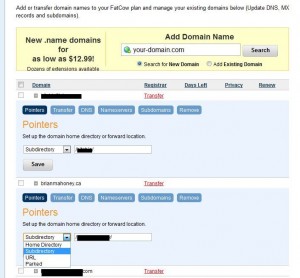
6. In this section, you are adding an existing domain (the one you registered) and you are putting it into a sub-directory. In the Pointer section, tell your host that you are putting the files in a sub-directory and tell them which one it is. (/sub-directory name/ is the format you would use). Enter the name of the sub-directory that you just created.
7. Click Save and you’re done. Right now, a request for your site isn’t going anywhere, however. You have one last thing to do.
8. Head over to your domain registration site and select your Domain Manager there. You’ll see a link to ‘Set Nameservers’. Like this:

9. Click on the link and this will come up:
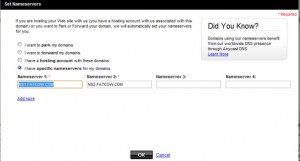
10. Back on your hosting site, there will be two nameservers listed, a 1 and a 2 designation. Some hosts might have three or four servers which shoot out the same stuff depending on which one is up and which ones are down. Never mind that now, you just want to tell your domain registrar where to send requests for your site. These nameservers are little domains on their own, hence the .com designation at the end. Once you enter them, as shown here, click OK.
11. The process from this point on is automatic but it takes time. Average time is about two hours before the main registry starts routing requests for your site to your host. Your host then routes that traffic to the sub-directory you just created in step 7.
OK, what now? If you type in your domain, after waiting a while, you’ll be sent to your sub-directory, right? Oh no! There is nothing there…yet. Every site is automatically based on two types of file, that I know of anyway. One file is named ‘index.html’ and the other is named ‘index.php’. If the host can’t find an ‘index.html’ file, it will look for an ‘index.php. file. Your job now is to put up a very simple ‘Under Construction’ index.html file that will be your placeholder. When someone types in your domain name, they will see your placeholder and know that you are working on your site. How do you do all of this? It’s easy. My next post will tell you all about it.
Thanks for reading. If you have questions, comments or ideas, please let me know. Follow me on Twitter: @_BrianMahoney

