Category Archives: Photography

Scanning Large Photos and Documents

We’ve described how to use Microsoft ICE in a previous post: Microsoft ICE  This free program works well with normal photographs but we ran into a problem this week with scans of an old map. Here’s how we managed to work it out.

1. We scanned each side of the map using six separate scans. When we placed it on the scanner, we made sure that the map was square and that each scan overlapped the previous scan. When we finished, we had six full platen scans.

Photo of HK Map Scan
One of the six scans for one side of the full map.

2. In order to ensure that each photograph was oriented the correct way, seeing as how we had to scan some parts of the map upside down, we opened each photo in Irfanview and used the original document as a guide. Some photos had to be turned horizontally left or right. Irfanview is great for looking at photos plus it has many tools with it. We’ll use it later on to make a PDF out of the map. A PDF can handle a large file much better than a JPG photo plus you can zoom in our out at will. For photo editing, however, we use the GIMP. (GIMP is short for Gnu Image Manipulation Program and it’s free.)

3. Once the GIMP was up and running, we created a new file. That new file had to be large enough to accept all six of the scanned documents (photos). The map was about three scans wide and two high. Doing the math created a huge new file. How big was the file? It measured 6920 pixels wide by 5090 high. That’s big!

4. With the file open on one monitor, we opened the folder with the scanned photos in the other monitor. One by one, we dragged each photo from the fold to the new GIMP file. Every time you add a photo to a GIMP file, you create another layer. All of this is done for you, just drag and drop.

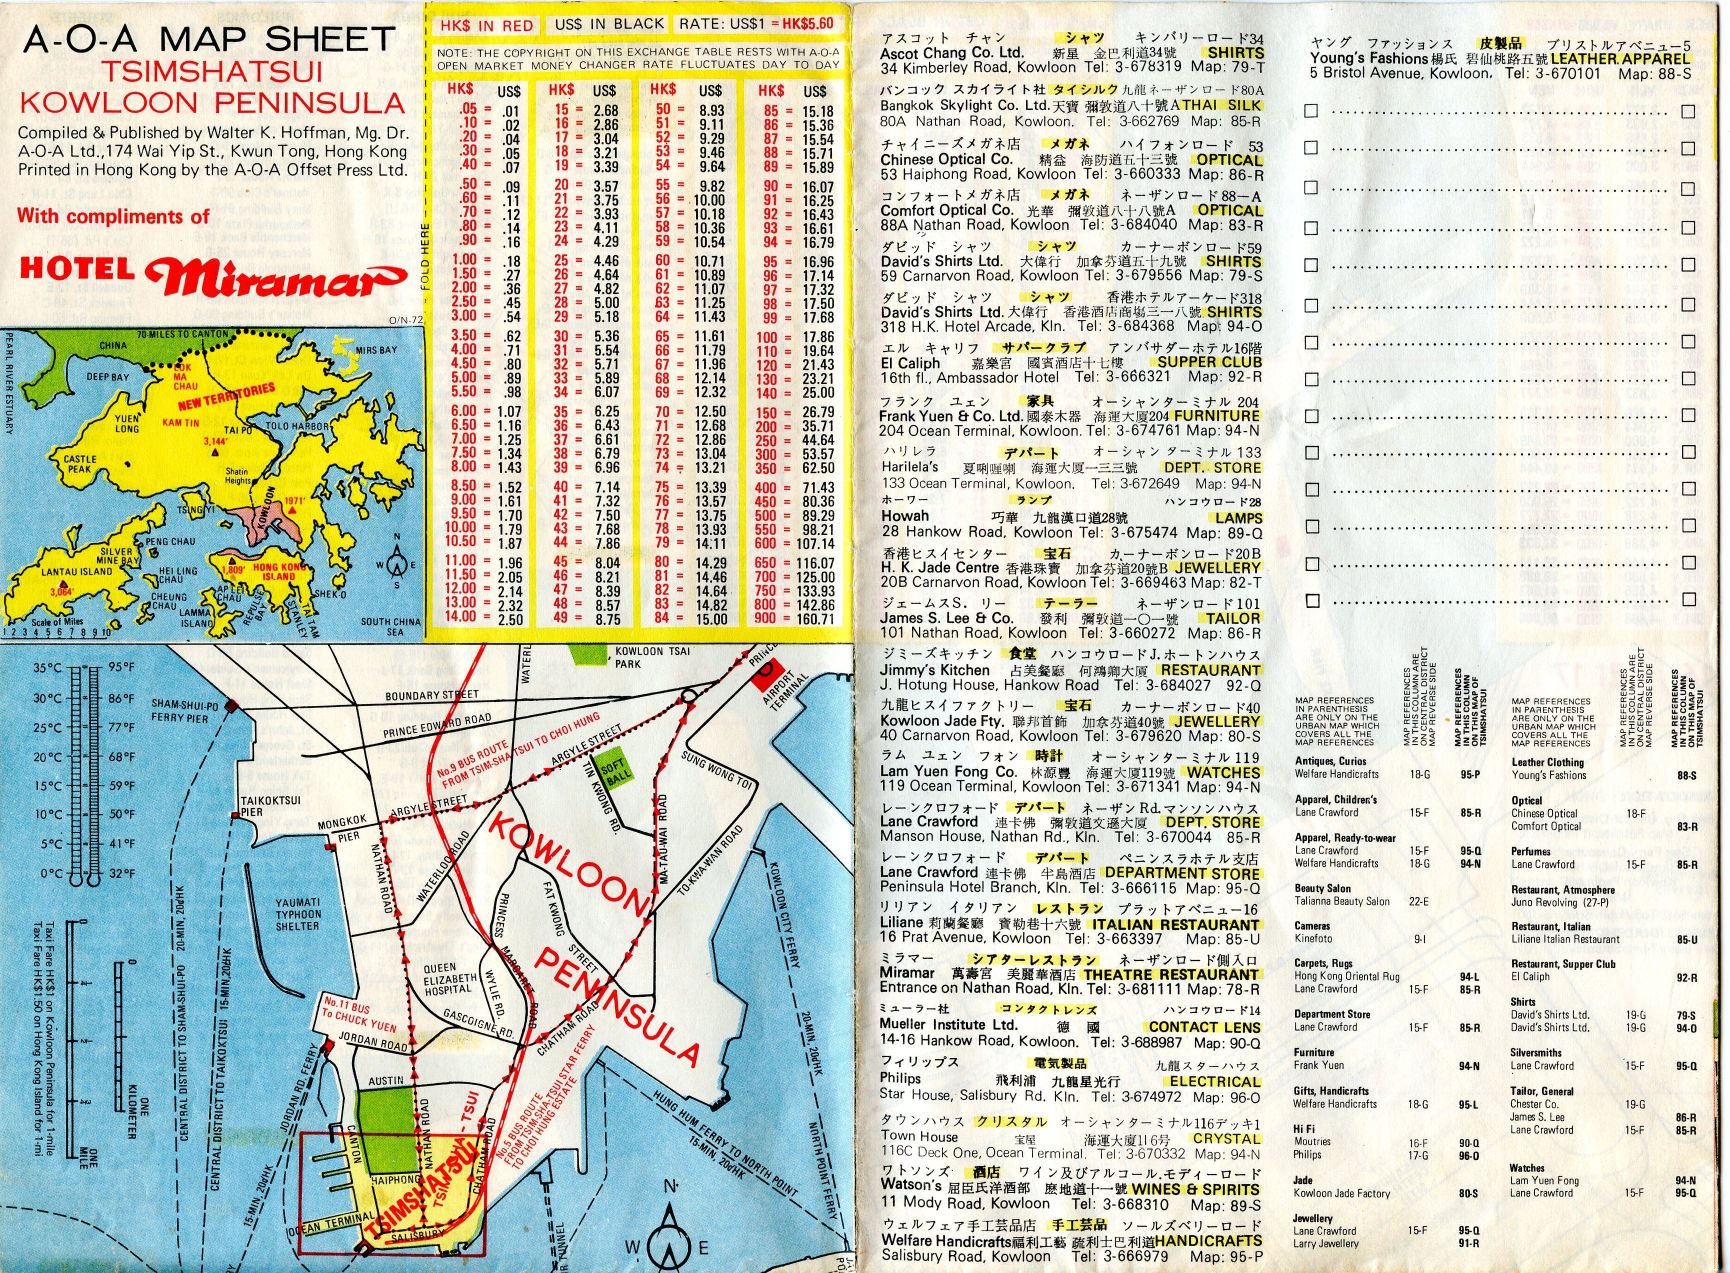
5. Once two images were in the new file, we would roughly align them to match each other. With a map, this is pretty easy because of things like roads and location names. Then we added the rest of the scans one by one and arranged them accordingly.

6. After all six scans were in the new GIMP image, we zoomed in and aligned them more precisely. This took a bit of time but, as we said, it’s much easier with a map than it is with a photo.

7. Six separate images mean six layers. A six layered image can’t be saved as a JPG so we had to ‘flatten’ the image into one layer. We double-checked our alignment then selected flatten under the Image tab then saved the image as a JPG file.

Photo of large HK Map.
Here it is, six scanned photos arranged like the original 1972 map.

8. Lastly, we used Irfanview to create a PDF from the two large GIMP images, one for the front of the map and the other for the back. Here’s our instructions for that: Creating a PDF with Irfanview

This is a basic outline of what you have to do to scan large documents. Microsoft ICE works perfectly…most of the time. We were surprised that it didn’t seem to be able to handle the maps but, as it turns out, we did well on our own. You will too.

Thanks for reading! If you have questions, ask us.

Follow us on Facebook. Just click Like and you’ll get all our updates and tech tips as soon as we post them:Computers Made Simple on Facebook

Multiple Screen Captures

When we create a new post here on Computers Made Simple, we use Irfanview for our screen captures. Using this free and incredible software, we can capture multiple screen grabs with a simple keyclick (Ctrl and F11). Here’s how we do it:

1. Obviously you have to download Irfanview and install it. While you’re at it, download the plugin package as well as the main program. We recommend using Tucows for the download. Why? With a few of the other sites listed, you have to use a downloader which, more than likely, installs some kind of malware/adware/toolbar that you don’t need.

Tip: When you are installing free software, or any software for that matter, read each menu carefully. Many apps will want to install a toolbar (don’t!) and will ask to change your home page to their page (don’t!) and also change your preferred search engine (don’t!). Make sure you look for these lines in the menus and uncheck them.

2. Fire up Irfanview. What we’re looking for on the main screen is Options and then Capture/Screenshot. Here’s how it looks in Irfanview:

Photo of Multiple Screen Captures 1
Click on Options then Capture/Screenshot


3. Once you install Irfanview, by the way, you don’t have to find the program to open it. Just double click on any photo on your desktop. We have Irfanview linked to all kinds of image files on our computers. It’s fast and simple, much faster than anything by Adobe.


4. Now we’re at the capture screen. It looks like this:

Photo of Multiple Screen Captures 2
This menu looks confusing at first. No worries. We will explain it all.


5. There are three main areas of concern in this menu. First, on the top left, choose which part of your dekstop that you want to capture. In our case, we wanted to capture the screen where we were working (we have two monitors). We only had one window open so we didn’t need to check ‘foreground window’ and we didn’t have a big window open with a separate client window (that would be a program such as Photoshop or GIMP). You can also save a specific part of the screen, let’s say the video window of a webcam chat, for instance. Once you identify the area, Irfanview will capture just that section. This saves cropping later on.

6. The next part of the menu, up on the top right, decides what action will start the screen capture. In our case we chose the default ‘Ctrl + F11’ key combination. Any time we wanted to grab a photo of the screen, we hit the Ctrl key and the F11 key at the same time. Irfanview plays a little sound to let you know that the screen capture has worked.

7. You can also set Irfanview up for multiple timed captures. One second is the lowest amount of time for this but you can adjust that upwards to longer intervals.

8. Lastly, tell Irfanview what to name the file (default is fine with us), where to save the file (make a folder on your desktop and browse your way to it) and what kind of file you want to end up with. Jpg or Jpeg (same thing) is the norm for this but you might want a another file type. Here’s a list of the types available:

Photo of Multiple Screen Captures 3
Many file types are available.


(You’ll note that you are able to use Irfanview to create PDF files from photos. Make note of that. That is one of the handiest file types when you’re dealing with large documents or photos.)

9. Once you have all of the screen captures you need, use Irfanview to crop them, if necessary. Draw a box shape around the area you want, click Ctrl + Y to crop, then Ctrl + S to save the image. Save it under a different name so the original is still there, just in case you made a cropping mistake.

Thanks for reading! Questions and comments are always welcome.


Free Panoramic Photos – using Microsoft ICE (Image Composite Editor)

Panoramic photos are now free and very easy to create. You do not need a special camera, any digital camera will do. As a matter of fact, you don’t even need a digital camera if you have a scanner. More on that later. First, let’s look at the panorama photos.

Let’s say that you want to create an image that gives a better feeling of a wide scene, maybe a harbor or a cityscape. Single images just won’t do for something like this. What you want is a full view of what you see when you look from left to right or right to left across a scene. While some digital cameras can create panoramic images by themselves, we’re here to show you how to create a panoramic photo on your own computer, with free software from Microsoft.

Microsoft Image Composite Editor (ICE) is available here:  http://research.microsoft.com/en-us/um/redmond/groups/ivm/ice/   The software is free and is available in either 32 bit or 64 bit versions. Download it and install it.

Next, go out with your digital camera and take about six or seven photos in a row, doesn’t matter which direction you start. Make sure you overlap a bit with each photo on one edge or the other. Keep the same camera height but you don’t have to be totally precise, just do the best you can. Later, you can crop the jagged bits caused by any up or down movement of the camera between snaps. You can do more, maybe even  a complete circle, although we haven’t tried that.  Once you’re done, upload the photos to your computer.

Fire up Microsoft ICE. The program opens with a blank screen. What you’re going to do is drag and drop that series of photos  onto the dark grey space that is shown here:

Photo of ICE 1
Highlight your new photos in their folder and drop them into this window.

As soon as ICE has the images in its hands, it starts to stitch them together. Depending on the speed of your computer, this could take seconds or a couple of minutes. Our seven photos only took about 15 seconds to stitch on a relatively fast computer. Here is how ICE looks when it’s completed its work:

Photo of ICE 2
See the jagged lines at top and bottom? We can crop those out.


Once ICE has completed working, check for jagged lines on the top or bottom of the image. Drag the horizontal line up or down, depending on which edge you are working on, to get rid of the jagginess. Once you’re done that, click on Export to disk, middle right side of the window.

The standard Windows save menu pops up and allows to save the stitched photo to your desktop or other folder. You’re done! Fast, easy and free.

As far as scanning is concerned, many things you want to scan are larger than the flatbed that you lay them on. Carefully line up different scans, making sure you overlap the edges as we did in the photo, and scan away. In this case, it doesn’t matter if the scans are overlapped on top or bottom, right or left. Just make sure to get scans of every part of the map, painting or whatever you are scanning.

When you’re done, open up ICE and, same as before, drag and drop the various images into it. Wait for ICE to complete its task and then export the photo to a disk. Even if you are copying a map, ICE sees it as a photo and will stitch it together. We’ve used this on maps and on things like diplomas. Both worked perfectly. Some scanners come with ICE software but, if not, you can use Microsoft ICE for free.

Let us know if you have questions. Comments are always welcome.

Thanks for reading!

Fotobounce – downloading a Facebook photo album


I’ve written about Fotobounce before. If you share photos from one social media site to another, Fotobounce is a great tool. It allows you to download complete Facebook photo albums to your computer. What you do with them after that is your business, I guess, but you really should ask for permission if you are going to share anything that isn’t your own. Here is an explanation about what Fotobounce is: Fotobounce Made Simple   (The original post wasn’t named that but it sounds good, right?)

While Fotobounce is a cool app, the actual downloading of albums can get tricky because of the way the instructions are worded. In this post I’ll try to help you figure out the odd English that they use in the selection process. Before I forget, Fotobounce is available here: http://fotobounce.com/

1. Download and install Fotobounce…duh!

2. Open the program and head over to Facebook. Sign in to Facebook with Fotobounce. You’ll have to allow it access but, according to the makers, they don’t save your password. You can always remove the access after you’ve downloaded the albums that are of interest.

3. Find the album you want to download. You have to sort through your friends, your likes and your acquaintances to find the right album(s) but that’s pretty basic.

4. Once you find the album, right click it. You’ll see the ‘Download’ button. Click it and the following menu pops up:

Choose where you want the album to be downloaded.
I've selected Events by clicking on it but I haven't started the download.

5. In this menu, you are choosing the main folder for the download. If you click ‘Select album’, Fotobounce will start the download to, in this case, Events. That’s not what I want. I want to create a sub-folder and then maybe a sub-sub-folder. Let’s do that. We’ll make a sub-folder inside of Events.

6. Click New Album. Fotobounce will show you a new album dialogue, as pictured below, and it will have the same name as the album has on Facebook. We don’t want that. We need to sort out the downloaded albums according to whose they were on Facebook, right?

Make a new album in Fotobounce
Type the new name of the album in the box and hit Enter.


7. Instead of Profile Pictures, I want to name my new album ‘Joe Nemechek’. (Joe and I are lookalikes to the point that I get stopped in stores. If I ever headed South and wore a NASCAR jacket then I’m sure I’d eat free wherever I went.) Type in whatever name you want and hit the Enter key. A new album will be created and Fotobounce will give you a notice at the top of the page.

8. Once you’ve found your new folder, click on it and you’ll see the same menu window come up same as before, giving you the option to Select that album or make a New album inside of it. This time you can leave the name the same, if you want. The default name is the same name as it was on Facebook.

9. If that name is fine, click on the Select Album button and Fotobounce will download the album inside of the album that you just created.

This sounds pretty simple, right? It’s not. Here’s the problem, as I see it. When I see the words ‘Select album’, I expect to get a choice. Instead of the normal ‘OK” that everyone else uses, Fotobounce uses ‘Select album’ as the button that starts the download. Unless you make a folder or a folder within a folder, Fotobounce will happily download your albums into the same directory. Good luck trying to figure that out when you’ve got more than a few albums in your collection. You have to create new albums if you are ever going to figure out which album is which. Sure, you could to all of this within Windows Explorer but it should be a one-step process or the wording should be a bit clearer. That’s what I think, anyway.

Fotobounce does a lot more than simply saving albums in Facebook. Check it out. I’ve just scratched the surface here.

Thanks for reading!

Bulk Photo Cropping


As you probably already know, Irfanview is one of my favorite free programs. I’ve used it for years and every computer in the house has it. Read past posts about Irfanview  here and here and here. Irfanview is fast, fun and works perfectly every time. You can download it and its plugins from Tucows. Get it here: http://www.irfanview.ca/main_download_engl.htm

If you have used Irfanview for a screen capture session, you’ve probably got dozens or hundreds of jpgs that include more of your screen than you need. Irfanview is perfect for captures but sometimes the box you draw around your target is too big. Here’s how you can set Irfanview up to crop those captures in one operation, no matter how many photos you have. How do I know? I’ve used this method before to crop about 2400 photos that I made into a little animated gif. It didn’t go viral but it was fun make.

1. Get all of your jpgs in one folder. Sort them out so that all the photos have the main capture in the same position on the screen. If you moved the window at some point while you were capturing the whole screen, sort those photos out and put them in different folders. You can reorganize them later.

2. Open Notepad or keep a paper and pencil by your hand. You will be writing down a few numbers for each cropping job.

3. Before you actually begin to crop, practice sizing the crop area first. Open one jpg. As with most programs, holding down the left mouse button and dragging the cursor will create a box. Test this out and try to get the correct size, the one that looks best to you. When you have the right box, click anywhere outside the box to unselect the crop.

4. Next, click on the top left corner of the area that you want to crop. Don’t move your mouse, just click once and hold it there. On the top left of the Irfanview window you’ll see XY:(number,number). This is your X -Y reference point. Make a note of those two numbers. This is what you will see:

The first crop window
Look for the XY:(480,561) - your numbers will vary.

5. Next, you’ll want to write down the full size of the crop box that you want. Click in the same spot, or as close as you can to it, then drag the box out and hold the mouse button down until you are able to read the numbers that you need. What you’re looking for is the number of pixels that define your crop box’s height and width. In the photo below, you’ll see what I mean.

Set the width and height of the box here.
See the (646x472 Pixels, 1.369)? You need the first two numbers: 646 and 472

6. Now you have the numbers that describe where the box starts and the numbers that describe the size of the crop box. You’re all set to start your batch cropping. Look for File on the top left, then Batch Conversion/Rename. The following window will open:

The batch processing window
Here is where you will do two things. Add the photos to crop and choose your output directory.

7. Set up the menu by checking that ‘Batch conversion’ is ticked. Then, on the top right, select the photos you want to crop. Remember when I said to keep your photos separate? This is why I said that. It’s much simpler to choose ‘Add all’ as opposed to picking through the jpgs one by one. Click ‘Add all’ if you have all the right photos in one folder. Then, in the middle left, choose where you will put the cropped pics. Don’t use the same directory as the originals, just in case you make a mistake with your crop window. You still want the originals until you make sure your numbers are correct. Once you’ve done these steps, click on the ‘Advanced’ button. The following window will come up:

Advanced Crop Window
Don't get nervous. This window looks complicated but it's not that bad.

8. Top left, see the Crop section? This is where you’ll fill in the numbers that you wrote down earlier. Make sure ‘Crop’ is checked then type in the X-pos number and the Y-pos number. Below that, write in the width and the height. Below that, make sure that ‘Left top’ is chosen. You can crop in any corner, just make sure you know which corner you have chosen. I always use top left but you can do whatever you want.

9. Make sure that nothing else is checked. On the bottom right, I have ‘Overwrite existing files’ chosen, simply because it’s easier if I make a mistake. I put the cropped photos in a new folder then I check it after the batch if finished. If I have made a mistake, I redo the numbers and run the batch again. I don’t have to open a new folder.

TIP: If you are doing a few batches, uncheck the ‘Overwrite existing files’ just in case you forget to use a new folder. Make sure this is unchecked if you are using the same folder as the originals, too. I’d advise against that, however.

10. Double check everything then choose OK once to close that menu. The batch menu is still open, of course, and you need to press the ‘Start batch’ button. Once you do that, Irfanview whisks its way through the task at hand. Depending on the speed of your computer, this might take a while. Wait until Irfanview is done then check your results. Chances are you’ll make a mistake the first few times but read through this again and you’ll get it right, sooner or later.

Thanks for reading!