Panoramic photos are now free and very easy to create. You do not need a special camera, any digital camera will do. As a matter of fact, you don’t even need a digital camera if you have a scanner. More on that later. First, let’s look at the panorama photos.
Let’s say that you want to create an image that gives a better feeling of a wide scene, maybe a harbor or a cityscape. Single images just won’t do for something like this. What you want is a full view of what you see when you look from left to right or right to left across a scene. While some digital cameras can create panoramic images by themselves, we’re here to show you how to create a panoramic photo on your own computer, with free software from Microsoft.
Microsoft Image Composite Editor (ICE) is available here: http://research.microsoft.com/en-us/um/redmond/groups/ivm/ice/ The software is free and is available in either 32 bit or 64 bit versions. Download it and install it.
Next, go out with your digital camera and take about six or seven photos in a row, doesn’t matter which direction you start. Make sure you overlap a bit with each photo on one edge or the other. Keep the same camera height but you don’t have to be totally precise, just do the best you can. Later, you can crop the jagged bits caused by any up or down movement of the camera between snaps. You can do more, maybe even a complete circle, although we haven’t tried that. Once you’re done, upload the photos to your computer.
Fire up Microsoft ICE. The program opens with a blank screen. What you’re going to do is drag and drop that series of photos onto the dark grey space that is shown here:

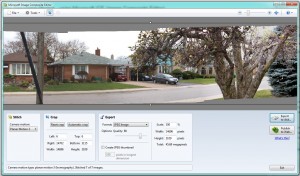
As soon as ICE has the images in its hands, it starts to stitch them together. Depending on the speed of your computer, this could take seconds or a couple of minutes. Our seven photos only took about 15 seconds to stitch on a relatively fast computer. Here is how ICE looks when it’s completed its work:

Once ICE has completed working, check for jagged lines on the top or bottom of the image. Drag the horizontal line up or down, depending on which edge you are working on, to get rid of the jagginess. Once you’re done that, click on Export to disk, middle right side of the window.
The standard Windows save menu pops up and allows to save the stitched photo to your desktop or other folder. You’re done! Fast, easy and free.
As far as scanning is concerned, many things you want to scan are larger than the flatbed that you lay them on. Carefully line up different scans, making sure you overlap the edges as we did in the photo, and scan away. In this case, it doesn’t matter if the scans are overlapped on top or bottom, right or left. Just make sure to get scans of every part of the map, painting or whatever you are scanning.
When you’re done, open up ICE and, same as before, drag and drop the various images into it. Wait for ICE to complete its task and then export the photo to a disk. Even if you are copying a map, ICE sees it as a photo and will stitch it together. We’ve used this on maps and on things like diplomas. Both worked perfectly. Some scanners come with ICE software but, if not, you can use Microsoft ICE for free.
Let us know if you have questions. Comments are always welcome.
Thanks for reading!

One thought on “Free Panoramic Photos – using Microsoft ICE (Image Composite Editor)”