Category Archives: Burnaware

Best Free Software – 10 products you need

Short and sweet today. We just set up a new computer and realized that we haven’t done a ’10 Best’ free software post in a while. If you’re a regular reader, you’ll know that we love free! There’s no need to pay for any software these days, believe it or not, other than a basic version of Windows or iOS. Heck, you can even get a free OS by downloading Ubuntu. If you go that route, Linux has hundreds of very cool, very free apps but that’s another story. Today, let’s move on to free software for Windows.

1. Irfanview 

Photo of Free Software    1
Irfanview


We’ve written many posts about Irfanview. Here’s one, complete with links: Post on Irfanview . We use Irfanview EVERY day for viewing pics, doing screen caps as well as bulk renaming and resizing PLUS making PDFS. You’ll wonder what you ever did without it. Make sure you get the main program as well as the plugins. Install Irfanview first, then the plugins.

2. VLC Media Player

Photo of Free Software    2
VLC Media Player


VLC will play any video file there is, hands down. Again, we use it every day. VLC will do more than play videos but the other things it does can get quite complicated. We prefer to use it as a player as opposed to a video tool. Here’s the link to the homepage: VLC Media Player

3. Windows Movie Maker

When we’re going to upload a video to Youtube, WMM is what we use to create it. Forget about using the Youtube tools, they’re not worth trying. Download WMM, get to know the easy interface, then create your masterpieces with it. It’s free but it’s powerful too. If you’re not into video, use WMM to create slideshows from your holiday pics. Here’s the link: Windows Movie Maker (If you have downloaded the old MSN Live Essentials, you should have WMM already. If not use the link.)

4. The GIMP

The Gnu Image Manipulation Program is just as powerful as Adobe Photoshop but it’s free. This powerful tool will take your plain pics and turn them into works of art, all the adjustments are at your fingertips. Here’s the link: GIMP

5. Burnaware

Archiving data to DVDs is simple and fast with Burnaware. The GUI is very intuitive, point and click and you’re soon creating DVDs (both normal and BluRay) in minutes. Get it here: Burnaware

6. Dropbox 
Photo of Free Software    3
Dropbox…you need it.


This should be number one on your list. We use Dropbox on every computer we own, and we have lots, keeping all of our current projects synced from on each one. Here is a link to one of our many posts on Dropbox:

Dropbox – 6 reasons why you should be using it now.  Don’t risk losing your data/pics/files to a hard drive that fails. Start using Dropbox now.

7. LibreOffice

Although not completely compatible with Microsoft Office, LibreOffice is extremely robust…and free. With six components (Writer, Calc, Impress, Draw, Math and Base), LibreOffice has all of your office suite bases covered. Here’s where you can get it: LibreOffice 

8. Recuva 

If you’ve accidentally deleted data from a flash drive or an external hard drive, download Recuva and get it back. Read the instructions, they’re simple, and copy the deleted files to another drive.  You’ll be breathing easier in no time. Get it and learn to use it now so you’ll be an expert when you need to be. Recuva 

9. 7-Zip

Windows has its own zip utility which is pretty good and only a right click away but, and this is a big but, it doesn’t have a password locking feature, at least not an easy one. If you have a file(s) that you need to keep private, 7-Zip is quick, free and easy to use. 7-Zip site

10. Calibre 

Photo of Free Software    4
Calibre – Ebook management.


If you are into Ebooks, you need Calibre to manage them.  This software catalogues all the ebooks on your computer, no matter which folder they’re in, then changes everything into a format that your reader can use when the time comes to upload them to your device. You can also use Calibre as an ereader, too. iTunes works fine as far as getting books to your Apple device, but you still need Calibra to get those books into the format that your reader can handle. It’s a big download but it’s worth it. Calibre – Ebook Managment

That’s our ten. What do you use that is indispensable? Let us know in a comment or on our Facebook page: Computers Made Simple on Facebook 

Thanks for reading!


Setting Up a New Computer – Part Two

Once you’ve got an email account set up and your anti-virus software working, it’s time to start setting up Windows. You did some of that the first time you turned it on but now it’s time to take a look at Windows Update.

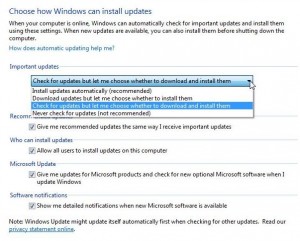
As you probably know all too well, Windows needs to update itself almost daily. Millions of hackers around the world are trying to find ways to get into your computer and Microsoft spends time and money trying to keep you safe. Windows Update is a part of Windows that automatically sends you the latest changes. Here are the settings available to you:

Photo of Windows Update menu.
We’ve chosen to take a look at the updates first, then choose which ones to download and install.


We would suggest the second choice (third from the top) if you are new to computing. That way, you can choose the time to install the updates as opposed to Windows doing it for you. Why? Because Windows doesn’t care if you are in the middle of something when it is updating your computer. If you let it, Windows will restart your computer when it needs to as opposed to you choosing to do it when you want to. We know what we’re doing, most of the time anyway, so we like to see what Windows is installing before it is installed. We don’t expect you to do that.  For the most part, you’re safe using the ‘Download updates but let me choose whether to install them.”

TIP: Don’t forget to check for updates at least once a month, every two weeks is better. There will be a little icon on the lower right of your taskbar that will indicate an update is available:

Photo of Windows Update Icon
Windows Update Icon


Next comes the fun part, at least for us. Every computer we set up has a set of standard software that we download and install after we’ve got the security features enabled. NOTE: All of the following programs are completely free. Yes, FREE!

Here’s the list:

1. Although Microsoft pretends that Internet Explorer is totally safe and vital to the future of the free world, we immediately download and install Google Chrome. Then we stop using Internet Explorer completely. No matter what Microsoft says, Internet Explorer is NOT safe. It’s also molasses slow. Don’t use it. Use Chrome.

2. Once Chrome is installed, we feel safe and start to download the other software that we need. First up is the Video Lan Player. Windows 8 doesn’t come with a DVD player, believe it or not. No matter, VLC will play any video file or DVD that you throw at it. Download it, install it and relax.

Photo of VLC Icon
The VLC icon. You’ll get used to this one, we think.


3. Next up is Irfanview. We’ve written about this superb free program before, many times. You can view all of your photos with Irfanview plus it has a few tools to help you work with your digital pictures. Download it and install it and make sure you download the plugins too. The plugins will open up virtually any type of RAW file there is. No need to use the software that came with your digital camera unless you really want to. Irfanview does it all. Check out our past posts on this brilliant program (go to the main page and search for irfanview). It’s simply the best there is.

4. Burnaware  , the free version, is necessary to backup your data (photos, videos, documents) to CDs or DVDs. Use blank DVD -R, they’re cheaper than CDS and have a much greater capacity. Once Burnaware is installed, all you have to do it pop in a blank DVD, choose your burn options, drag and drop files into the window and that’s it. Click the burn button and you’re done.

5. Most of us use Skype to communicate with friends and relatives. Microsoft has purchased Skype so now you can sign in with your hotmail or live account. You can chat with video, video and mic or just by typing in the chat window. Skype to Skype calls are always free and while you could investigate making telephone calls using it, we think there are better alternatives. There are many ways to make free phone calls, depending on where you live. If you’re in North America, free telephony is as easy as opening a Gmail account. We use WeChat and Yahoo Messenger as well as QQ for our international video conferencing but we do use Skype with relatives in our own country.

These are the programs that we can’t live without when we get a new computer. There are others, of course, that we like to add. Tomorrow, we’ll outline some of them. Remember that every piece of hardware that you add to your computer, things such as printers, scanners, webcams, external hard drives, etc, will want to add their own programs. Some of these programs do double-duty, too. This means that they work with the hardware that they came with but they also do other things. It’s worthwhile to check what else some of these bits of software will do that might be helpful.

We’ll run through some optional programs in our next post. These would be programs that we find useful but, depending on your computer use, might not interest you. Stay tuned for that.

Thanks for reading!


Burn a Video DVD – April 5th, 2013

In our last post we described how to use DVD Flick to ‘author’ a DVD video. When you author a DVD, you’re creating a set of files that you can burn to a normal DVD which will then be able to play on a standalone DVD player. It will play on your computer too, of course.

Today, we’re going to take those files which we created with DVD Flick,  and burn them to a DVD. Here are the steps:

1. Pop a blank writable DVD into your DVD burner.

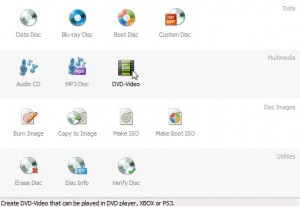
2. Open Burnaware, download it here: http://www.burnaware.com/ , and choose DVD Video on the main menu:

Photo of Burn DVD With Burnaware1
Click the DVD Video button.


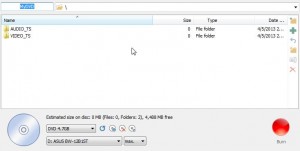
3. Burnaware then opens another menu, shown here:

Photo of Burn DVD With Burnaware2
Ignore the Audio_TS and VIdeo_TS folders that seem to be there now.

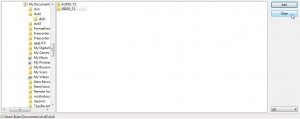
Burnaware knows that it needs to replace its current AUDIO_TS and VIDEO_TS folders (which are empty) with the AUDIO_TS and VIDEO_TS folders that we created using DVD Flick. Click on the green arrow up on the top right. This will open Window’s file menu. Search for the DVD folder in My Documents.


Photo of Burn DVD With Burnaware3
DVD Flick created the dvd folder when it authored the movie. That folder is on the left, you want the VIDEO_TS folder inside it.

DVD Flick has already made the folders you need, you just have to find them. Click on the VIDEO_TS folder and choose Add. (You only need to choose the VIDEO_TS folder. Since we made the video from an AVI file, sound and video are all in the VIDEO_TS folder. This is the way it will be for virtually every DVD you create this way.)

Remember when we said Burnaware had already placed two empty folders in its menu? When you try to add your own Video and Audio folders, this error menu comes up. That’s normal. Simply click ‘Replace’ and your full VIDEO_TS and AUDIO_TS folders will be replace the empty ones. Once you’ve added the folders, click Close:

Photo of Burn DVD With Burnaware 5
Close this menu.


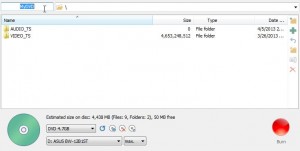
4. Back to the main menu again. This time, you’ll see that the VIDEO_TS file is full and the red burn button is lit. Don’t forget to make a title for the DVD. See the highlighted MYDVD in this photo?

Photo of Burn DVD With Burnaware 6
Look for the blue MyDVD words.

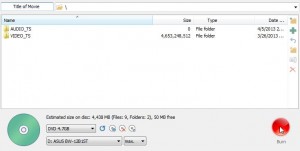
5. Name your movie by typing in that slot and then click the red Burn button:

Photo of Burn DVD With Burnaware 7
Name the DVD and then burn it. You’re done!

The speed of the burning process depends on your computer’s speed, of course. Try to limit your computer use during the burning unless you have the latest and greatest computer out there. The burn takes a big chunk of your computer’s resources and you don’t want to make a ‘coaster’, right? Coaster is the old term for a ruined DVD.

That’s it! You’ve created a DVD that you can play anywhere, on your computer or on a standalone DVD player. Pat yourself on the back.

Thanks for reading! Questions and comments are welcome. Follow us on Facebook: Computers Made Simple