As you probably already know, Irfanview is one of my favorite free programs. I’ve used it for years and every computer in the house has it. Read past posts about Irfanview here and here and here. Irfanview is fast, fun and works perfectly every time. You can download it and its plugins from Tucows. Get it here: http://www.irfanview.ca/main_download_engl.htm
If you have used Irfanview for a screen capture session, you’ve probably got dozens or hundreds of jpgs that include more of your screen than you need. Irfanview is perfect for captures but sometimes the box you draw around your target is too big. Here’s how you can set Irfanview up to crop those captures in one operation, no matter how many photos you have. How do I know? I’ve used this method before to crop about 2400 photos that I made into a little animated gif. It didn’t go viral but it was fun make.
1. Get all of your jpgs in one folder. Sort them out so that all the photos have the main capture in the same position on the screen. If you moved the window at some point while you were capturing the whole screen, sort those photos out and put them in different folders. You can reorganize them later.
2. Open Notepad or keep a paper and pencil by your hand. You will be writing down a few numbers for each cropping job.
3. Before you actually begin to crop, practice sizing the crop area first. Open one jpg. As with most programs, holding down the left mouse button and dragging the cursor will create a box. Test this out and try to get the correct size, the one that looks best to you. When you have the right box, click anywhere outside the box to unselect the crop.
4. Next, click on the top left corner of the area that you want to crop. Don’t move your mouse, just click once and hold it there. On the top left of the Irfanview window you’ll see XY:(number,number). This is your X -Y reference point. Make a note of those two numbers. This is what you will see:
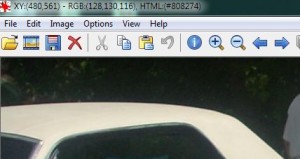
5. Next, you’ll want to write down the full size of the crop box that you want. Click in the same spot, or as close as you can to it, then drag the box out and hold the mouse button down until you are able to read the numbers that you need. What you’re looking for is the number of pixels that define your crop box’s height and width. In the photo below, you’ll see what I mean.
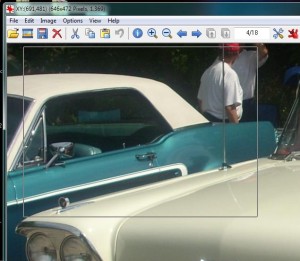
6. Now you have the numbers that describe where the box starts and the numbers that describe the size of the crop box. You’re all set to start your batch cropping. Look for File on the top left, then Batch Conversion/Rename. The following window will open:
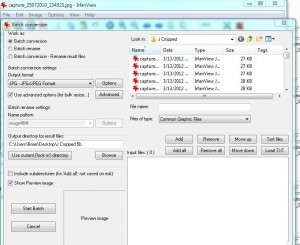
7. Set up the menu by checking that ‘Batch conversion’ is ticked. Then, on the top right, select the photos you want to crop. Remember when I said to keep your photos separate? This is why I said that. It’s much simpler to choose ‘Add all’ as opposed to picking through the jpgs one by one. Click ‘Add all’ if you have all the right photos in one folder. Then, in the middle left, choose where you will put the cropped pics. Don’t use the same directory as the originals, just in case you make a mistake with your crop window. You still want the originals until you make sure your numbers are correct. Once you’ve done these steps, click on the ‘Advanced’ button. The following window will come up:
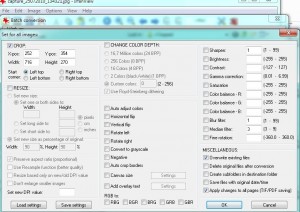
8. Top left, see the Crop section? This is where you’ll fill in the numbers that you wrote down earlier. Make sure ‘Crop’ is checked then type in the X-pos number and the Y-pos number. Below that, write in the width and the height. Below that, make sure that ‘Left top’ is chosen. You can crop in any corner, just make sure you know which corner you have chosen. I always use top left but you can do whatever you want.
9. Make sure that nothing else is checked. On the bottom right, I have ‘Overwrite existing files’ chosen, simply because it’s easier if I make a mistake. I put the cropped photos in a new folder then I check it after the batch if finished. If I have made a mistake, I redo the numbers and run the batch again. I don’t have to open a new folder.
TIP: If you are doing a few batches, uncheck the ‘Overwrite existing files’ just in case you forget to use a new folder. Make sure this is unchecked if you are using the same folder as the originals, too. I’d advise against that, however.
10. Double check everything then choose OK once to close that menu. The batch menu is still open, of course, and you need to press the ‘Start batch’ button. Once you do that, Irfanview whisks its way through the task at hand. Depending on the speed of your computer, this might take a while. Wait until Irfanview is done then check your results. Chances are you’ll make a mistake the first few times but read through this again and you’ll get it right, sooner or later.
Thanks for reading!

