Tag Archives: facebook privacy

How to Beat Facebook at Its Own Game

Facebook loves the fact that people share everything on their platform. In fact, the more you share, the more money Facebook makes on your information and preferences. If you’re reading this, you’re probably a bit concerned about privacy and how Facebook plays fast and loose with it. Here’s how to tune your profile so you can trick Facebook into thinking you’re someone other than who you really are.

1. While Facebook pretends that you have to use your real name on your profile, there is no real reason to do this. On Facebook, and on the Internet in general, you can be whoever you want to be. If you’re worried about whether your friends will recognize you, keep your real last name or, if you’re a female, use your maiden name. There are many ways around the ‘real name’ restriction but just remember that you don’t have to play by the rules here. Why is this important? Well, once Facebook has your real name, they can sell your information to third party advertisers, complete with your home city or state. This leads us to the next available spoof.

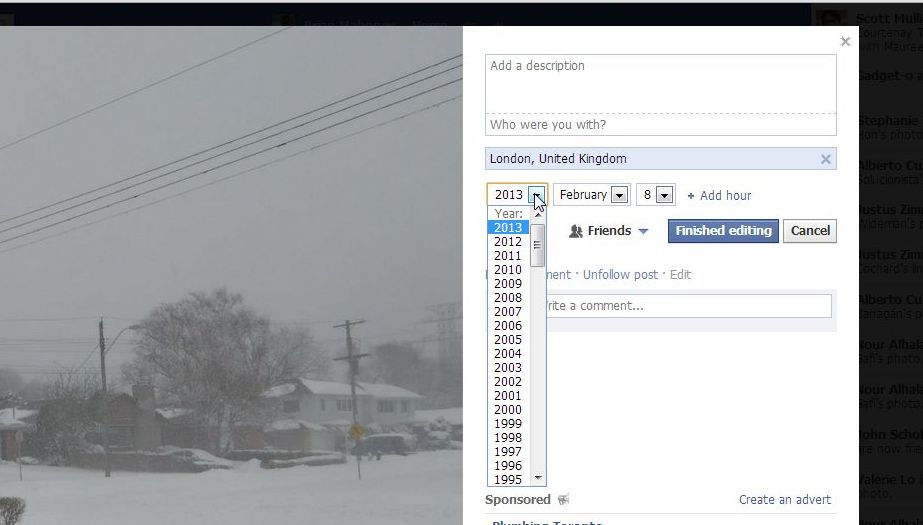
2. Don’t use your real city/town/country. Even if your IP address says that you are coming from Timbuktu, you can always tell Facebook that you live in Cincinnati, and vice versa. As long as your friends know who you are and where you really live, if they are real friends of course, you can tell Facebook that you live somewhere else.

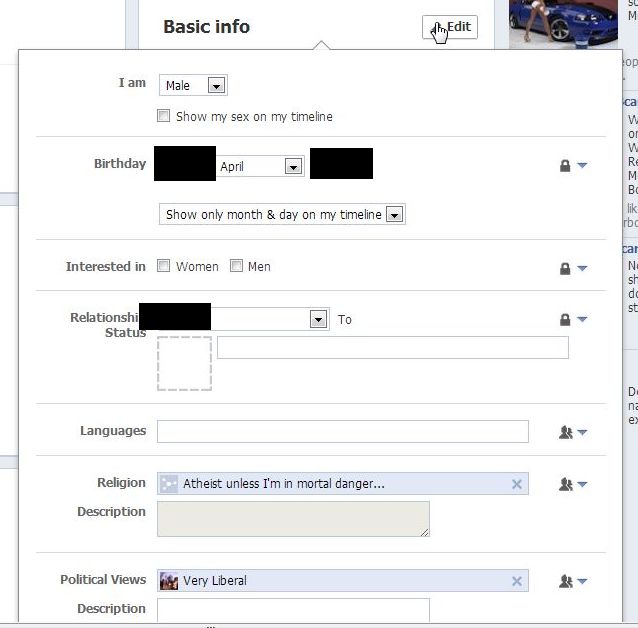
3. Why does Facebook have to know how old you are? Simply because they can tune their ads to your age demographic. Why let them? You don’t have to give your real age when signing up and, if you do, you don’t have to show the year you were born. Adjust your privacy settings to show only the date, not the year. We all know that young teens or pre-teens pretend to be older when they sign up for Facebook. You can do the same thing …in reverse.

4. When you’re posting a photo of your house/dog/cat/kids, tag the photo with some random location. Facebook doesn’t have to know where you go or what you do. Your friends will know that it’s your house/dog/cat or kid, Facebook doesn’t have to.

5. There is no reason to share your sex, your marriage status, your date of birth, your political views, etc. Your friends already know you or they can ask if they want more information. Facebook pretends that this information is vital to your success on the site but, come on, why would anyone share this stuff in public?

Here are some photos of different settings that are available. Many of our friends do not use their real name while others change their name later on. You’re allowed to do one change on the same profile so change to a nickname or just make up a new one. It’s simple to message someone and say, ” Hey, this is me. I changed my name.”

Photo of Facebook photo.
This photo was taken in Toronto. You can tell Facebook that it was taken just about anywhere.


Photo of Facebook photo 2.
Use this page to hide your personal information from Facebook and strangers.


Remember to hide what you can, change everything else and pretty much tell Facebook to stuff it. There is no need to share any personal information with them. Good luck and let us know if you have questions about any of this. We’re here to help.

Thanks for reading!

Follow us on Facebook and keep up with the latest tech news: Computers Made Simple on Facebook

Facebook – Restricted Friend List


Everyone has some people on Facebook who aren’t really friends. Maybe they are relatives or co-workers but, because of circumstances, you may have to have them on Facebook. Even though they are on your friend list, you probably don’t want to share everything that you post with them. Facebook has a setting for this situation. Here’s how it works.

1. Head to your timeline by clicking your profile image up on the top right of any Facebook page.

2. Click on the box that says Friends. Here’s the box:

Photo of Friend Box
Click the box.


3. Once your list comes up, choose any friend that you want to put on the restricted list. Hover over their name and a bigger box pops up. Like this:

Photo of Friend's Info
Don’t click for a while, just hover.


4. Again, hover over the word Friends. This box will appear:

Photo of Popdown on Facebook
Different settings are available from this one menu.


5. This person isn’t on any list right now but let’s click ‘Add to another list…’ to see what happens. Here’s the next menu:

Photo of Facebook Lists
Down at the bottom, look for Restricted.


6. Click on the word ‘Restricted’ and that person is now on the restricted list. Details on what that means in a minute.  For now, head back to any Facebook page and click on the little down  arrow just to the right of Home. Click on Privacy Settings. Like this:

Photo of Privacy Settings on Facebook
Let’s check our privacy settings.


7. What we’re doing now is checking to see who is on the restricted list. If you add a few friends to this list, it’s a good idea to check who is on it, right? Here is the page that shows up next. Click on ‘Manage blocking’ down at the bottom right.

Photo of Facebook Privacy Page
Down at the bottom, look for Manage blocking and click there.


8. When the blocking page appears, at the top you’ll see a section for your restricted list. There is a short description of what happens when you put a friend on this list. As far as Facebook is concerned, they are not friends since they cannot see anything that you post that is set to ‘Friends only’. However, people on this list will see anything that you post that is public. Additionally, Facebook does not notify your friends that they are on this list. Here is the photo of this menu:

Photo of Facebook Restricted Settings
Read about what the restricted list means.


9. Once you are here, you might as well add more friends to this list. Here’s how we do that. Click on Edit List. This box appears:

Photo of Friend on Facebook Restricted List
All of the friends who are on the list are shown here.


10. The people who are on the list are shown here. To remove them, click the X that appears when you hover over the person’s photo. If you want to add more people to the list, click on the words ‘On this list’ and the following choices show up:

Photo of Facebook Restricted List
Click on the word Friends.


11. Now you will see a page full of all of your friends. Simply click on any friend who you want to add to your Restricted list. You’ll see a check mark to signify that they are now restricted from seeing most of what you post on Facebook.

Photo of Facebook Restricted List  11
Click any profile photo here to add that person to your restricted list.


This is a long post, to be sure, but we feel it’s important to do everything in a step-by-step manner. If you still have questions, comment below. We’ll help you out.


Thanks for reading! Check out (and like) our Facebook page here: Computers Made Simple


Facebook Stalking – how to stop it


Even though you may have your Facebook contact info privacy settings for your phone number set to ‘friends only’ or ‘only me’, did you know that anyone can find you on Facebook using that phone number? Read that again. You’re right. It doesn’t make sense. But, that’s Facebook, right? Read on and we’ll tell you how to stop complete strangers from stalking you and finding you on Facebook.

1. Go to your privacy settings page. Here is how you get there:

Photo of Privacy Settings link
Down arrow, then click on Privacy Settings.


2. On the page that pops up, look for the words ‘How you connect’. This is where you edit the settings for how people search for you. If you don’t change the settings here, anyone can find you using your phone number, the one that you might have given Facebook, or your email address. This is how it looks:

Photo of Facebook Privacy settings page
How you connect, that’s what you’re looking for.


3. This ‘How you connect’ setting is not  overridden by your basic info settings. If you have your phone number listed in your basic info and if you have that set to ‘friends only’ or only me’, anyone can still search for you using that phone number. Sad but very true. Here are the settings that we suggest:

Photo of Facebook search settings.
We suggest that you set this to ‘Friends’.


4. If your friends happen to know your phone number, they can find you on Facebook. If they know your email address, they can find you. Then again, if anyone knows your phone number or email, they can find you on Facebook…unless you change this setting. Sure, anyone can search for your real name and they may or may not find you, depending on how many other people share your name and whether you used your real name or your nickname when you signed up. In other words, people can still find you, old school friends, ex-lovers, whoever, but they won’t be able to link up your phone number to your Facebook account. Change it now!


Working backwards here, your friends won’t be able to see your phone number on Facebook if you have this particular privacy setting:

Photo of Phone Number privacy settings
You decide…Only me or Friends or whatever you want.

OK, if your friends already know your phone number, that’s fine. With your phone number privacy set to ‘only me’ , at least they won’t be able to find the number on Facebook. If you set this to ‘friends’, then they can find your number here. Either way, using the privacy settings outlined above, no one will be able to search for you using your phone number.

Are we chock full of paranoia? Not really. Consider this scenario: You apply for a job. Obviously, you have to provide a telephone contact number. If that number is linked to your Facebook account, the person who is hiring you can search for you on Facebook using that number. Like it or not, they can find out quite a bit about you, depending on your privacy settings. If you remove your email and your phone number from your search settings (unfortunately you can’t separate them), then no one can find you that way.

Lastly, should Facebook even have your phone number? Think about that for a while. Sure, they say that they need it in case your account is compromised. Hmmmm, really? Your phone number is a direct link to you and/or your home. Mull that over for a while.

Thanks for reading!


Layered Privacy on Facebook – Part 2


In our last post we divided our Facebook friends into different lists (groups). Here’s the link, in case you missed it: Layered Privacy on Facebook – Part 1  This time we’ll show you how to separate your posts and some of your activity, in order to keep the posts from being seen by everyone on your friend list.

Remember that anything you comment on that isn’t yours is wide open. You can’t hide anything that isn’t your own, including comments that you make on another person’s photo,note,share, or post. No can do!

OK, now that we have that straightened out, here’s how to control who sees what you post:

1. Go to your normal Facebook page, not your Timeline. Click on the word Facebook up on the top left.

2. We’re going to add a photo as a test. Click on Add Photo/Video to bring up this menu:

Photo of Facebook menu
Note that the current default setting is ‘Friends’. Keep that in mind for later.


3. Click on the little down arrow just to the right of the word Friends. Your menu may differ, depending on your default privacy setting. (It may say Public which is a big no-no. Nothing you post should be shared with the Public unless you are a celebrity or a celebrity wannabe.) Whatever it says, click on the down arrow to bring up a menu that looks like this:

Photo of Facebook Menu
Look for ‘See all lists’ at the bottom.


4. Click on the words ‘See all lists’ to bring up the following menu which will show all of the lists that you made last time. Here it is:

Photo of Facebook Menu
All of your lists will be shown on this menu. You might need to scroll up or down to see them all.


5. For this exercise, we’re going to share it with our Family, no one else. Click on Family (or some other group) to put a check mark beside it. If you don’t have a list or group named Family, choose another one. If you see where this is going, skip out of class and do something else. The last section is important though, so maybe you want to stick around.

Photo of Facebook Menu
We’ve chosen Family here but you’re on your own. Choose any group you want or choose multiple groups.


6. Once you choose which lists you want to share your photo with, you can upload the pic. Only those lists that you’ve chosen will be able to see or comment on the photo. No one else will see the photo or the comments on it.

You’re done. However, if you sort out your Facebook posts using this method, there is one more thing to remember. Read this:

Tip: Whatever your setting was for your last post, that setting is now your default setting. If you chose Family as the list you will share your photo/note/video with, your next photo/note/video or share will be visible to only that list. Read that again if you’re not clear on it. You have to change the setting for everything you post from now on. Safer, perhaps, but kind of a pain, too. 

This is important. Let’s say you post a questionable pic and share it with the wrong group. Oooops! After all of this ranting about layered privacy, we still think it’s best to have separate Facebook accounts. This isn’t crucial unless you are kind of ‘out there’, right? If you just post pics of kittens and fishing trips and weddings, stick with this method. If you have a wild night life and a staid home life, think having two or more Facebook accounts.

As always, questions and comments are welcome. Our Facebook posts are the most popular on this site. If you want us to write about something that’s bugging you, let us know in a comment.

Thanks for reading!