Tag Archives: layered privacy

The Perfect Facebook Profile (Part 3) – Hide your friend list

Day three of creating a totally private Facebook profile. By the end of this week, anyone who manages to find you on Facebook won’t be able to discover much about you, certainly no more than the bare minimum that Facebook says you have to reveal. Today, we’re going to lock up your friend list, at least as tight as you can. Remember that you cannot hide mutual friends that you have with someone.

Theory: Ask yourself why any of your friends need to know who else you are friends with. Think about it and then you can set your privacy accordingly. If you have friends that you don’t know very well, keep them from knowing who else  you know. If you have guys who raid your list of friends for leads, you know what we mean, you can stymie them easily.

1. Short and sweet, head to your own Timeline by clicking on your name up on the top left.

Photo of Hide Friend List    1
Click on Friends to start the journey.

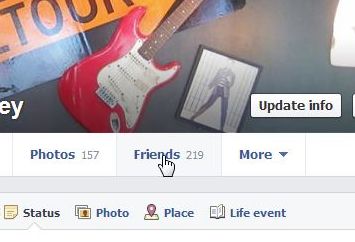
2. Click on the word Friends.

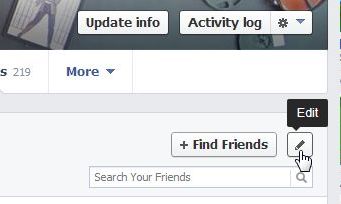
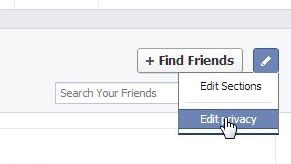
3. Up on the top right, click on the pencil icon and choose ‘edit privacy’.

Photo of Hide Friend List    2
Click the pencil.
Photo of Hide Friend List    3
Choose ‘Edit privacy’.


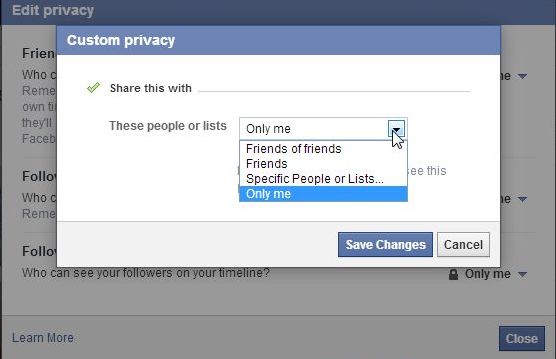
4. In the box that opens, make your selections carefully. You can choose ‘Only me’ or any number of other options. If you’ve made a list of acquaintances, you can keep your friend list away from them, for instance.

Photo of Hide Friend List    4
Lots of choices here. Make your choice carefully.

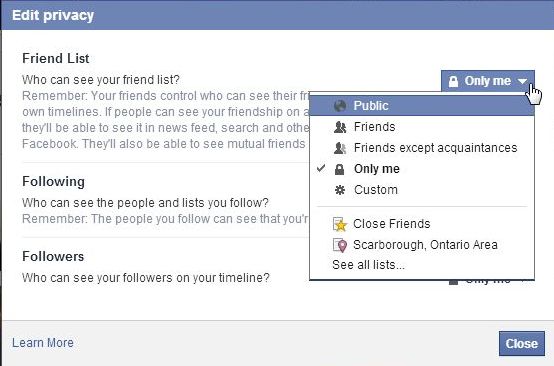
5. Ideally, this is what we’d like to see:

Photo of Hide Friend List    5

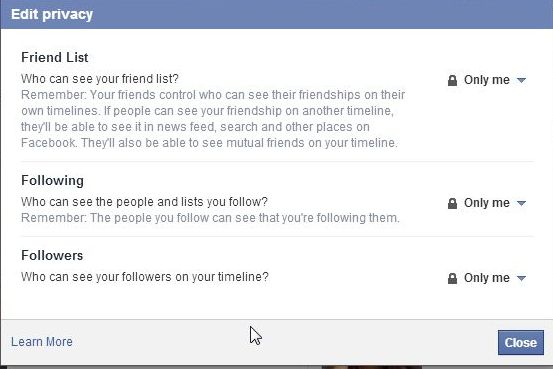
No one else really needs to see your friend list, do they? Why?

6. If you want some friends to see your list, you can tune your privacy in quite a few ways. Friends of friends? Specific people or lists?

Photo of Hide Friend List    6
It doesn’t have to be complicated. That’s why we prefer the ‘Only me’ setting.


Finally, please remember that you can’t hide your mutual friends. Facebook does not allow that. We can see how that might be a problem for some teen users, but that’s the way it is.

Thanks for reading! Let us know if you have comments, problems, questions or suggestions. We’re very approachable. Like us on Facebook and you’ll get some good karma! Here’s the link: Computers Made Simple on Facebook.


Layered Privacy on Facebook – Part 2


In our last post we divided our Facebook friends into different lists (groups). Here’s the link, in case you missed it: Layered Privacy on Facebook – Part 1  This time we’ll show you how to separate your posts and some of your activity, in order to keep the posts from being seen by everyone on your friend list.

Remember that anything you comment on that isn’t yours is wide open. You can’t hide anything that isn’t your own, including comments that you make on another person’s photo,note,share, or post. No can do!

OK, now that we have that straightened out, here’s how to control who sees what you post:

1. Go to your normal Facebook page, not your Timeline. Click on the word Facebook up on the top left.

2. We’re going to add a photo as a test. Click on Add Photo/Video to bring up this menu:

Photo of Facebook menu
Note that the current default setting is ‘Friends’. Keep that in mind for later.


3. Click on the little down arrow just to the right of the word Friends. Your menu may differ, depending on your default privacy setting. (It may say Public which is a big no-no. Nothing you post should be shared with the Public unless you are a celebrity or a celebrity wannabe.) Whatever it says, click on the down arrow to bring up a menu that looks like this:

Photo of Facebook Menu
Look for ‘See all lists’ at the bottom.


4. Click on the words ‘See all lists’ to bring up the following menu which will show all of the lists that you made last time. Here it is:

Photo of Facebook Menu
All of your lists will be shown on this menu. You might need to scroll up or down to see them all.


5. For this exercise, we’re going to share it with our Family, no one else. Click on Family (or some other group) to put a check mark beside it. If you don’t have a list or group named Family, choose another one. If you see where this is going, skip out of class and do something else. The last section is important though, so maybe you want to stick around.

Photo of Facebook Menu
We’ve chosen Family here but you’re on your own. Choose any group you want or choose multiple groups.


6. Once you choose which lists you want to share your photo with, you can upload the pic. Only those lists that you’ve chosen will be able to see or comment on the photo. No one else will see the photo or the comments on it.

You’re done. However, if you sort out your Facebook posts using this method, there is one more thing to remember. Read this:

Tip: Whatever your setting was for your last post, that setting is now your default setting. If you chose Family as the list you will share your photo/note/video with, your next photo/note/video or share will be visible to only that list. Read that again if you’re not clear on it. You have to change the setting for everything you post from now on. Safer, perhaps, but kind of a pain, too. 

This is important. Let’s say you post a questionable pic and share it with the wrong group. Oooops! After all of this ranting about layered privacy, we still think it’s best to have separate Facebook accounts. This isn’t crucial unless you are kind of ‘out there’, right? If you just post pics of kittens and fishing trips and weddings, stick with this method. If you have a wild night life and a staid home life, think having two or more Facebook accounts.

As always, questions and comments are welcome. Our Facebook posts are the most popular on this site. If you want us to write about something that’s bugging you, let us know in a comment.

Thanks for reading!


Layered Privacy on Facebook – Part 1


We’ve talked before about creating a separate Facebook profile, just in case you need an extra layer of privacy. Now, we’re going to show you another way to protect your privacy while using only one account. It’s a bit complicated and it only works for things that you post but we think it might help some of you. Stay tuned for subsequent posts on this. We can’t do it all in one post.

Here’s how to isolate parts of your profile:

 The theory works like this: out of say 100 friends, 15 of them are family, 30 are close friends and the rest are simply acquaintances that you’ve picked up over time. Your family photos are probably private. Maybe you don’t want to share all of your birthday photos with your other 85 friends. By the same token, that party at Mickey’s last week isn’t something that you want to share with your family. Get it? You want to share some things with some friends, but not others.

The first step is to sort your friends out into groups. You want to make lists to keep them all separate. Here’s how to sort your friends into lists:

1. Make sure you are logged-in to your account, right? Then, click on your profile photo up on the top right to bring up the timeline. Then, click on the little box that says Friends. You might have to click on the right side of the boxes if your Friends box is tucked underneath your Likes and Photos, etc. Ultimately, you want to see this page (or one like it):

Photo of Facebook Friend Page
A full page of your Facebook friends.


2. Now we get into some hovering. Hovering is when you rest your cursor (mouse) over something but you don’t click on it. You hover, OK? If you click, it makes things much more difficult so just hover. Practice. We’ll wait. (insert coffee break here…)  Got it? Good. Start at the top left and hover over that person’s name. This is what you want to see:

Photo of Facebook Friend menu
Your first hover shows this. Wait, there’s more!


3. Hover over the word friends. You’ll see this next :

Photo of Facebook Friends menu
Here are all the settings for that particular friend. Right now, you’re looking for the words ‘Show all lists’


4. If you have hundreds of friends, this could take a while. Do 10 or 20 a day, something like that. Anyway, this time you get to click. Click on ‘show all lists’ to bring out this menu:

Menu of Facebook Lists
We have some lists set up, even some Trial ones for this post. Your menu will be different.


5. Now, you might have some lists already. Facebook arbitrarily makes some lists for you, based on geography or school or some arcane algorithm that only they understand. You want to start dividing your friends into different groups. Take some time and think about it. A list of family members is an obvious choice but some of your family might be more open-minded than others. Then again, they are in contact with your other family members so the next step is to figure out how discreet they are. You get the gist of what we’re trying to say here.

Click on the words, New List. Like this:

Photo of New List slot
Type in the name of your new list.


6. Type in the name of your new list, Men from Mars sounds good, and continue on through all of your friends. Sure, it’s a chore but you might find it easier than creating a separate profile. If you only have 50 or 60 friends, this won’t take long. Remember that some friends can be on more than one list. You’ll work it out, no problem.


Tip: Remember, when you add a new friend, make sure you put them on one of the lists you’ve created or start a new list. 


This is step one. As this week progresses, we’ll get deeper into the layers of privacy as we attempt to simplify your Facebook experience and protect your reputation.


Thanks for reading!