In our last post we divided our Facebook friends into different lists (groups). Here’s the link, in case you missed it: Layered Privacy on Facebook – Part 1 This time we’ll show you how to separate your posts and some of your activity, in order to keep the posts from being seen by everyone on your friend list.
Remember that anything you comment on that isn’t yours is wide open. You can’t hide anything that isn’t your own, including comments that you make on another person’s photo,note,share, or post. No can do!
OK, now that we have that straightened out, here’s how to control who sees what you post:
1. Go to your normal Facebook page, not your Timeline. Click on the word Facebook up on the top left.
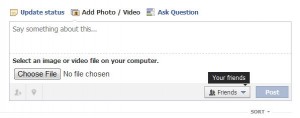
2. We’re going to add a photo as a test. Click on Add Photo/Video to bring up this menu:

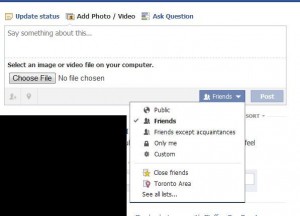
3. Click on the little down arrow just to the right of the word Friends. Your menu may differ, depending on your default privacy setting. (It may say Public which is a big no-no. Nothing you post should be shared with the Public unless you are a celebrity or a celebrity wannabe.) Whatever it says, click on the down arrow to bring up a menu that looks like this:

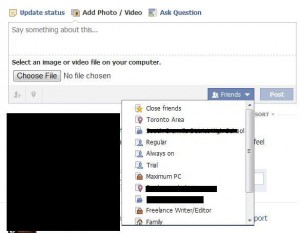
4. Click on the words ‘See all lists’ to bring up the following menu which will show all of the lists that you made last time. Here it is:

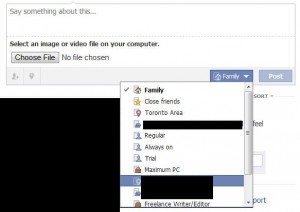
5. For this exercise, we’re going to share it with our Family, no one else. Click on Family (or some other group) to put a check mark beside it. If you don’t have a list or group named Family, choose another one. If you see where this is going, skip out of class and do something else. The last section is important though, so maybe you want to stick around.

6. Once you choose which lists you want to share your photo with, you can upload the pic. Only those lists that you’ve chosen will be able to see or comment on the photo. No one else will see the photo or the comments on it.
You’re done. However, if you sort out your Facebook posts using this method, there is one more thing to remember. Read this:
Tip: Whatever your setting was for your last post, that setting is now your default setting. If you chose Family as the list you will share your photo/note/video with, your next photo/note/video or share will be visible to only that list. Read that again if you’re not clear on it. You have to change the setting for everything you post from now on. Safer, perhaps, but kind of a pain, too.
This is important. Let’s say you post a questionable pic and share it with the wrong group. Oooops! After all of this ranting about layered privacy, we still think it’s best to have separate Facebook accounts. This isn’t crucial unless you are kind of ‘out there’, right? If you just post pics of kittens and fishing trips and weddings, stick with this method. If you have a wild night life and a staid home life, think having two or more Facebook accounts.
As always, questions and comments are welcome. Our Facebook posts are the most popular on this site. If you want us to write about something that’s bugging you, let us know in a comment.
Thanks for reading!
