Dropbox – 6 reasons why you should be using it now.


Dropbox has been around for a while and I’ve talked about it in a previous post. Basically, it’s a folder ‘in the cloud’ where you put files in order to access them from anywhere on the Internet. The files in your Dropbox are also on your computer, too. You don’t need the Internet to access them, you just need the Internet to synch the files on every computer you use.

Dropbox is free, at least the 2 gigabyte version is, and secure. Larger storage options are available at extra cost.

Here are six reasons that you should be using Dropbox if you aren’t already:

1. Security against your own mistakes. Dropbox stores old versions of your files on its servers. If you accidentally delete part of a document and then accidentally save it (don’t roll your eyes! It happens! hahaha), you can head to your online Dropbox vault and retrieve an old, pre-screwup version of your document. I keep copies of all of my writing in my Dropbox, just in case.

2. Security against prying eyes on your own computer. If you have sensitive files on the computer that you share with your family, lock your Dropbox and your files are safe. Hey, I’m not saying you do have, ahem, those kind of files but most of us do.

3. While you should be doing backups on a regular basis, using your Dropbox for your documents, essays, or family photos means that you have them saved somewhere other than on one of your computers. If the hard drives fails, at least you’ve got some of your irreplaceable files safe and sound in your Dropbox.

4. Dropbox is far more secure and easier to access than a flash drive. Sure, you can buy flash drives that are secure, encrypted, fireproof, waterproof or bomb-proof but are they loss-proof? If your Dropbox account is secured with a good password that you change at frequent intervals, it’s hard to ignore the fact that it’s better than a flashdrive for your files.

5. You can travel anywhere in the world and access Dropbox. You don’t have to carry anything with you, not even your computer. No flash drives, no discs, no nothing. Two gigs of storage for free that you can get at if you have an Internet connection.

6. Share files with people all over the world using your Dropbox. Details are in the Dropbox setup but, basically, you create a public folder and lock it with a password then send a link via email to one or more people. They can then access whatever files are in that public folder, be it a video, music files or simple documents.

If you’re not using Dropbox, get off your butt and sign up now. I’m not affiliated with Dropbox in any way. I just like the concept and couldn’t do the things I do without it.

Thanks for reading. Comments, screams, boos, cheers are welcome. Follow me on Twitter : @_BrianMahoney


Hotmail Spam – how to block an IP address


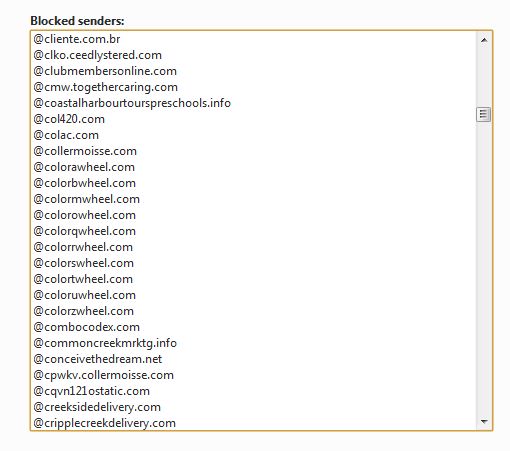
Bugged by spam in your hotmail account? Me too. I’ve written about spam in Hotmail before and described how to ban email accounts from sending spam to you. Spammers, of course, have many tricks up their sleeves and often the email address you are banning isn’t really the address that sent the email. Confusing? Here’s and example for you:

list of blocked spammers
See how there is a list of domains that are similar?

I would guess that all of the ‘color’ domains originate at the same IP address. Let’s find the IP address and block it.

1. Go to your junk mail folder. Find any piece of junk mail, right click it and choose ‘View message source’.

2. A new tab will open in your browser which will look like a bunch of gibberish. Near the top, you’ll see:

header of junk email
This is part of the email message source. Look for the IP address.

3. Find the (sender IP is xxx.xxx.xx.xx) section. The number may not always have two sets of two digits at the end but it will ALWAYS have four sets of numbers and ALWAYS have two sets of three numbers at the start. Each set will ALWAYS be separated by a period.

3. Highlight that number and copy it, being careful not to include any extra spaces at the start or at the end.

4. Go back to your junk mail folder and put the check mark beside the junk email you’ve just found. Up at the top click Sweep and then choose Block From. After a second or two, Hotmail will tell you that this email address had been blocked.

5. Click on ‘Manage blocked senders list’.  This screen will open:

blocked sender slot
Paste the IP address you have just copied into this slot.

6. Paste the IP address from the message source tab into this slot and choose ‘Add to list’.

That’s it! You’ve blocked that IP address completely. You will not receive any email at all from this address. Pat yourself on the back.

TIP: You often receive email from Hotmail, Yahoo and other domains so make sure you don’t block those IP addresses or you won’t receive any email from those domains. Block the email address but not the domain: Block him@hotmail.com but NOT @hotmail.com).

Questions or comments are welcome. Follow me on Twitter: @_BrianMahoney

Thanks for reading.


How to Enter Safe Mode – here’s an easy way to do it.


Most people know that hitting the F8 key during the boot process brings up a menu that lets you boot into Safe Mode . What’s Safe Mode? Why would you want to use it? Here’s a rundown on it.

Safe Mode is a very slimmed-down version of Windows that allows you to repair the regular version without hindrance. When your regular Windows is running, hundreds of things are going on in the background. In Safe Mode, this background noise is minimized, allowing you access to settings that are sometimes locked in other modes. Renaming system files, for instance, can’t be done any other way than using Safe Mode. Some viruses don’t allow themselves to be removed unless you are in Safe Mode so it’s a good idea to run your virus software sometimes in it. Very often Windows itself will ask you to reboot into Safe Mode. How do you get into it? Here’s my way:

1. Go to the Start button and type ‘msconfig’ into the Search slot (without the apostrophes). Like this:

msconfig in search slot
Type msconfig into the search slot

2. Hit enter and wait for a few seconds. If you have an older computer, it might take more than a few seconds.

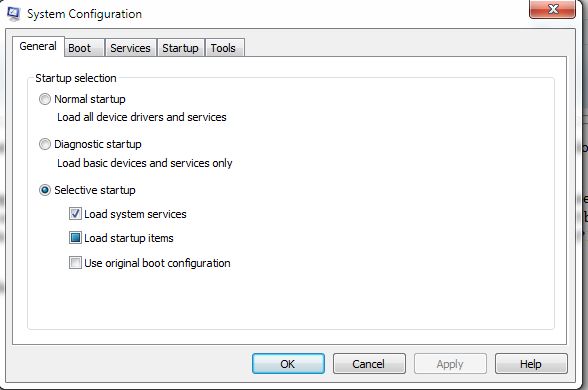
3. The msconfig menu will pop up in due time. It looks like this:

msconfig menu
Here's the very handy msconfig menu

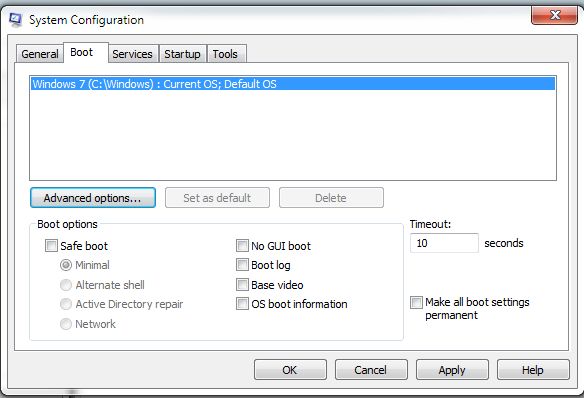
4. There are five tabs. The one we want to use right now is ‘Boot’. Click on it and you will see this:

boot tab on msconfig menu
This is the tab we want to boot into safe mode.

5. Choose the box ‘Safe Boot’ and ‘minimal’. There are other uses for this, you’ll have to use Windows Help to figure out which one you want but I use ‘minimal’. Once you can get into this menu, there are many other things you can do. I’ll write about some of them in subsequent posts.

6. Choose Apply then click OK. You can now re-start your computer and it will be in Safe Mode.

7. Do your repairs and then reverse this process to get back into the full Windows that you’re used to.

TIP: Your screen won’t be the same. This isn’t a problem. Because there are no drivers (the things that run your video settings), your screen is set to its default mode. Huge icons and a mish-mash of things on your screen are normal in Safe Mode.

Thanks for reading. Follow me on Twitter if you have questions.


Defragging explained – a free, easy way to speed up your computer


Defragmenting your computer’s hard drive should be a regular part of your maintenance routine. Is it? If it’s not, and if you don’t know what the heck defragging is, read on.

If you’re like me, but who is, you probably download pictures, music and software quite a bit. Once you’re done with whatever it is you’ve downloaded, then you delete it. Right? The more you do this, the more your hard drive gets ‘fragmented’. Let’s consider what Windows tries to do when you’re using your computer. Like any other stressed worker, Windows feels the need to hurry up and get things done. I know, sometimes it doesn’t seem that way but Windows does the best it can do.

When Windows is putting your stuff away, that is putting your files where it thinks it has room, sometimes it just throws everything everywhere. This is similar to someone getting ready for an evening out. Clothes fly here, shoes fly there and, at the end of the preparations, the person looks great but the room is a disaster. That’s what your drive is like after a few weeks or months of adding and deleting files.

Windows knows where everything is, it just takes longer to find things because of the mish-mash on the drive surface. It’s the same thing as the person’s room in the example above. Everything is still there, nothing has disappeared but things take time to find.

Defragging is simply a cleaning up process that puts all of the ‘fragments’ of the files in order, more or less. Windows sorts out the bits of files, puts them back in order and creates an empty space, known as contiguous space. Basically this is like a landing zone where Windows can start to throw stuff again when the defragging is finished. If you haven’t used a defragmenter lately or, god forbid, you have never used one before, make sure you get at it. Here’s how:

1. Before you go to bed or before you head out somewhere and know that you won’t be using your computer, turn off everything except the computer itself. Of course, leave your anti-virus on but turn off things that run in the background: chat engines, software updates and things like that.

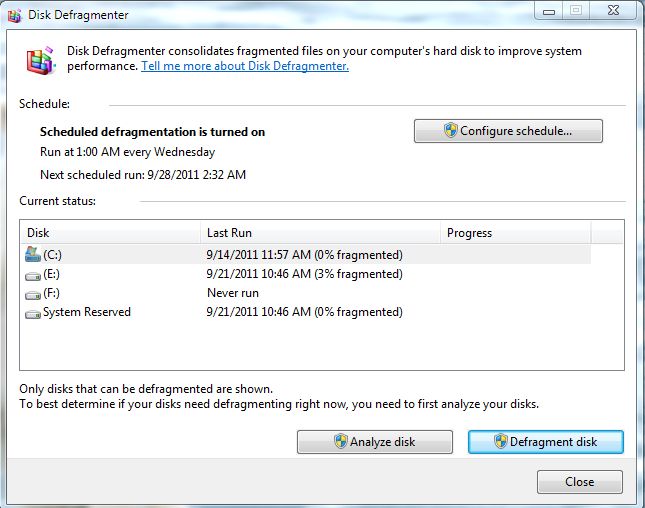
2. Go to Start, All Programs, Accessories then System Tools and choose “Disk Defragmenter”.  You’ll see a menu like this:

disk defragmenter menu
All of your drives are listed here, ready to be analyzed and defragged.

3. Click on your main drive, almost always (C:) and click on ‘Analyze disk’. Windows will then take a peek at your hard drive and see how messy it is.

4. If the drive is anything above 5% defragmented, I would suggest degragging it. I just did this on my two year old netbook that I use infrequently for file downloads. After two years of more or less daily use, the drive was 14% defragmented. After defragging, the computer was noticeably faster.

5. Once the analysis is finished, click ‘Defragment disk’ if it is sufficiently fragmented. Right now, the hard drive on this computer is 8% defragmented. However, this drive is a 2 terabyte drive and, while I probably need to defrag it, I will wait until I go to bed tonight. The larger your hard drive, the longer it takes to defrag. I can see the defragging on this drive taking several hours or more.

6. Once the defragging is done, reboot your computer and, hopefully, you’ll notice a difference in speed. There are other ways to speed up your computer so stay tuned to this spot for more help.

TIP : If you have one of the new SSD drives, you don’t have to defrag it. In fact, Windows should turn off automatic defragging as soon as it has sensed the type of drive you have. Automatic defragging can be set in your Task Schedule but, hey, who remembers to set that up?

Thanks for reading. Questions are welcome. Follow me on Twitter (top right of this page).


Fotobounce – download whole Facebook albums quickly


Want to download a whole Facebook album without having to click the download button on each pic? Fotobounce will help you do just that. For small albums the download clicking works just fine but some albums have hundreds or even a thousand or more photos. Here are the steps to downloading those Facebook albums quickly and easily. Oh, Fotobounce is free. Did I mention that?

1. Download Fotobounce here : http://fotobounce.com/  and install it. There are two versions, one is ad supported and one is not. The one that isn’t ad supported costs money, obviously. There is even a free version for Macs.

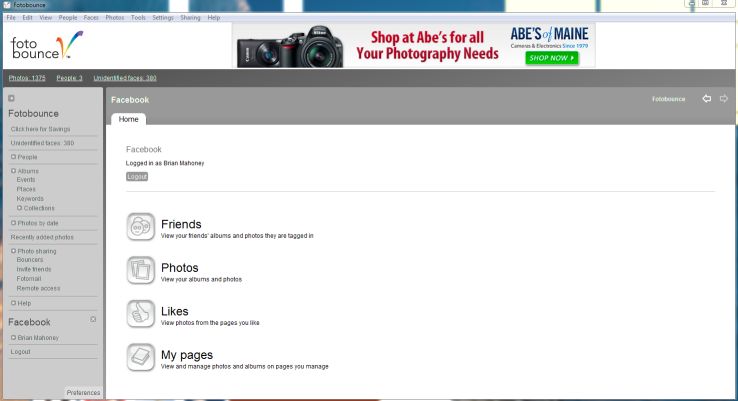
2. When Fotobounce opens, you’ll see the word Facebook down on the lower left side. Click that and sign in, Fotobounce doesn’t save your password unless you want it to. Once you are logged in, you’ll see a menu like this:

Fotobounce Facebook Menu
All of your friends are listed here, as well as your likes.

3. Fotobounce lists your friends as well as your ‘like’ pages. You can also download your own albums.

4. Click once on friends or likes, whatever you want to see next.

5. Double click on whoever you choose.

6. Right click and select ‘download’ then specify a name that will identify the downloaded album on your computer. You might want to create a new album every time. This would make it easier later on to find the albums.

7. Once you have named the album, hit enter and Fotobounce will download the complete album from Facebook. The albums are saved in your Pictures folder. On my computer, the Pictures folder wasn’t available to explore while Fotobounce was open. If you want to see the photos you have just downloaded, close Fotobounce then head to your Pictures folder (under Libraries in Wondows 7).

Tip: Keep in mind that the photos you see in Fotobounce are not high-res pics. They look crappy in the program but the ones that are saved to your computer are just fine, don’t worry.

That’s it! Quick and easy and, best of all, free. There used to be an extension for Google Chrome that did all of this for you. Facepad, unfortunately, doesn’t seem to work anymore. No matter, we now have Fotobounce. This program also does other things, check it out, but the point of this post was to let you know how it works with Facebook.

Thanks for reading. If you have comments or questions, add me on Twitter or comment here. Good luck!


a little bit of hi-tech, a little bit of common sense and a lot of fun