Email Detective – Is your email buddy really who they say they are?


These days, it’s pretty easy to pretend you’re someone else on the Internet. Here’s simple way to tell if your new email ‘friend’ is really from where they say they’re from.

Here’s the scenario. You meet someone and start to have an email relationship. This person may or may not be from where they say they’re from. Something about them makes you suspicious. How can you figure out if they are from the United States or Mongolia? I’ll use hotmail as the example but you could use any email system as long as you can find out how to view the message source.

1. Right click any email from the person in question. On the menu that comes up, click ‘view message source’, like this:
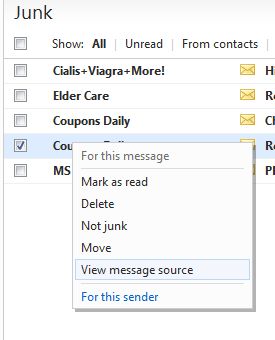
view message source
Right click the message and choose 'view message source'

2. Near the top of the message source page that opens up, look for ‘sender IP’. This IP is a series of numbers separated into four groups with a period between each group. The first two sets of numbers will be a series of three and the next two sets may or may not be made up of three numbers.  255.254.1.151 is an IP address. 255.254.231.456 is also an IP address. You’ll recognize it when you see it. Here is what the source page and the IP address looks like:

Message source with IP address highlighted

3. Drag your mouse over that number and right click the highlight. Choose to ‘copy’ it.

4. Head over to: http://ip-lookup.net/index.php

5. Right click in the ‘Lookup an IP address’ and choose paste. Click the yellow magnifying glass icon to the right of the search window.
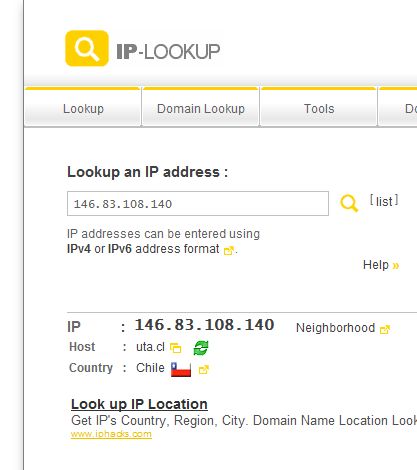
origin of the email
The IP address shows that this email is from Chile

6. The search will tell you which country the email originated from, even showing you the country’s flag.

This technique will work for any email you get and you can rely on the result most of the time. Some clever spammers can mask their emails through foreign servers but for your own personal contacts, this system will at least tell you the email’s origin.

Thanks for reading! Comments, questions are welcomed. Follow me on Twitter :  @_BrianMahoney


A cool WordPress trick – find out what theme that site is using!


This is a WordPress site, as you may have guessed, but it doesn’t look like one. Well, it doesn’t look like one to me anyway. For the last few weeks I’ve been scouting around, looking for a new theme. In case you are a WP newbie, a theme is something that takes the basic structure of WP and modifies it to look like something else. WordPress is rapidly becoming the backbone of the Internet. Hell, even news sites are using WP in the background.

If you haven’t used WordPress, give it a shot. I have lots of info on this site about installing it. Today, I’ll show you how to find out which theme a site is using. This is precisely what I did about fifteen minutes ago when I came across this site: http://photofocus.com/2011/09/30/be-careful-about-loaning-someone-your-camera/  (I’m plugging this site because I decided the theme looked good and wanted to use the same one on my site.)

Every Internet page has a ‘source code’. This page is full of code, be it HTML or java or whatever else is on the page. Initially, the code looks like gibberish but to the semi-trained eye, this code can tell you quite a few things, not the least of which is what theme this site is using for WordPress.

I’m using Google Chrome. I can view the source code for any web page simply by right clicking anywhere on the page and choosing ‘view page source’. Each browser is different, you’ll have to find out how to do this in your browser of choice.

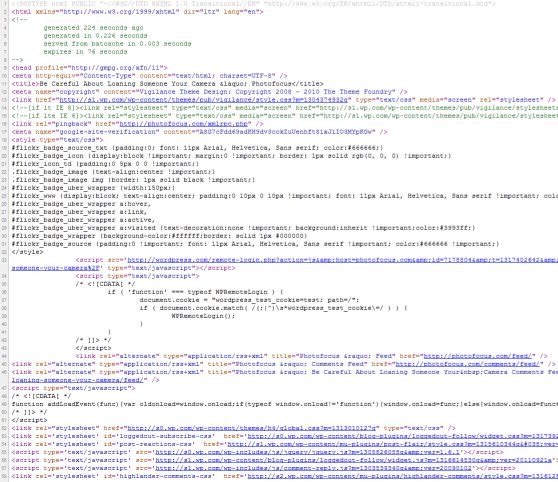
Here’s what the code for ‘photofocus.com‘ looks like :

html code for web page
These are the hieroglyphics that make up a standard web page.

Up at the top of the page, you can use Cntl/F to find this part, look for the word ‘theme’. I’ve highlighted the theme in this capture:

showing theme on page source
You can see that the theme's name is 'Vigilance'

Ah, so Vigilance is the theme! Love it. Hell, there is even a plug for the theme creater, The Theme Foundry. The rest was easy. I logged into my Admin page for this site, clicked on themes, downloaded the new one and set it up. Clean, crisp and ready to be tuned.

Thanks for reading. Follow me on Twitter : @_BrianMahoney


Speed up Windows – Part 2


In my last post we found out how to disable apps that were running in the background, potentially slowing your computer down. This time we’ll take a look at turning off a Windows feature that seems helpful but really isn’t.

Windows Search used to be speedy, light on your resources and powerful at the same time. That’s all changed. These days, Windows Search is slow, confusing and a resource hog. Here’s how to switch off the indexing that Windows uses to keep track of everything on your computer. This time-consuming indexing runs behind the scenes and slows your computer down.

1. Click Start then Computer or My Computer (depends on the version of Windows you are using.)

The computer menu
The My Computer or Computer display menu.

2. Right click your C: drive and choose Properties. You have to do this for all the drives on your computer except your DVD/CD drive. This is what you’ll see:

C drive properties menu
A pie chart showing C: drive

3. Uncheck the box beside ‘Allow files on this drive to have contents indexed in addition to file properties’.

4. Click OK then close the My Computer menu.

That’s it. Windows Search will still work but, of course, the search itself will be slower. What’s the alternative to this? Well, Google has a app named Google Desktop  that you can download and install in a matter of minutes. The Google Desktop will do the same thing as Windows Search, it has to index your files in order to find something when you want. However, this indexing is substantially faster and less intrusive than Windows Search. OK, that may be subjective but the search results are much better.

When Google Desktop searches your computer, it’s just as intuitive as the Google Internet search that we’re all used to. It even opens up using the same interface as Google Internet Search. I used to love Windows Search, I really did. It was fast and worked well. Now, I’m totally behind Google Desktop as a faster and better alternative. Try it! You’ll like it!

Thanks for reading. Comments are welcome. Follow me on Twitter : @_BrianMahoney


Speed Up Your Computer – use msconfig to trim your start list


If you’ve just bought a new computer or you’ve loaded a ton of new software on your old one, it’s most likely not running as fast as it could. Sure, you might have lots of RAM (memory) and the latest, greatest version of Windows but your computer is still being choked by software that starts when your computer starts…but doesn’t have to.

Additionally, malware or spyware can weasel its way into your system and clog it up. Do you really need all of those toolbars? Does your DVD burning software really have to run the whole time you are using your computer? Here’s how to trim the fat:

1. Click Start. In the search menu there, type in msconfig , just like that with nothing else like commas or capitals.

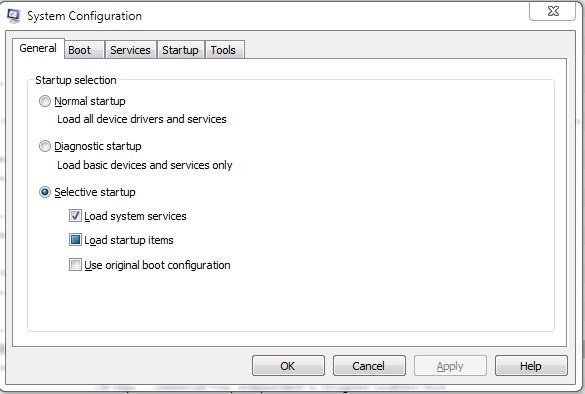
2. Wait for a bit and your System Configuration menu will pop up. It looks like this:

msconfig menu
This is the basic msconfig menu.

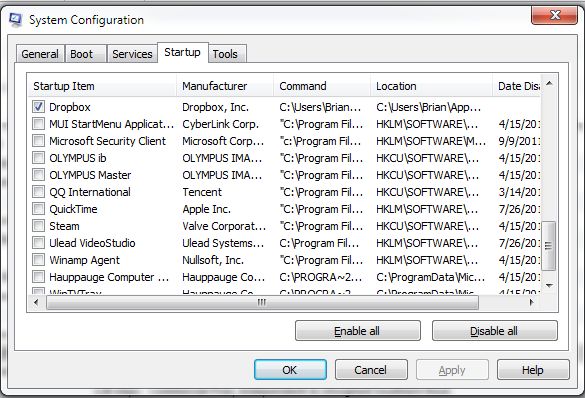
3. The tab we are interested in today is the ‘Startup’ tab, fourth from the left. Click it. This is what should see now:

msconfig startup menu
This is the msconfig startup menu.

4. This is a screen capture of my startup menu. I have scrolled down to show you the things that I have turned off. When I turn these things off, Winamp Agent for instance, this doesn’t mean that this program won’t run. All it means is that it won’t run ALL the time. I can always start the program manually, wait for a second or two, and use it. It doesn’t have to be running in the background. There are many things that you want to run all the time, your anti-virus software for instance.

5. Before you change anything here, check to see what it is that you are disabling. Your computer will still run if you turn everything off. It just won’t run very well. Your virus protection probably won’t work, your scanner won’t start, maybe your mouse won’t have all of its functions…things like that. Do your best to figure out what each one does. Most are self-explanatory but some are not. Realtek Audio Manager might seem safe to turn off but that’s my onboard sound system. I like my tunes so I can’t turn that off.

6. If you have malware or spyware, most likely it is on this list somewhere. Before you change anything here, download Malware Bytes and run it. It’s free, quick and will tell you if you have any bad stuff that is slowing down your surfing. It will get rid of anything that shouldn’t be there.

7. If you see something here that you don’t recognize, google it and see what comes up. Usually the site that tells you what it is will also tell you if you need to have it running. There are many very helpful forums around the Internet (Microsoft runs a few) that will give you an answer on anything you ask. If you decide you don’t need it to run all the time, simply uncheck the box to the left of it.

8. You can use trial and error here, too. Turn off a few things, usually near the bottom, and see if your computer runs faster. I can almost guarantee that if you’ve noticed things running slowly, this is the place to fix it. Get familiar with this little menu and you’ll have a faster, more responsive computer. It probably won’t crash as much either. Sometimes there are conflicts with programs that are running at the same time. If you stop a certain program from loading, you might find that your ‘BSODs’ (Blue Screen of Death) happen less often.

Good luck! You can’t really screw anything up here so don’t worry. You can disable everything here and then start them one by one if you want. Modern computers have lots of ram but if you’re saddled with an older one with less ram, this is a good place to start if you’re looking to speed it up.

Thanks for reading! Comments are welcome. Follow me on Twitter: @_BrianMahoney 


How to save a page full of photos instantly – no need to right click each image


If you like to share images in Facebook and other social media sites, you are probably sick of right clicking a photo in order to save it. If a web page has many images on it, it takes a lot of time to save each one individually. Here’s how you can do the same thing in two clicks.

1. Let the page load completely. Depending on the number of pictures on the page and your Internet connection speed, some pages might take a long time to load. Scroll down to the bottom of the page and make sure that all of the images are loaded.

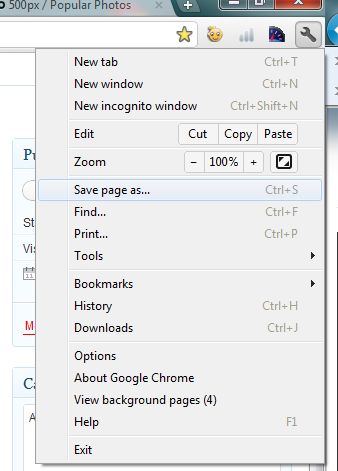
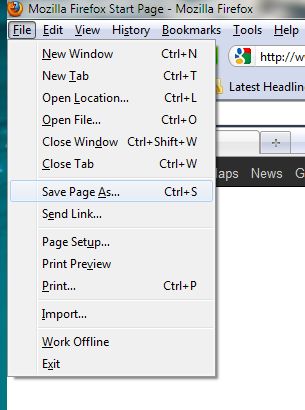
2. Depending on your browser, click somewhere up on the top right where you see a wrench (Chrome) or a gear (Explorer) or File (top left in Firefox) and choose ‘Save page as….’.  At that point, make sure you select ‘Web Page, complete’. Here are screen captures of each of the three main browsers:

the save page menu in Explorer
Top right in Explorer, click the gear and save as a complete web page.
menu in Chrome
Wrench top right, click Save Page As
Menu for Firefox
Look for File on the top left then select 'save as'

3. Your browser will then save the web page for you, usually in your Downloads folder.

4. For each web page saved, there will be two parts. One part is the basic html code that contains the skeleton of the page while the other part is a folder that contains the java, the css information and, best of all, the photos that you wanted to save in the first place.

5. Once you find the folder you can easily select the photos that you want to use or share and get rid of the rest. TIP:  The two parts of the web page are locked together in Windows. If you delete the skeleton icon (it will be the icon of whatever program is your default browser), then the folder with the pics in it will be deleted also. Make sure you do something with the photos that you want BEFORE you delete anything.

6. Unfortunately, not every web pages uses this format for their images. Some use a java app to feed the images to the page. When you save the complete page, you get the java code but not the photos. At that point you have to save the images one by one or do a screen capture and then crop the image to save the photo that you want. I’ve described this in an earlier post.

That’s it! Fast and easy and a great way to save whole web pages for future reference or sharing.

Thanks for reading! Comments are welcome. Follow me on Twitter :   @_BrianMahoney


a little bit of hi-tech, a little bit of common sense and a lot of fun