Category Archives: Cloud Storage

Protect Your Privacy with TrueCrypt – Part 2


In this post, we’ll describe how to encrypt a small folder using TrueCrypt, a free and very powerful encryption tool. You can put anything you want in this folder, of course, but the point of this exercise is to have something that is extremely safe from prying eyes that will allow you to keep your passwords or online account numbers private. Once you create this folder, you can put text files, documents…basically whatever you want to, as long as the total size is not larger than the folder you create. We’ll explain that later.

1. Download and install Truecrypt. You can install Truecrypt or run it from a folder. You could even keep the Truecrypt folder inside your Dropbox folder in order to make it available on every computer that you access Dropbox with.

2. Run Truecrypt. Here is the window that comes up at the start:
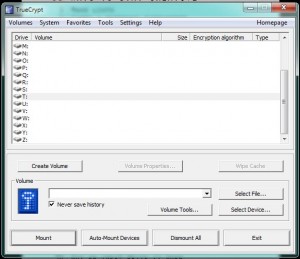
Photo of TrueCrypt menu
Click on the Create Volume button or click on Volumes then Create New Volume.

A volume is something that only Truecrypt can open. As you will notice later on, there is no three letter file designation to the folder/file/volume that you create. No other program will recognize it, not Windows, not Notepad, only Truecrypt.


3. 
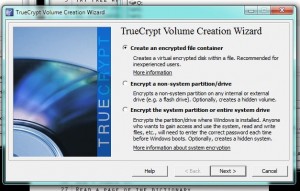
Menu for TrueCrypt
For the next few screens, you’ll just accept the default settings. Here, choose ‘Create an encrypted file container’ then click Next.


4. 

Menu for TrueCrypt  3
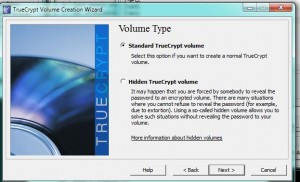
Click Next to start creating a Standard TrueCrypt volume.


5. 

Menu for TrueCrypt
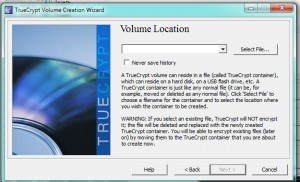
This menu looks complicated but it’s not. Click on the Select File and the standard Windows dialogue will open up.


6. 

Menu for TrueCrypt
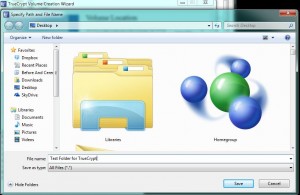
You do not actually choose a folder, you are making one. Type in a name, we’ve used Test Folder for TrueCrypt.

Don’t get confused here. You’re not choosing a file or folder, you are really creating a volume somewhere you are on your computer. We chose our Desktop but you’re on your own here. All you do in this menu is simply type in a name, make up anything you want. You can even use a three letter file name to make this Truecrypt volume look like another kind of file. The default program for that type of file, .avi or .mp3 for instance, will NOT be able to open it, remember? Only Truecrypt can open this file.


7. 
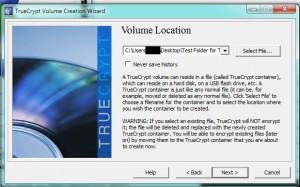
Photo of TrueCrypt menu
This menu just confirms the file location. Click Next. 


8. 

Photo of TrueCrypt  menu.
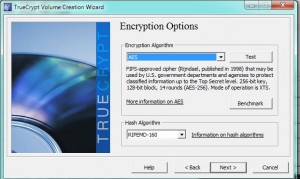
Just click Next here. The default AES algorithm is fine.


9. 

Photo of TrueCrypt
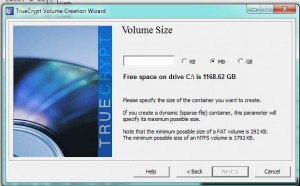
You’re on your own here but we chose a 1 MB file, lots of room for our password text file.


10. 

Photo of TrueCrypt  menu
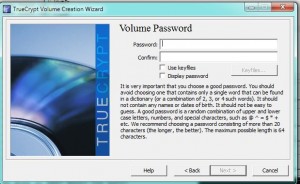
Choose your password. If you make it less than 20 characters, Truecrypt will give you a nudge. Whatever you do, don’t forget the password you use. You can’t open this volume without it, no matter what you do.


11. 

Photo of TrueCrypt menu.
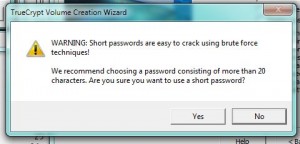
Your password is too short! Don’t worry about this. You’re not protecting state secrets, right? If you can remember a 20 digit password, however, use one.


12. 

Photo of TrueCrypt menu
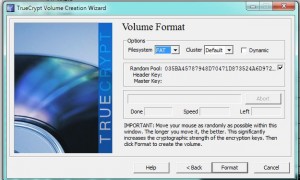
We would normally choose NTFS for the filesytem but our volume is only 1 MB so NTFS isn’t available. Move your mouse over this screen in a random order to create a very strong encryption.

Move your mouse all over this menu for a minute or two then click Format. Truecrypt will then format the volume that you just made, creating, more or less, a separate drive on your computer. That drive is controlled by Truecrypt, nothing else. Windows doesn’t know anything about it, other than it takes up space. It cannot open the volume and will not even suggest a program that might open it.


13. 
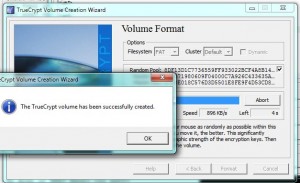
Photo of TrueCrypt menu.
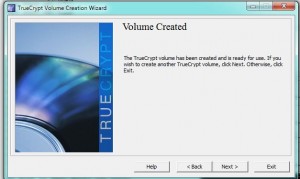
Success! Click OK and you’re done.


14. 

Photo of TrueCrypt menu
Click Exit to end this part of the lesson.


That’s it for now. This post is long enough but we’ve accomplished a lot. You now know how to create a locked volume that can be opened only by you. Even if someone gets access to your computer or your cloud folder, they will not be able to see what is inside this folder. Cool huh?

Next time, we’ll show you how to use this volume. Basically, you just mount it using your password, open it then drop files into it and then dismount it. Once you dismount it, it is locked again.

Thanks for reading!

Check out our Facebook page. Like and follow our updates. Here’s the link:  https://www.facebook.com/ComputersMadeSimple


How do I back up my computer? Part 3


Once you have figured out where all of your stuff is, including documents, photos and videos, it’s time to sort it all out and back it up. Sure, you could dump everything onto one or more DVDs but it makes more sense to organize things a bit beforehand. In this case, photos are more important to arrange than anything else because the files names are arbitrary unless you rename every one. Once you have the various folders in one place, you can sort them out by date, naming the separate folders by when you took the photos or by subject, if all of the photos in a folder can be identified by a few words.

Videos can be named or arranged by date but taking a bit of time now to rename each avi file will make it easier to find what you are looking for at some point down the road. If you have recorded any HDTV shows that you want to save, make sure you convert them to XVID files using Format Factory or  Handbrake to save storage room. Both programs do a fine job of transferring recorded video files to the DIVX or XVID format. The file choice is optional, of course. Use the type of file that you’ve had experience with and works best with your other hardware.

We should mention now that some programs save their files in places other than My Documents. CamStudio, for instance, saves its avi files in the CamStudio main folder. There is a link to those files in My Documents but that is only a shortcut. The files themselves are kept somewhere else. This also applies to Audacity. When you have been working on an audio file in Audacity and you haven’t completed your work, it’s a good idea to back up all of the Audacity files BEFORE you lose them in a hardware crash. Once you export your files in Audacity, you can choose the format and, if you are satisfied with your efforts, you can get rid of the working files. But if you are still working on the files, save them. You’ll find them in the main Audacity folder, not in My Documents.

If you’ve been diligent about telling each program where you want it to save your work, your job is much easier when it comes to backing up your computer.

What’s next? Well, we use Burnaware to make backup DVDs. Burnaware is fast, stable and free. Since DVDs are relatively cheap, we can get 100 for less than $20, you might even want to make backups of backups for important files. Keep each backup in a separate place, maybe even distributing family memories to various relatives. Mark the disks with a Sharpie and put them in a protective package which is also clearly marked with the date and some descriptive words.

Lastly, think about backing up any material that’s ‘in the cloud’. Dropbox is about as secure as you can get but who knows what their financial status is? Backup the Dropbox folder on your computer whenever you back up everything else. That backup isn’t dynamic, of course, so be sure to only use it as a backup in case of emergency. Don’t try to integrate the old files with your current Dropbox files at some date later on. Saving old files over newer files never works.

We can’t hold your hand all the way through but we’re here to help. If you have questions, ask us. Comments are welcome, yays or nays, it doesn’t matter.

Thanks for reading!

Do you trust ‘The Cloud’?


With the death of the MagaUpload site, the keyword these days seems to be backup… your own data. I’ve written three posts about how to do that, the first one is HERE, but the point of this post is about security in the cloud, not losing your data. There is ample information online to prevent data loss. If you manage to lose a month’s worth of work, it’s your fault not your computer’s or the loss of some cloud storage site.

The point of this post is cloud security. Here is an example of the what I mean. A couple of years ago, I was sharing some photos with a friend in another country. At that time I was using hotmail and the photo-sharing section of my hotmail account. I had the privacy settings such that only my friend and I could see the photos. A couple of the photos were adult pics, harmless but still of an adult nature. Since my friend and I were the only people who could see them, I thought they were safe from prying eyes. Turns out they weren’t. Hotmail/MSN/Microsoft or whoever, sent me an email complaining about the type of photos I was storing there and requested me to delete them. They were deleted, of course, but that single incident made me very aware of the complete lack of security in the cloud.

A site such as Dropbox tells its users that they encrypt everything that is stored there. I assume that other sites make the same assertions. But do they? How do you know? With the United States in the throes of panic over terror and its associated threat, how do you know that the cloud storage companies are not government backed? The U.S. government, for one and I’m sure there are others, reads every email or text message you send. They also listen in on your cell phone calls and, probably, your landline calls also. If you don’t think they do, check out this PBS ink: http://www.pbs.org/wgbh/nova/military/nsa-police.html and see what you think. America’s Internet connections are split in two. One line is for the public, the other is for the government. Trust me, you’re being watched.

If you accept that private citizens are the subject of government spying, and they are, what’s to be done? Well, if you encrypt your own data before you plunk it up on the cloud, you should be fine. If you can figure out the GNU Privacy software, available here: http://freecode.com/projects/gnupg , then you’re well on your way to keeping your personal data private.  Another, easier to use bit of software is Truecrypt which locks up files, folders and complete disks in an extremely secure, password-locked vault.

Look at it this way, if Microsoft knew that I had a few adult photos in a folder on hotmail that was only accessible to myself and one friend, then it follows that none of the cloud storage facilities are safe from prying eyes, no matter what the companies tell us.

As far as losing your data due to a government takeover of a site, there is no excuse for that, as far as I am concerned. If you are too lazy to burn a few DVDs, tough luck. Even backing up your data to an external drive isn’t safe. Learn how to burn DVDs and back up your private data, at least every month if not every couple of weeks. You’ve been warned!

This site has lots of information on backups, security and other Windows-related computer problems and solutions. Make use of it and keep your data safe!

Thanks for reading!