Category Archives: Facebook Secrets

How to Stalk on Facebook and Google +

Warning: This post is NOT a guide to stalking. It’s a warning to everyone who doesn’t take the time to adjust their privacy settings. Facebook and Google +, thanks to their interest in making a buck for their shareholders, don’t care about your privacy. The more you reveal, the more they know. Both can adjust their ads specifically to your particular demographic, your pattern if you will, hoping you will buy something from one of those ads. If you click on something, they know about it and they remember it. As you travel around the Internet with your accounts open, they will know everywhere you go and, to a certain extent, everything you do. You’ve been warned.

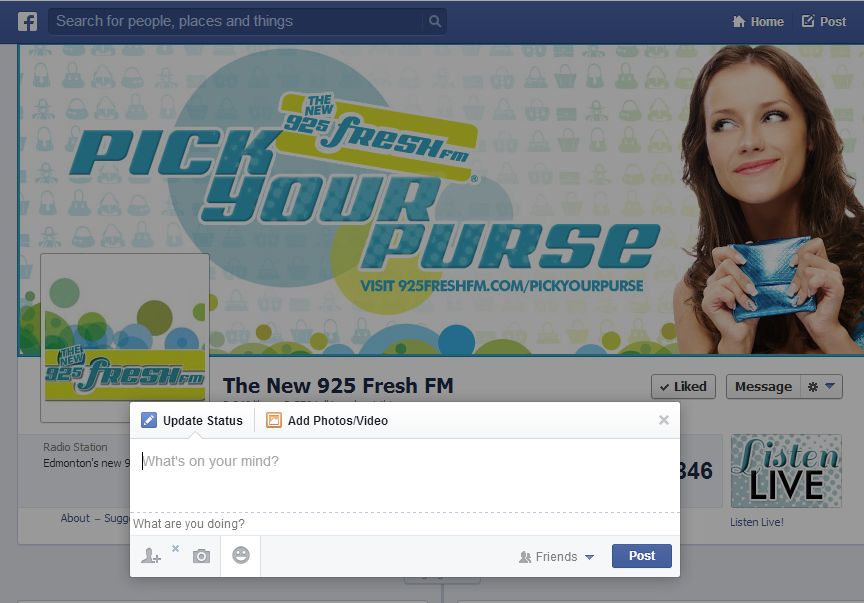
Here is a step by step, do-it-yourself, stalking manual.

1. Pick a magazine, any magazine. Better yet, pick a magazine that appeals to the type of person you are looking for. Here are a couple of examples, straight from the Internet:

Photo of Stalking 1
This is from Google + but the idea is the same.


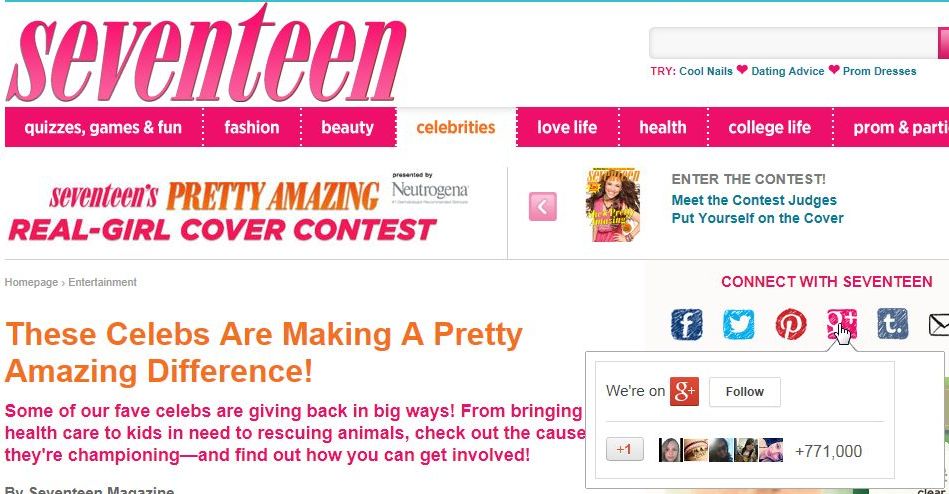
In the above example from Seventeen Magazine, hovering over the Google + icon brings up the ‘Follow’ button. Clicking on any profile photo brings up their Google + profile. Believe it or not, and this is the scary part, Google + seems worse than Facebook on this issue because we do not have a Google + account yet we were still able to view the profiles. It gets worse. On one of the profiles we clicked on, we were able to see two important maps. One was of the school that the person attended, the other was a map to their home, complete with street name and number,  believe it or not.

Here’s another:

Photo of Stalking 2
This is a Facebook facepile.


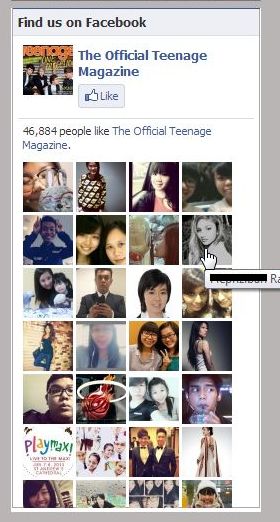
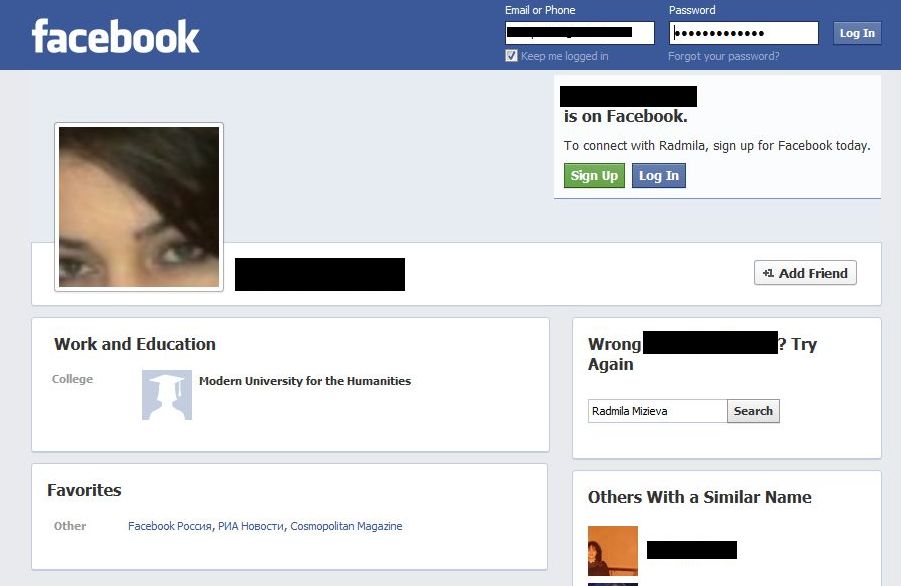
We weren’t able to find a facepile on a North American magazine site in time for this post but a magazine from Singapore had one. If you hover your mouse over a photo, the person’s name pops up. If you click on any profile photo, you are taken to that person’s Facebook page. Depending on your privacy settings, a complete stranger, even one who does not have a Facebook account, can see everything that you haven’t bothered to hide. Here is an example of someone who didn’t hide very much at all. (We were able to see this without being logged into Facebook):

Photo of Stalking 3
It’s all there, isn’t it?


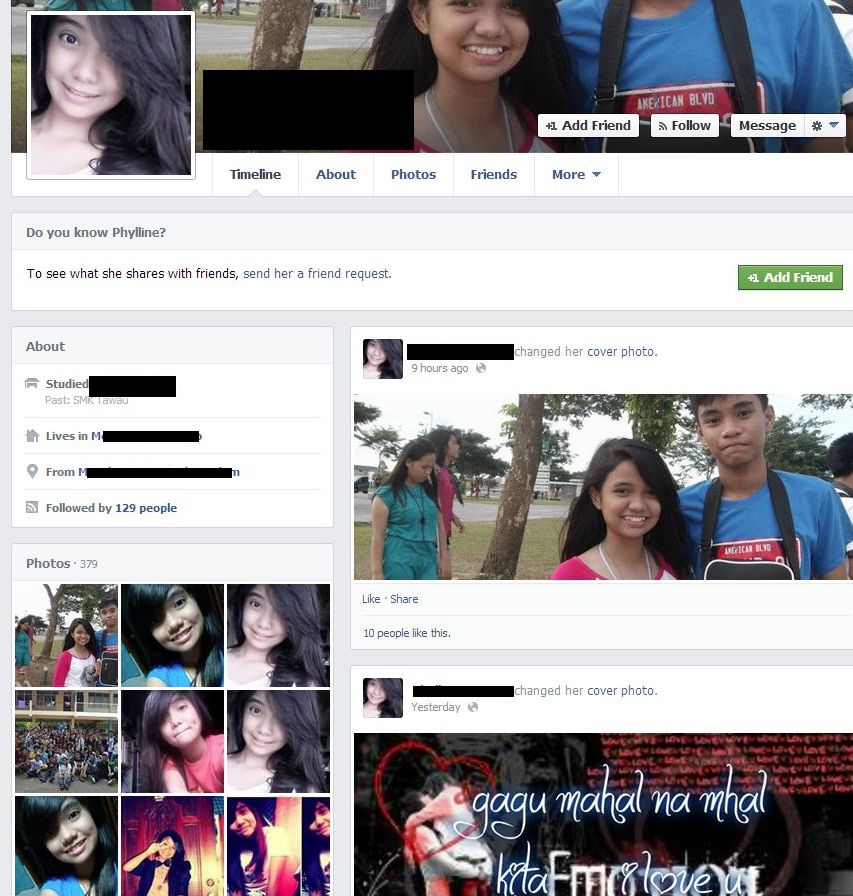
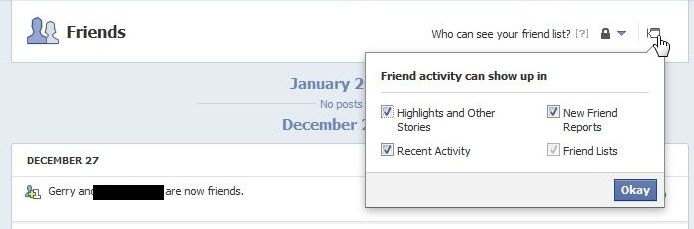
Her school, her city, lots of photos…it’s all here. Remember, this information is available to anyone,whether they have a Facebook account or not, simply by clicking on a tiny profile photo.  Here’s what we think a stranger should see when they click on a link in a facepile:


Photo of Stalking 4
Still some information but not much.


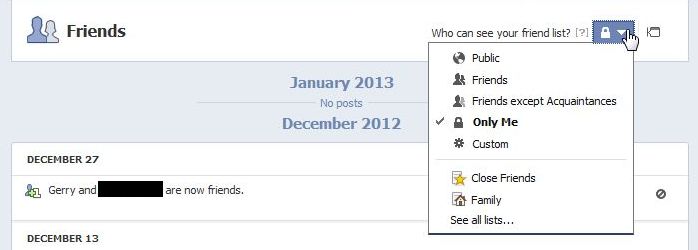
In the example above, we can see this person’s school but not much else, other than her name. We are not signed into Facebook, by the way. This person’s profile photo is good, too. It does not reveal too much about the person. Think about your profile photo. What does it show about you? What information are you revealing to the public?

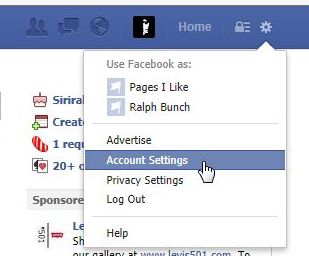
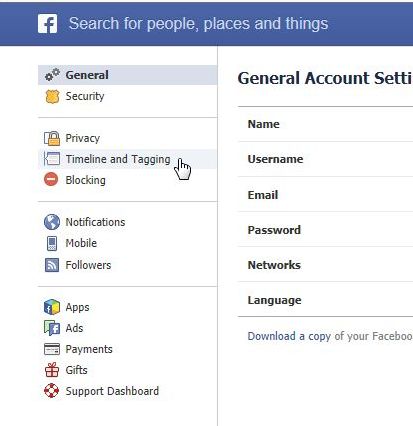
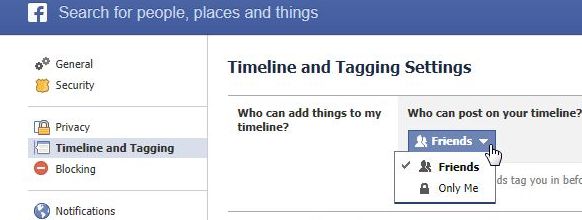
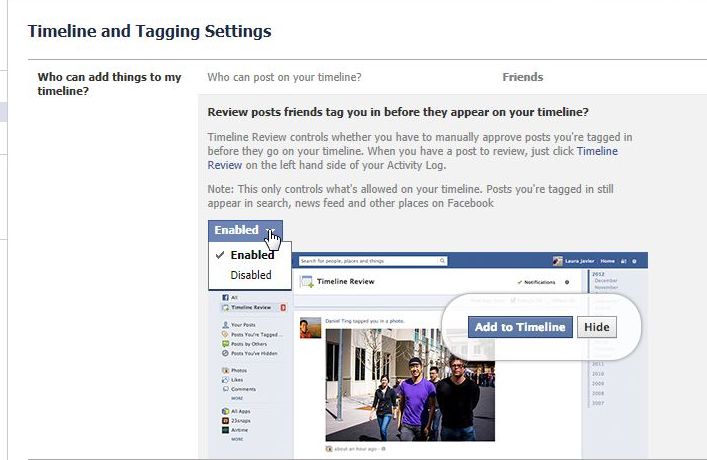
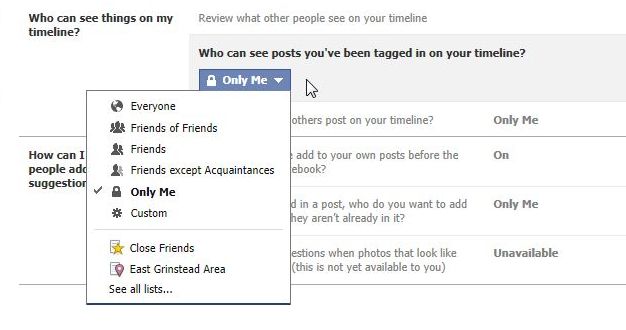
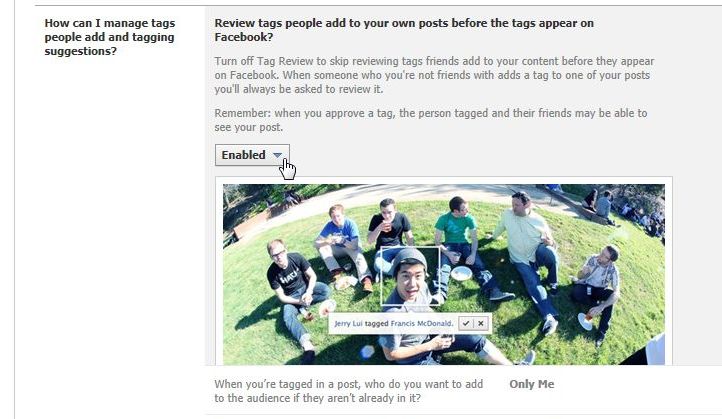
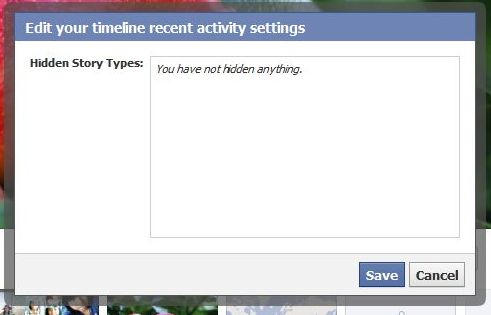
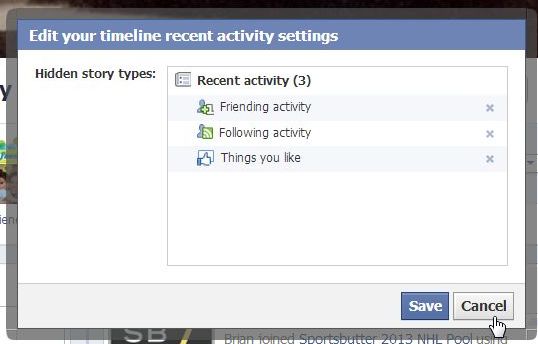
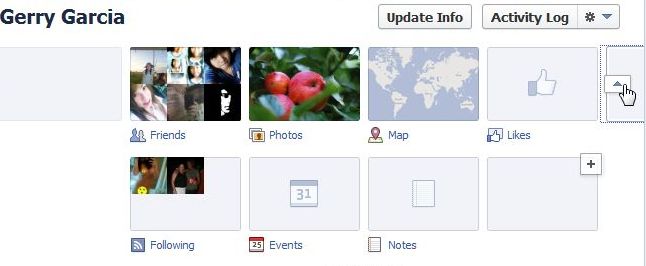
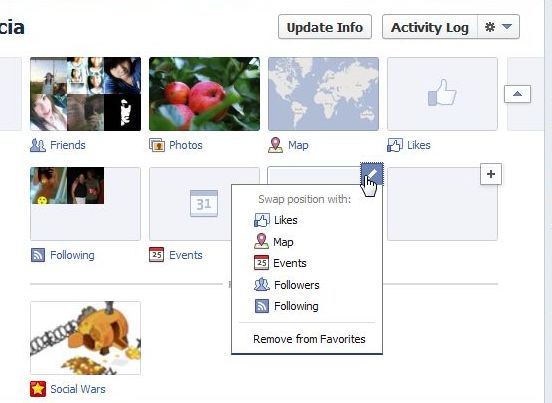
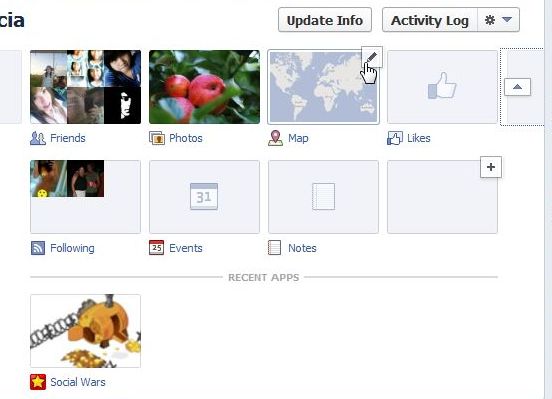
We don’t use Google + (we are in the process of figuring it out) so we can’t advise you on your privacy settings yet. With Facebook, remember that you can hide everything except your profile photo, your timeline covers and any mutual friends you have with the person who is viewing your profile, provided that you have any and that the person is signed into Facebook. There is no need to make any information public, it’s not a requirement. Choose your own level of privacy, one that you feel is secure and, most important, make sure your young friends and relatives have their privacy set to reveal the absolute minimum.

We hope this post has made you think about what information you are putting out for the world to see. What information are your children sharing with the world? What about your friends who are less comfortable with computers and/or social networking? Maybe you can refer them to us or, better yet, help them lock down their privacy using our guides.

Thanks for reading!


Navigating the New Facebook

We got wind of the latest Facebook update earlier this week. After living with it since then, we’re still semi-semi on it. It has some good features but it still seems very busy and cramped. Today’s post will deal with the layout and navigation plus one cool new feature that we’ve discovered.

1. How do you feel? This is silly but Facebook has added a set of smilies to your status updates. Here’s where you start:

Photo of How do you feel menu.
Now you can share your REAL feelings! Or simply tell everyone that you’re having a coffee.

Facebook seems pretty happy about their new gimmick, don’t they? Once you get back to your normal status window, clicking on the grey smiley will bring up this:

Photo of mood selection menu.
A wealth of selections to fine tune your mood.


Once you  wend your way through these selections and make a choice, then post your status update, this is what your friends see. Clicking on the mood or action you’ve chosen brings up the chance to Like whatever it is that you’re doing, could be drinking coffee or listening to the Beatles.

Photo of Happy menu 3
How many of your friends like coffee? Facebook will tell you.


As you can see, this is just another way for Facebook to get to know you and your friends. Why do they care? Simply because they want to tune their ads to your well-defined demographic. Every time you click like or add a friend or do just about anything on Facebook, your Facebook profile is tuned to a higher level. Think about it. Facebook probably knows you better than your SO! (Significant Other)

2. Post from anywhere: A big part of the new Facebook design isn’t a gimmick, thank goodness. The best part of the change is the ability to post from anywhere on Facebook. Previously, you had to go back to your main Facebook page, your homepage in other words,  or your Timeline to post a status update or add a photo or video. Now, you can post from anywhere in Facebook, even if you’re on another person’s page.

Photo of Post Menu
This is what you see when you are on your own Facebook page.


See the new button? It’s the word Post up on the top right. Let’s say you are on another Facebook page, a radio station’s page for example. Here’s what happens:

Photo of Post Menu
The new status or post menu pop-out.


It doesn’t matter where you are on Facebook, you don’t have to go home to post. Click the word Post and say or share what you will, no problem. We think this is the best part of the new Facebook design, don’t you?

If you have comments or questions on anything related to just about anything, ask us. We’re always looking for new challenges. Better yet, why not Like us on Facebook? Here’s the link:

Computers Made Simple on Facebook

Thanks for reading!


Facebook – control posts on your timeline

Have you ever something posted on your Facebook Timeline that wasn’t appropriate? Something that upset you? Have you recently been tagged in some crazy photo or video? Here’s how to stop things like this from ruining your day.

1. Head over to your Account Settings:

Click on the gear (settings) then Account Settings.


2. Click on Timeline and Tagging:

Photo of Privacy 2
Timeline and Tagging.


3. Click on the word Edit up on the right. Start at the top and work down.

Photo of Privacy     3
Click on Edit.


4. Who can add things to my Timeline? You can choose to block all of your friends. Unfortunately, you can’t block only some of your friends. It’s all or nothing.

Photo of Privacy    4
Tough decision here, right?


5. If you choose to allow your friends to post on your Facebook Timeline, make sure you also choose to review those posts:

Photo of Privacy    5
Review posts before they show up on your Timeline. Read the warning note, though.


TIP: Make sure you read the note in the photo above, the one that says that nothing is private on Facebook. Quote: Note: This only controls what’s allowed on your timeline. Posts you’re tagged in still appear in search, news feed and other places on Facebook.

6. Limit visibility of posts that you’ve been tagged in:

Photo of Privacy    6
Set this to ‘Only Me’. No one else has to see the posts, right?


7. Continue on down the list and edit each one so that they match your own level of security and privacy. Here is an important one:

Photo of Privacy    7
Make sure you review tags on your own posts BEFORE they show up on your Timeline.


We hope this tour of your Timeline privacy settings helps you keep unwanted posts and tags off your Facebook page. Remember that you can block someone who posts troublesome things on your Timeline. Choose your friends wisely, right?

Thanks for reading!

Follow us on Facebook. Just click Like and you’ll get all our updates and tech tips as soon as we post them: Computers Made Simple on Facebook


Download Facebook Albums

Please Note: Since we wrote this review, ‘Download FB Album mod’ has changed its settings and asks form more permissions than we feel is safe. Here are the permissions it is asking for now: 

Photo of FB Album permissions.
Too many permission for a Facebook downloading app.

There is no reason why this extension has to access ALL of your data on websites, that would include passwords, by the way. Nor is there any reason for it to access your other tabs or browsing activity. It seems that the creators are involved in data mining, selling your information to advertisers, etc. Beware! We’re going back to Fotobounce. 

If you want to download whole photo albums on Facebook, you don’t have too many choices. The old ways, Fotobounce and others, only work sometimes, if at all now. We’ve discovered a brand new system that will download whole albums quickly and easily. Yay us! Here’s the scoop:

1. You have to be using Google Chrome as a browser. We suggest Chrome should be your default browser anyway so go to Google and download it, it you aren’t using it now.

TIP: When you are downloading software, make sure you go to the source. We’ve noticed that fake Chrome sites exist. We can only assume that these sites will install a modified version of Chrome, probably filled with some kind of malware. Go to google.com and take the link from there.

2. Once Chrome is installed, head over to the Google Web Store, everything is free so don’t worry about the word ‘store’. What you’re going to do is install an extension, a little bit of software that is added to Chrome which will download full Facebook photo albums. Here’s the link: Google Web Store

3. What you’re looking for is: Download FB Album Mod. This is an ‘extension’, not an app. Here are a couple of links to the download page for this extension:

https://chrome.google.com/webstore/detail/download-fb-album-mod/cgjnhhjpfcdhbhlcmmjppicjmgfkppok?hl=en

https://chrome.google.com/webstore/search-extensions/Download%20FB%20Album%20mod?hl=en

4. Download and install the mod. You don’t have to reboot your computer or even restart Chrome.

5. Now for the fun part. Head over to Facebook and find an album that you want to save. Here is the process in pictures:

Photo of Facebook Album  1
Up on the top right of your URL bar, look for this symbol. Click it.

TIP: Please note that this icon only appears when you are on a Facebook page.

6. After you click the icon, this menu appears:

Photo of Facebook Album  2
Choose Normal. You can also choose to download the captions with each photo.


7. A new tab opens when you click Normal. The album will load on that page and a message will be shown at  the top. It flashes on and off so be prepared to read it. Here it is:

Photo of Facebook Album  3
Use the CTRL + s keys to save the album to your computer.


8. The save menu comes up next. It will give the name of the album and save it as an htm file, in other words as a complete web page. Click OK to save the file.

Saved as a Web Page, an htm file.

9. Once the file is saved, and for a large album this could take a while, head over to your download folder. The photos will be in a folder, as opposed to a single set of files, so look for the folder icon with the correct name.

Photo of Facebook Album  5
Look for the folder icon with the name of the album you just saved.


10. Double click on the folder. Inside that folder will be all of the photos in the album. You’re done!

Photo of Facebook Album  7
Here are the photos in this album.


As of February 5th, 2013, this system works. None of the others ways that we have written about in previous posts seem to work now. Why? Probably because of new privacy settings that Facebook is using. Fotobounce will still work with some albums but it’s much more difficult to use and it still stops working on large albums. This system, using Download FB Album Mod, works perfectly. Let us know if you have a problem with it.

Thanks for reading

NOTE: For this post we used https://www.facebook.com/Riddlesmessywardrobe  page. Riddle is one of our favorite cosplay stars. Stop by and like her page.


How to Hide Anything on Facebook

It seems we’ve been writing about Facebook for longer than Facebook has been around. Judging from the popularity of our “Hiding Likes on Facebook” posts, everyone has something to hide. In this post, which will be a long one, all we’re going to do is post screen captures of as many Facebook menus as we can find. In some photos you won’t see a menu but in the next one, we’ll show you where to find it.

Before we begin, there are two caveats here. First, while we’ll show you how to hide almost everything on Facebook, some of those things may pop up in other areas. Consider the fact that liking a page is different from showing that like later on in a series of your ‘likes’. Liking and showing likes are two different things. For this reason, we suggest that you don’t do something on Facebook that would cause you grief later on in your life or your career.

Secondly, there are two things that you cannot hide on Facebook. First, photos that you post cannot be completely hidden. You can selectively choose who can see the photo but you can’t completely hide it. Think about it. Facebook employees can see the photo, right? Even if the privacy settings for that photo are set to ‘Only Me’, someone at Facebook can see it.

Lastly, you cannot hide mutual friends from anyone. Yes, you can partially hide your friend list but you can’t hide the fact that you have a mutual friend with someone. If being friends with someone will cause problems in your life, especially if that person is a friend of a friend, you can’t hide it. We can see many situations where this would cause a problem so keep this in mind when you’re ‘friending’ someone.

TIP: Why did we say that you could partially hide your friend list? Read this post and you will see why. You can set your friend list’s privacy to ‘Only Me’ but that won’t prevent Facebook from suggesting every one of your friends to someone else. Here’s the link to the post: Stalking Friends on Facebook

Here we go with the screen caps:

Photo of HIde 1
Most things that you’ve done are shown on your Activity Log, available from your Timeline.


Photo of HIde 2
On the right side of almost all items shown, there is an edit icon which allows you to hide that activity from your Timeline.


TIP: Remember that you can’t hide comments that you make on something that you did not post. Keep that in mind. If you like a photo that someone else posted, you can’t hide it. Same thing for a comment on a photo. You can’t hide that either. All of those things are controlled by the privacy settings that the other person used. Make sure you understand this before you go randomly clicking ‘Like’ on photos or making comments on things posted by other people.

Photo of HIde 3
On your Timeline, you can find the edit icon up on the top right of most boxes.


Photo of HIde 4
You can check on story types that you have hidden. Seems we haven’t hidden any…yet.


Photo of HIde 5
Here, we’ve hidden three types of activity.


Photo of HIde 6
Click the arrow to open up all the boxes in your Favourites. Only then can you edit them.


Photo of HIde 7
You can swap positions or remove the box from your Favorites.


Photo of HIde 8
If the box menu isn’t open, you can’t edit any of the Favorite boxes. Click the arrow just to the right of the 4.


Photo of HIde 9
See? Now the Places or Maps box can be edited.


Photo of HIde 10
You can check what posts you’ve hidden by looking at your Activity Log and choosing the correct link on the left.


Photo of HIde 11
Here is the full list of activities that you can check by clicking More down near the bottom (shown as Less here).


Photo of HIde 12
Hide all of your game posts here. Click the Stop Publishing Activity. Please do this for your friends!


Photo of Hide 13
Hide all Friending activity here.


Photo of  Hide 14
Here’s where you can hide your friend list from everyone or from some people, Choose ‘Custom’ to select specific people or lists.


This has been a long post, we know that, but we think you’ll be able to find most of what you’re looking for here. If not, let us know! We love questions.

Thanks for reading! Follow us on Facebook. Just click Like and you’ll get our updates and tech tips as soon as we post them: Computers Made Simple on Facebook