All posts by Computers Made Simple

Avi to DVD

We had some AVI files that we’d recorded over the last few months. While they play well on a computer, we wanted to share them with family members during the upcoming holiday season. As is the case in most families, not all of our relatives are experienced computer users. What we needed was a way to convert those AVI files into a format that would allow them to be played on a standalone DVD player.

We searched the Internet for different options, with free being the key word. In the past we had used PowerDVD but none of our current computers came with that bit of software. Sure, there are several professional solutions but we were looking for something that didn’t cost money. We finally found that solution. As it turns out, it was right under our nose. Here’s how to make a DVD from an avi file.

Tip: This process works with Windows 7. You may be able to download the software from Microsoft but, at this point, Windows DVD Maker is only available in some versions of Windows 7.

1. Get your AVI files together. Total time for a DVD is about 150 minutes so you can make chapters with several different AVI files as long as the total time doesn’t exceed 150 minutes.

2. Insert a blank writeable DVD into your CD/DVD burner. The following menu should pop up:
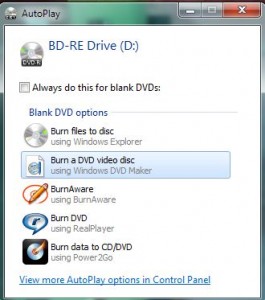
Photo of DVD Menu
Choose ‘Burn a DVD video disk’.

A DVD video disc is one that will play on a DVD player or on a computer. It is different from a data DVD, one that may contain AVI files plus documents, etc. , because it is presented in the same style as a DVD that you rent or buy from a video store. There will be a splash screen when the DVD opens,  the same as what you see when you play a Hollywood or Bollywood blockbuster video disc.

2. Here’s the next screen that you will see:
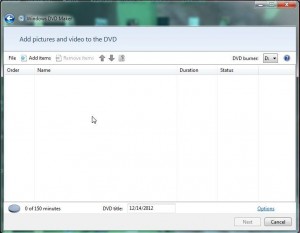
Photo of DVD menu 2
Drag and drop your AVI files into this window.

You can either add items using the ‘Add items’ button or drag and drop files into this window. Take note of the little icon on the bottom left, the grey pie with ‘0 of 150 minutes’ beside it. As you add AVIs, this icon will show how many minutes are left out of the initial 150 minutes. If you go over the limit, a section of the pie will be in red.

Also, see where it says ‘DVD title’ with the date? Click in that area to make a name for your DVD. You can do it later but it’s easier to do it now.

3. Once you’ve added the AVI files, click Next. This menu pops up:
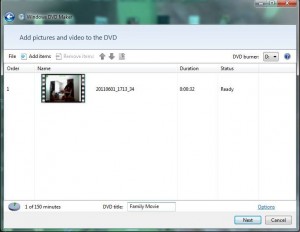
Photo of DVD  menu 4
The AVI icon shows as a strip of film. Cool huh?

We’re using a 32 second film just to show you how this is done but you will see the timing of every AVI file you add to the previous menu. There is a status indicator and the pie chart shows a whole lot of open space. Your menu will be different. Note where we have typed ‘Family Movie’ . Click Next and this menu pops up:
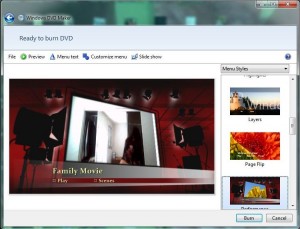
Photo of DVD 5
Here is where you choose the look of your splash screen.


Click on the menu styles on the right and choose which one looks good to you. There are other choices here, too. You can preview how things will look or customize the menu or create a slide show. We’ll deal with the last choice in another post.

Make sure you have changed the title. If you forgot, click on ‘Menu text’ and this menu will allow you to change the title and a few other things:
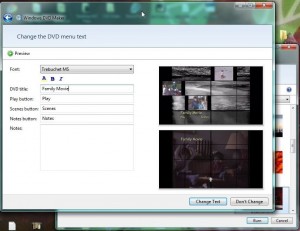
 

You can change the title here, add notes, change the names of the buttons, etc.


4. Once you’re ready to go, click on the Burn button and Windows DVD Maker will go to work and, depending on the speed of your computer, will shoot out a completed DVD in a matter of minutes. For us, on a relatively fast computer, the process took anywhere from 5 to 20 minutes. The time seemed dependent on the source material. We made DVDs from different types of files, not just AVIs. You can experiment with which files work and which don’t. We had an OGV file that stalled the program but there aren’t many OGV files around these days.


We love free! Here is a very cool bit of software that’s tucked inside of some versions of Windows 7 and we were lucky enough to find it. We were amazed at how easy and intuitive the whole process was and we were just as amazed at how good the final product looks. With this free app, you can create very professional results in just a few minutes.

Thanks for reading! If you have questions or comments, feel free to fill out the form below and we’ll respond as soon as we can.



Keyboard Shortcuts

We think that everyone knows about cutting and pasting bits of text or parts of photos from one place to another in Windows or OS X. This kind of shortcut has been around since the age of Wordperfect or even Wordstar. The big difference between then and now? Well, in the old days of word processing (remember when they called it that?) there was no mouse, only a keyboard. These days we’ve become dependent on the mouse and we may have forgotten all about keyboard shortcuts. Here are some of our favourites:

TIP: Many of these shortcuts assume that you have highlighted some text or a portion of the screen or a photo. How do you do that? Click your mouse once where you want to start highlighting then hold the button down and drag your cursor across the screen. As you drag the mouse/cursor, the part of the screen that you choose will turn blue. In a photo program, there will be a square or rectangular shape (usually) drawn across the scree. Once you have a section highlighted, you can let go of the mouse button and use the keyboard shortcuts to perform an action on the highlighted portion.

1. CTRL + c (press the CTRL key and the c key at the same time. This same ‘two key’ process applies to all the shortcuts here) – This copies the highlighted item and puts in up into your computer’s memory (Windows calls it a clipboard). Whatever you put up into that memory is there until you copy or cut something else or until you shut your computer off.

2. CTRL + V – This pastes whatever you copied before into whatever window or app you are using now.

Tip: Remember what we said above about whatever you put into memory is there until you put something else in it? Well, you can make multiple pastes from the same copy just as easily as you make one. If you’re describing a series of photos in an album in Facebook, for example, you can type out the description then copy it once and paste it many times below or beside each picture.

3. CTRL + x – This ‘cuts’ the highlighted item and puts it into memory. Instead of copying, this shortcut removes the selection completely. In a document, there will be a space where the words were. In a photo, there will be a black space where the selection was. We try to copy first then cut if we are unsure about what we’re doing. If you cut it and make a mistake, the selection is lost forever, right?

4. CTRL + s – This opens up the save window so that you can preserve whatever you are working on. This same shortcut will save everything on top of whatever you have saved before. Sometimes that isn’t a good idea. Read the next shortcut to solve this problem.

4. s – Pressing ‘s’ in some programs, Irfanview for example, will open up the ‘save as’ menu. The term ‘save as’ usually means that you are saving something under another name, different than the name you used before. If you are editing a photo, use the ‘save as’ shortcut to create a new name for the edited photo in order to preserve the original. If you make a mistake, you will always have the original photo to work on.

TIP: In most word processing software, using CTRL + s will save the current document complete with all changes since the last time you saved it. This can cause problems if you are editing a document. As soon as you open the original document, immediately click File then Save As to save it as something else. We use names such as ‘originalEdited’ to indicate that this is the edited copy not the original. From then on, every time we press CTRL + s, we save the changes made on the copy not the original.

5. CTRL + y – In most photo programs, this sequence will crop the highlighted section of a photo (remove everything outside the box but leave the portion inside the box). If we highlight a section of a photo and want to create a hole in it, we would use the ‘cut’ sequence then we would paste something else into the hole.

6. CTRL + b – In a word processing program or WordPress or most html editors, this sequence creates Bold Text. 

7. CTRL + i – As above, this creates italics.   (Hitting CTRL + b then hitting CTRL + i would create Bold and Italicized text. (To stop typing bold and/or italics, use the same two key sequence again.)

8. CTRL + (other keys) – In Word and other text editors, there are shortcuts to underline text (CTRL + u), print over or under, insert or delete, etc. Sometimes when you start to type, the letters are doing funny things. This means that you have inadvertently hit the CTRL key and some other key by accident.

9. CTRL + a – This selects everything in the window where you last pressed a key or made a mouse click. You can then copy or cut whatever you have selected. Use this to copy whole documents from one place to another. Performing the same key shortcut again will undo the action that you selected by accident.

Tip: Text shortcuts can either be performed on text that you highlight or before text is typed. Highlight what you want in bold, for instance, then use the CTRL + b shortcut or simply hit CTRL + b and start typing in bold. Either one will work.


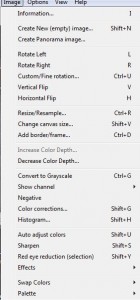
Every software program has shortcuts. Some use the standard ones listed here, others use shortcuts that are specific to that program. If you look carefully at the menus in each program, you will see shortcuts listed for common tasks. Look at this menu from Irfanview:

Photo of shortcut menu
Keyboard shortcuts for one tab in Irfanview.

There are a multitude of keyboard shortcuts out there. In emergencies, shortcuts like these will even allow you to work without a mouse. We’ve listed eight of our favourites. Which ones do you use? Let us know in a comment below.

Thanks for reading!


What is an RMA?

We go through a fair bit of hardware here at Computers Made Simple. Sometimes that hardware doesn’t work correctly or fails after a period of time. If the item is still under warranty, we have to go through the RMA process. RMA (Return Merchandise Authority) can be confusing. Here’s what we know about it.

Last month, we had a Western Digital (WD) 2 TB hard drive fail. We spent hours and hours trying to recover as many files as we could from it, then decided to get a new drive under warranty from WD. We’ve done many RMAs in the past and every one went smoothly. This one didn’t.

The first step in any RMA process is to contact the manufacturer. This can be done by telephone or email but you can sometimes use a contact form on a website. We used the contact form on the WD website to begin the RMA process. The manufacturer must authorize the return, hence the RMA acronym. Each piece of hardware that comes back to a company must have an RMA number on it. Keep that in mind.

Photo of RMA screen
Everything looks efficient on the WD site…but isn’t.

WD emailed us back, explaining that there were two types of RMAs. We already knew this but here’s the low-down on that. Once the company approves your RMA, you could simply send them the faulty product and they will send you a replacement. You pay the shipping one way and they pay the shipping back to you.

Alternatively, you could use the advanced RMA process. The company will charge you a nominal fee for the replacement product, then ships it to you. Once the replacement arrives, you return the faulty product and the company gives you a credit for the same amount that they charged you in the first place. In our case, WD charged us $150.00 for the drive (we only paid $69.00 for it originally) and gave us 30 days turnaround time to get the faulty drive back to them. Initially, this seemed like the best option. Oh, were we wrong!

WD now says that the 3-5 day turnaround is only good in the United States. As you know, we are in Canada.  We really don’t see what the difference is here because the drive is a replacement drive, it’s not something that we purchased. Since it is being shipped as a replacement, it should sail through Customs. WD also says that we could ship the drive back to them before the new drive arrives. This means that we’ll be out the shipping costs. (As it turns out, we shipped the drive off today and will have to absorb the shipping costs ourselves.)

It is now 15 days since the drive was shipped to us from WD. Remember that we only have 30 days to get the drive back to them, right? We are in Canada, not Timbuktu. We get shipments from the United States almost every week. There is no reason on earth that a drive shipped from the U.S. would take two weeks to arrive at its destination in Canada. WD uses UPS, that might be the problem. If you are ever going to ship something, DO NOT USE UPS. The United States Postal System is far better than UPS, as are Purolator and FedEx.

The process usually is flawless. Sometimes, as in our case, something goes wrong. At that point you have several options. We took to Twitter and shouted about it there. We emailed WD several times as well. So far, 15 days into this, the drive is somewhere between WD and us.

We’ve had good experiences with Dell, with HP/Compaq and with Staples. It’s always good to check online to see what experiences other people have had. Usually tech products work very well but when they don’t, you have to go through the RMA process. Hopefully, your experience will be better than ours.

At this point in time, there are only three or four companies who make traditional, as opposed to solid-state (SSD), drives. They are Toshiba, Seagate and Western Digital with Hitachi showing up at some vendors. Many of our old drives from Samsung, Fujitsu, etc. are still working perfectly. Are WD drives reliable? Usually they are. Right now, the only thing that isn’t reliable is the WD RMA policy! It looks like Hitachi has the best warranty, 5 years. Whatever drive you get, make sure you check the warranty before you buy it.

Photo of NCIX extra coverage offer.
Compare the coverage that NCIX offers. (That’s Esther up at the top.)

Tip: Some vendors, NCIX is one, offer what they call “Express RMA’ as an extra-cost option when purchasing a product. On their hard drives, three years of extra protection costs under $50.00. Some products are worth this extra money, some aren’t. It’s up to you to decide. Because of the problems we’ve had with WD, we’re going to spring for this coverage on our next purchase from NCIX.

Update: According to Western Digital, the drive is held up in Canada Customs. We’re not saying that WD isn’t being truthful but we have been around international shipping since 1976 and only rarely have shipments been ‘held up in Customs’. If indeed the shipment, supposedly a whole skid of drives, is in Customs, we suspect that it’s UPS’s fault, not WD’s.

Thanks for reading! If you’ve had problems with RMAs or Western Digital, please let us know.


Multiple Screen Captures

When we create a new post here on Computers Made Simple, we use Irfanview for our screen captures. Using this free and incredible software, we can capture multiple screen grabs with a simple keyclick (Ctrl and F11). Here’s how we do it:

1. Obviously you have to download Irfanview and install it. While you’re at it, download the plugin package as well as the main program. We recommend using Tucows for the download. Why? With a few of the other sites listed, you have to use a downloader which, more than likely, installs some kind of malware/adware/toolbar that you don’t need.

Tip: When you are installing free software, or any software for that matter, read each menu carefully. Many apps will want to install a toolbar (don’t!) and will ask to change your home page to their page (don’t!) and also change your preferred search engine (don’t!). Make sure you look for these lines in the menus and uncheck them.

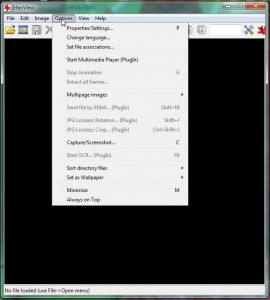
2. Fire up Irfanview. What we’re looking for on the main screen is Options and then Capture/Screenshot. Here’s how it looks in Irfanview:

Photo of Multiple Screen Captures 1
Click on Options then Capture/Screenshot


3. Once you install Irfanview, by the way, you don’t have to find the program to open it. Just double click on any photo on your desktop. We have Irfanview linked to all kinds of image files on our computers. It’s fast and simple, much faster than anything by Adobe.


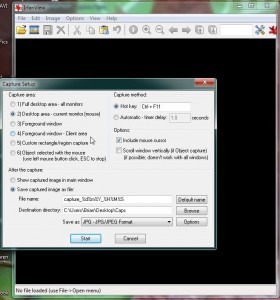
4. Now we’re at the capture screen. It looks like this:

Photo of Multiple Screen Captures 2
This menu looks confusing at first. No worries. We will explain it all.


5. There are three main areas of concern in this menu. First, on the top left, choose which part of your dekstop that you want to capture. In our case, we wanted to capture the screen where we were working (we have two monitors). We only had one window open so we didn’t need to check ‘foreground window’ and we didn’t have a big window open with a separate client window (that would be a program such as Photoshop or GIMP). You can also save a specific part of the screen, let’s say the video window of a webcam chat, for instance. Once you identify the area, Irfanview will capture just that section. This saves cropping later on.

6. The next part of the menu, up on the top right, decides what action will start the screen capture. In our case we chose the default ‘Ctrl + F11’ key combination. Any time we wanted to grab a photo of the screen, we hit the Ctrl key and the F11 key at the same time. Irfanview plays a little sound to let you know that the screen capture has worked.

7. You can also set Irfanview up for multiple timed captures. One second is the lowest amount of time for this but you can adjust that upwards to longer intervals.

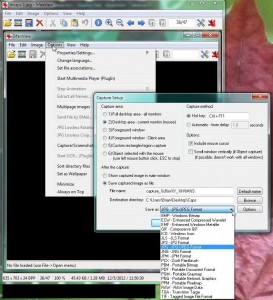
8. Lastly, tell Irfanview what to name the file (default is fine with us), where to save the file (make a folder on your desktop and browse your way to it) and what kind of file you want to end up with. Jpg or Jpeg (same thing) is the norm for this but you might want a another file type. Here’s a list of the types available:

Photo of Multiple Screen Captures 3
Many file types are available.


(You’ll note that you are able to use Irfanview to create PDF files from photos. Make note of that. That is one of the handiest file types when you’re dealing with large documents or photos.)

9. Once you have all of the screen captures you need, use Irfanview to crop them, if necessary. Draw a box shape around the area you want, click Ctrl + Y to crop, then Ctrl + S to save the image. Save it under a different name so the original is still there, just in case you made a cropping mistake.

Thanks for reading! Questions and comments are always welcome.


Windows Restore – your very own time machine!

Sometimes things go wrong with your computer. It starts to act different, freezing or locking up after you’ve installed some software or added a new driver for a piece of hardware. In the old days, you’d have to figure out the problem, sort it out and maybe reload Windows. Remember those days? Well, thanks to Microsoft Window’s restore function, there’s no need to do any of this. Just go back in time to when your computer was functioning properly. Here’s how you do that:

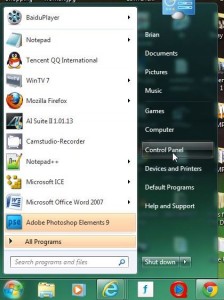
1. Head over to the Start/Windows icon button, click it and look for Control Panel.

Photo of Windows Restore   1
Click ‘Control Panel’


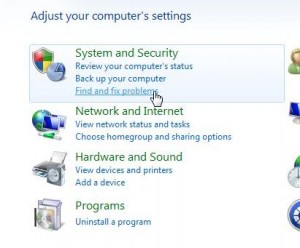
2. Here’s the next screen. Look for System and Security.

Photo of Windows Restore   2
System and Security up on the top left then ‘Find and fix problems’


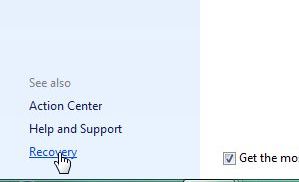
3. The next screen that pops up is pretty much vacant but down on the lower left, look for the word Recovery on the bottom left, as in this photo:

Windows Restore   3
The last word on the lower left is ‘Recovery’. Click it to continue.


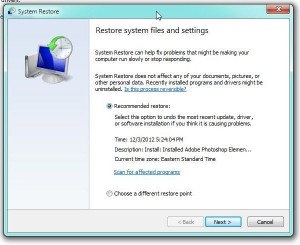
4. The next menu explains what system restore is all about. There is even a recommended time and date, basically the last restore point. Read the menu then click on ‘Scan for affected programs’. Restore does not affect anything that you have created, such as a document or photo. All it does is restore your computer to an earlier date and time, getting rid of  any changes to system files or installed software. When you ‘scan for affected programs’, Windows will tell you what software you’ll have to reinstall. Here’s the menu that we’re talking about:

Photo of Windows Restore   4
Once you’re read this menu, click on ‘Scan for affected programs’.


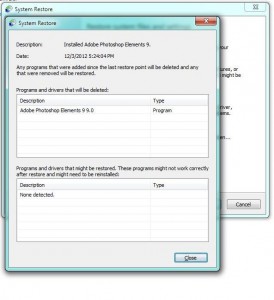
5. Let’s see what would be affected if we restored this computer right now:

Photo of Windows Restore   5
We installed Photoshop Elements recently so it is the only software affected if we use restore right now.


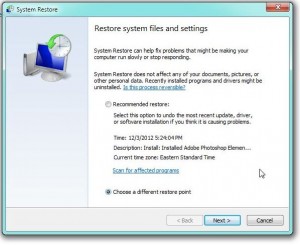
6. If you know that the suggested restore point is not the one you want, click on the button to the left of ‘Choose a different restore point’. Like this:

Photo of Windows Restore   6
Click Next after select ‘Choose a different restore point’.


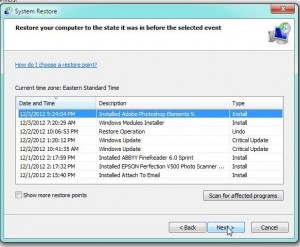
7. At any given point in time, Windows has several restore points to choose from. Obviously, the farther back you go in time, the more programs will be affected. Here’s a list of the restore points for this computer:

Photo of Windows Restore   7
There are eight restore points on this computer, each one just before software was installed.


8. Before Windows installs any software or even its own updates, it creates a restore point. That way, if something screws up, you can go back to the time before that software was installed and start over again. If you’ve made a mistake in the installation process, you get to go back in time to fix it. Wouldn’t it be great if life were like that?


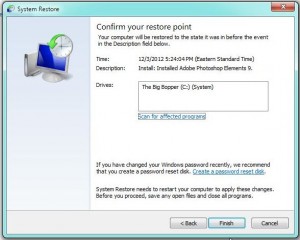
9. Once you decided on which restore point, click Next and the final menu pops up:

Windows Restore   8
Here are all the details of what you’re about to do.


10. Once you click ‘Finish’, Windows will start the process and reboot. When you log in again, your computer will be set back to the date you chose, complete with all of your documents, photos, etc. but without the offending software or update. Life is good again, right?

Thanks for reading! Hit us up with a ‘like’ on Facebook and you’ll get all of our updates and tips. Here’s the link:   Computers Made Simple on Facebook