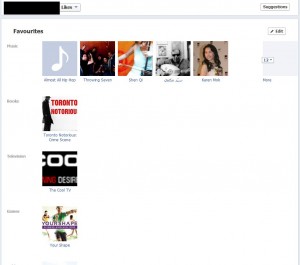
This post is strictly for your Likes, the ones that your Like box is linked to. Go to your Facebook timeline and click on the Like box. This is that page that will pop up:

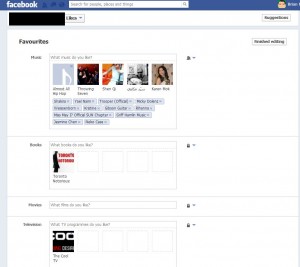
The next page, after you click the Edit button, looks like this:

This is a long page, starting with your Favorites. (The photo reads Favourites because we’re in Canada and use the British spelling.) Your page of Likes is made up of both your favorites as well as the pages you like. The pages are all at the bottom. Right now, let’s look at the Music box. You can do two things with each favorite. You can show it or hide it. If you decide to show it, you can choose who you want to see it or who you want to hide it from, the same as if you post a photo on Facebook.
Once you decide who you want to share this favorite box with, you’re left with showing them every type of music you like. You can’t break up this box into pieces, say Techno being one piece that you don’t mind showing and Andy Williams being another piece that you don’t want to show. If you show your music to anyone, they see all of the music you like. If you want to hide old Andy, you have to hit the X beside their name to delete it.
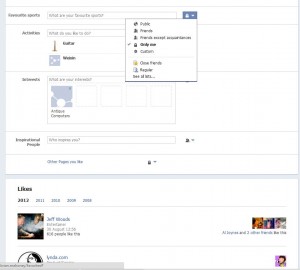
The same applies to all of the topics that Facebook thinks should be listed as Favorites, whether they be books, TV, movies or whatever. If you want to hide your Favorites from someone or only show them to a group of friends, click on the icon on the right. That will bring up this menu:

You can see from the photo above that you can hide a particular favorite from some people but you can’t hide only one of those individual items unless you hide the whole group of favorites. Get it? If you like Madonna in your Music favorites and you show your Music favorites to your friends, you can’t hide the fact that Madonna is in that group.
Useless Favorites Tip: These favorites are really useless in the whole scheme of things to share on Facebook. The only reason they are even on your timeline is to open yourself up a bit to your friends. You may have an acquaintance who knows a bit about you but they didn’t know that you like Bladerunner (a movie). Once they find out that you like something, they have a fuller picture of you as a person and, possibly, might feel better about chatting with you about similar interests. Having a favorite in this group doesn’t mean that you’ll get inundated with offers or emails or updates on anything. These favorites are just there in order for people to get to know you better. Hide them, show them, it doesn’t matter.
Let’s move on to items that actually get updated every now and then, Facebook pages. As you know, Facebook pages are full of information, updates as well as photos and links, all pertaining to the person or company that created the page. Virtually every star, celebrity or company has a Facebook page. If they don’t, they’re missing the boat.
Facebook Page Likes – Options Available
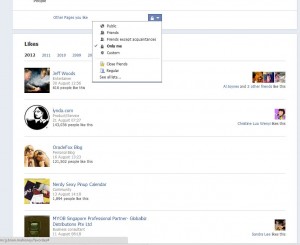
As far as Facebook page likes go, you can hide them or show them as a group. Yes, you can show or hide them all to whatever group of friends you choose but you cannot hide one of the pages and show the others. This is the same as your other favorites, it’s all or nothing. All means every page you like will be shown to whoever you show any page you like. You can’t pick and choose what to show.
If you like a page, only you will see the updates and information that this page feeds out. No one else will see anything that a page feeds out to you unless they follow the same page.
TIP: There is no reason to show anyone what pages you like. Why not hide all of the pages you like? That way you won’t slip up. Close friends, relatives, employers and employees don’t have to know what pages you follow, do they? Instead of tripping up at some point as you try to keep track of who can see what, why not just shut out everyone? Makes sense to us. Once you lock your page likes from everyone, you are free to be yourself. We advise you to set your Page Likes to this setting:

We’re done. Over the last few posts we’ve tried to sort out everything about Facebook like boxes, Facebook likes and, finally, Facebook page likes. We hope things are a bit clearer now for you. Questions, comments, all are welcome. Good luck!
Thanks for reading!

how i hide my friend likes
We assume that you mean ‘how to hide your friend’s list’. right? If not, ask us specifically what you want to hide. Here’s how to hide your friend list: Go to your own timeline (click on your profile photo to get there), click on Activity Log, on the left side either click on Friends or click on the word ‘more’ to bring down a complete list of options, then click Friends. Up on the top right, look for the words ‘who can see my friend list’. Change your settings there. Let us know if you have a problem. Thanks for commenting.
When I click on “view as” some friends are able to see actual boxes listed below my “friends” box for recent likes, map and recent photos on the right side, and some are not. My privacy settings are the exact same for people viewing a different timeline on my profile. Why is that? I hope this makes sense.
It’s better to open another Facebook account to check your settings. Open another account, add your other profile as a friend then check what you can/can’t see, depending on the privacy/like settings you use. Open the new test profile in another browser, of course, then you can flip back and forth to see what changes. If you use the ‘view as’ tool, we think your browser gets slightly confused. We’ve noticed that changes we make don’t change anything when we use the ‘view as’ tool but they do have an affect when we view the profile in another browser. Let us know if this helps.
Thanks for commenting!