Tag Archives: Hardware

How to Buy a Laptop – Comparing CPUs

In the last few months, we’ve purchased two laptops. Because of our interest in this area, the process was relatively stress-free and, believe it or not, quite fun. For you, this whole strange world of confusing numbers and specifications might be very scary indeed. Over the next few posts we’re going to outline some of the differences you should look for when buying a new laptop. By the time we’re through, we think you will feel a lot more confident when shopping online. Why online? Our experience tells us that the customer service reps in the various stores do not know what they’re talking about. The presence of a salesperson just adds more stress, something you don’t need when you’re spending a few hundred dollars of your hard-earned cash. Shopping online can be done at your leisure, any time of the day or night.

The Basics

Laptops are the portable computers that have a screen that folds down onto the keyboard. That may seem obvious but you will see many other mobile computing devices, tablets for instance. Tablets don’t have a separate keyboard as standard equipment and the simple act of inputting words is much less convenient. For these posts, laptops are our concern. We don’t consider tablets to be real computers, they’re more of a toy, at least as far as getting work done.

Laptop Categories

Right now, laptops come in a few different forms. Not only are there different sizes, there are at least two different types you might see. The difference between these two types has to do with their storage capacity. Google has recently come out with what they call a Chromebook. HP, Samsung and some other manufacturers make these Chromebooks. They differ from all other laptops in two ways. First, they don’t run a standard OS (Operating System). Instead, they use the Google OS, as opposed to Windows or the Apple OS or Linux. Second, the Chromebooks have very small storage capacity. Google figures that most of us are online all the time anyway, so they’ve come up with the idea of storing everything online, in the Cloud, instead of on a hard drive. We just bought a Chromebook but these posts deal with laptops with conventional hard drives. We’ll do a separate post on Chromebooks at a later date.

Laptop Sizes

Small laptops, often called ‘netbooks’, can be as small as ten inches. This is the measurement of the screen, measured diagonally. Netbooks are fun, very portable but difficult to type on and, usually, very slow. Beyond that the sizes range from thirteen inches up to about eighteen inches. If there is a standard size, one that matches portability with usability,  you would likely want to look for a laptop that has a 15.6″ screen. This size usually has a full keyboard, often with a number pad on the right, and large keys, not the ‘chiclet’ kind that you see on a netbook.

Comparing CPUs

We’ll get into some of the other laptop specs later but we’re going to demystify the CPU today. What’s a CPU? Basically, it’s the brain of any computer. If you personify any computing device, the brain controls how fast that device thinks. Remember those ‘Intel Inside’ ads from a few years ago? These ads were telling you that the brain inside that computer was made by Intel. At that time there were other CPU manufacturers but these days there are two main makers, AMD and Intel.

Here’s what we see when we check out laptops on a popular website:
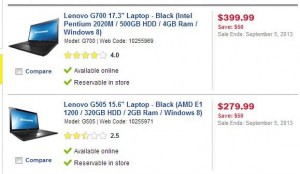
Photo of Comparing Laptop CPUs   1
Two Lenovo laptops, different specs and different CPUs.

Pricing and other specs aside, these two laptops have different CPUs. The top one contains an Intel Pentium 2020M while the lower one has an AMD E1 1200. How on earth is anyone supposed to keep track of these numbers or know what they mean? Most of this is deliberate on the manufacturer’s side. Even if you do manage to remember one type of CPU, the names are always changing. Here’s how you can compare CPU specs very quickly.

1. Go to google.com

2. In the search slot, type in the first CPU name, e.g. Intel Pentium 2020M, then type in ‘vs. then the name of the second CPU, AMD E1 1200 in this case. This is how it should look:

Photo of Comparing Laptop CPUs  2
No caps needed, just letters and numbers.

3. Take the first link that comes up, cpuboss.com:
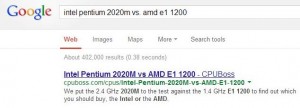
Photo of Comparing Laptop CPUs  3
Click the link to find out which CPU is best for you.

We’re not sure how they do it but once you type in two CPU descriptions, a page is created that compares one to the other.

4. This is the result of this comparison:
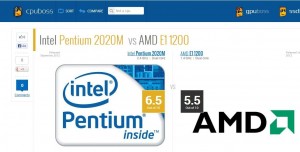
Photo of Comparing Laptop CPUs  5
We thought the more expensive CPU would be best and we were right.

5. For the more discerning searchers, here is how CPUBoss came up with their recommendation:
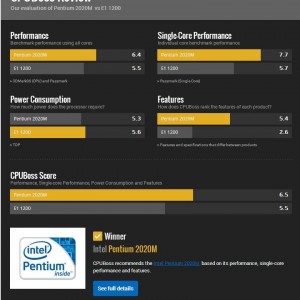
Photo of Comparing Laptop CPUs  6
Various test results.

5. OK so CPUBoss thinks the Intel CPU is best. This is based on the results of the various tests they put the chips through. You might find it interesting to scroll down the page, at least in this example, to see one interesting difference between the two CPUs.
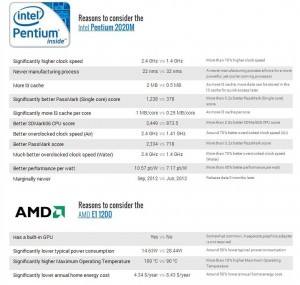
Photo of Comparing Laptop CPUs  7
Not a whole lot of reason to choose the AMD…except one.

In our example, the Intel is the better choice but the AMD CPU will use about half the energy of the Intel chip. It also has a built-in graphics processor, uses less power but, unfortunately, runs a bit hotter than its competitor. Going back to the original ad, ignoring the other specs again, we see the better CPU is also $120.00 more. Here is where you have to weigh the extra cost against the better performance. The Intel doesn’t seem to be worth the extra money, at least in this case. If other criteria were similar, we’d choose the AMD but in this case, we wouldn’t buy either one. The less expensive laptop doesn’t have enough RAM, only 2 gigs instead of our required minimum of 4, plus both are overpriced.

This exercise shows you how to compare CPUs, taking obscure combinations of numbers and letters and turning them into something a whole lot more meaningful and comparable.

Next, we’re on to the other specs in this same ad. Stay tuned.

Thanks for reading!


How do I back up my computer? Part 3


Once you have figured out where all of your stuff is, including documents, photos and videos, it’s time to sort it all out and back it up. Sure, you could dump everything onto one or more DVDs but it makes more sense to organize things a bit beforehand. In this case, photos are more important to arrange than anything else because the files names are arbitrary unless you rename every one. Once you have the various folders in one place, you can sort them out by date, naming the separate folders by when you took the photos or by subject, if all of the photos in a folder can be identified by a few words.

Videos can be named or arranged by date but taking a bit of time now to rename each avi file will make it easier to find what you are looking for at some point down the road. If you have recorded any HDTV shows that you want to save, make sure you convert them to XVID files using Format Factory or  Handbrake to save storage room. Both programs do a fine job of transferring recorded video files to the DIVX or XVID format. The file choice is optional, of course. Use the type of file that you’ve had experience with and works best with your other hardware.

We should mention now that some programs save their files in places other than My Documents. CamStudio, for instance, saves its avi files in the CamStudio main folder. There is a link to those files in My Documents but that is only a shortcut. The files themselves are kept somewhere else. This also applies to Audacity. When you have been working on an audio file in Audacity and you haven’t completed your work, it’s a good idea to back up all of the Audacity files BEFORE you lose them in a hardware crash. Once you export your files in Audacity, you can choose the format and, if you are satisfied with your efforts, you can get rid of the working files. But if you are still working on the files, save them. You’ll find them in the main Audacity folder, not in My Documents.

If you’ve been diligent about telling each program where you want it to save your work, your job is much easier when it comes to backing up your computer.

What’s next? Well, we use Burnaware to make backup DVDs. Burnaware is fast, stable and free. Since DVDs are relatively cheap, we can get 100 for less than $20, you might even want to make backups of backups for important files. Keep each backup in a separate place, maybe even distributing family memories to various relatives. Mark the disks with a Sharpie and put them in a protective package which is also clearly marked with the date and some descriptive words.

Lastly, think about backing up any material that’s ‘in the cloud’. Dropbox is about as secure as you can get but who knows what their financial status is? Backup the Dropbox folder on your computer whenever you back up everything else. That backup isn’t dynamic, of course, so be sure to only use it as a backup in case of emergency. Don’t try to integrate the old files with your current Dropbox files at some date later on. Saving old files over newer files never works.

We can’t hold your hand all the way through but we’re here to help. If you have questions, ask us. Comments are welcome, yays or nays, it doesn’t matter.

Thanks for reading!

More Gifts for you Computer


In my last post I discussed gifts that involved the care and cleaning of your computer. Today, I’ll discuss some real gifts to spruce up your rig. Cost will be an important criteria so we won’t be getting into a new video card, know what I mean?

1. Keyboard: A new keyboard can add a whole lot of fun to your computer experience. If you are still using the plain, generic keyboard that came with your computer, why not spring for something better, something with more pizazz! Instead of the normal F keys on top and a number pad on the right side, some keyboards add a significant level of control. This means that you can manage things like the sound volume, the eject button on your DVD unit, fast forward or rewind with your media player or even such things as opening web pages or Google search. You’d have to load drivers for some of the new boards but you should be used to that by now.

2. Mouse: As with the keyboard, a new mouse will add some flare to your daily computing life. The two major prerequisites would be USB connectivity and optical (as opposed to a wheel). Every mouse sold today is  USB and I haven’t seen a wheel mouse to years but you never know. If you are a gamer, you can buy a mouse which allows you to control many different aspects of your favorite game, assigning weapons, for instance, to certain buttons. You can consider wireless with both of these gifts but I have found the battery replacement to be a pain. Wireless is mandatory if you use your computer for a media centre but there are custom remotes with digital keyboards that might be better.

3. A USB Key: You may call these flash drives but they are the same thing. Right now, a 32 gig drive can be had for around $20.00. With a drive that size, you can do a few things to make your work go faster. You could use the drive to enhance your RAM. (Here’s a post on Instructables.com about how to do it.) It’s also possible to load a complete operating system on a large flash key, allowing you to avoid using a slow hard drive. Linux has different packages for this and there are many portable apps out there which add  good amounts of fun and function. On netbooks without DVD drives, you could add movies to your flash key and play them from it instead of always using your desktop. This would be faster than streaming but not as fast as copying the movie or video to your netbook hard drive.

4. A New Monitor: CRTs are dead, LCD is the only way to go. Let me rephrase that a bit. LCD is dead. LED is the way to go. If you are energy conscious, consider getting one of the new LED monitors. Bright, long lasting and very energy efficient, these new LED units are a joy to use. Stick to a brand name such as Dell, Asus or any of the other recognizable names. If you see a good deal on a non-brand name monitor, at least do some research on it.

5. Chairs: A few years ago I sprang for a very comfortable, high back office chair. It reclines, swivels and has arms. It’s light so it rolls fairly easily on carpet. I don’t regret the purchase one bit. Ten years or so later, it still works perfectly. Head over to your local big box office supply store and take a seat in a few display models. Whatever you do, don’t get something cheap. I’ve seen a couple of  accidents with cheap chairs, one which could have ended very badly as in spinal or brain injury. Get a brand name or something that is solid. Cheap plastic legs won’t last. Watch for sales or sign up for email newsletters which sometimes include discount coupons. Have some fun with this and make sure you get something that supports your back adequately. Oh yeah, my chair goes up and down, too. To be really comfortable, you have to be at the correct height, right?

6. Speakers: I like to listen to music while I work. Cheap desktop speakers don’t cut it for me, not since I’ve been spoiled by 5.1 surround sound. Logitech is my company of choice for speakers. I have at least five sets around the house. You can choose a solid 2.1 unit or pay a bit more for a mid-range 5.1 setup. The .1 means a sub-woofer which is pretty much mandatory these days. The centre speaker of a 5.1 system usually sits on top of the monitor with the bracket already built-in. Some monitors have speakers with them but, personally, I’d steer clear of these. Multi-function devices usually scrimp on quality, I’ve found.

Happy Holidays and Happy Computing!

Thanks for reading.

Give Your Computer a Holiday Gift


It’s the holiday season, people. Your computer has given you a year of yeoman service, right? Why not treat your trusty workhorse to a nice gift for the holidays? Here are some suggestions:

1. Clean it up! If you use a desktop, carefully remove the cabling on the back, take the side panel off and vacuum the interior. I’m sure you will find lots of dust bunnies in there, specially if you keep it on the floor. Make sure you vacuum around the power supply intakes, the front intakes (take the front panel off to get to the dust underneath it) and the bottom of the case. If you are really a techno-weenie, remove the cooling fan from the CPU and vacuum the fins of the cooler itself. If you’re not technically minded, get a buddy who is to do that for you. You don’t have to take the whole cooler off, just the fan. Four screws usually do the trick.

2. A Vaccination Shot: If you haven’t done a virus scan in a while, make sure this is one of the first things you do for the holidays. I use Avast , the free version, and it works well. Just this week I did a fully system scan. First I ran it overnight because a full scan takes hours on my large drives, then I did a boot scan the next morning. Microsoft Security Essentials works well, too. Personally, I wouldn’t pay for an anti-virus program but you’re on your own if you want to spend your money that way. There are plenty of free or very low cost pieces of software that do the job. Lastly, download Malware Bytes and run it. Hopefully you won’t have any malware but if you do, Malware Bytes will get rid of it.

3. Update Everything: If you have everything set to update automatically, there still might be some software or hardware around that needs renewal. Your router? A firmware update is always a good idea. Your BIOS? Your fancy multi-function keyboard? I’m sure you will be able to find something to update. Most software gives you the option to update automatically and that’s always a good option to choose. I know Apple is a total pain with updates for iTunes and iCloud, etc. as is Windows. Whatever your feelings are on that, updates are generally better than the current version of most software. It takes time, sure, but it’s worth it.

4. Back Up : If you haven’t set up an auto-backup system for your computer, now is a good time to archive your personal data. DVDs are cheap and lost data is expensive. Digital photos don’t come with negatives. Once they’re gone, they’re gone forever. Time to download Burnaware and get busy. It’s free, fast and simple. Do it now, don’t put it off.

5. Get Rid of the Crumbs : My keyboard has served me well all year, helping me write hundreds of thousands of words. It’s time to unplug it and suck out the Triscuit crumbs. While I’m at it I will get a damp (not wet) J-cloth and clean off the various coffee and scotch spills. If you share the keyboard, maybe it’s time for a rub down with some anti-bacteria cleaner, too. Just don’t get it wet! If it does get a few drops of water inside it, put it in the sun for an afternoon to evaporate the moisture.

6. Watch It! : When your monitors are on, they look pretty clean but I can guarantee they probably aren’t. Get a soft cloth, dampen it and give the screen a wipe. Don’t use anything other than water and don’t spray the screen directly. Make sure your soft cloth is only damp not wet, grease free and lint-free. There are special cloths that you can pick up at the local big-box computer accessory store for this purpose. You don’t need any fancy liquid, just water.

Happy Holidays!

Thanks for reading.

Windirstat – What is taking up all the room on my hard drive?


With today’s huge hard drives it’s sometimes tough to know where all that room has gone. You buy a one or two terabyte drive, use it for a while and then you’re suddenly running out of storage space. Here’s a solution for you!

Windirstat (available here for free: http://windirstat.info/) gives you a real picture of what your hard drive looks like, in terms of which files are taking up all the room. Download the program and install it. I’ll wait. When you’re done, come back to see how to use the program.

Back? Ok. Here’s what you do:

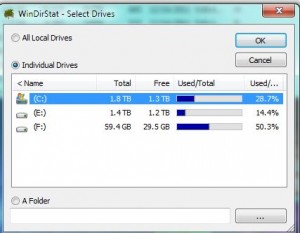
1. Start Windirstat. This is the menu you will see:

Choose the Drive
Select the drive.

Select the drive that you want to take a look at. Usually that is your C: drive. In my case I have three to choose from but most computers have only one or two drives.

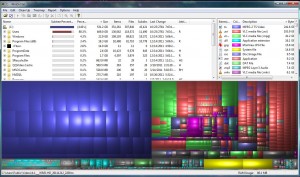
2. WinDirStat will nibble away at your drive, setting up an image for you. As it does this you’ll see little PacMans zipping back and forth. It’s kind of cute, actually. Once all of the stats have been collected, here is what you’ll see:

A graphic of a hard drive's files and folders.
This is a graphical representation of my hard drive.

3. Once WinDirStat has collected the information it needs, it shows you this graphic of your hard drive. It may look confusing at first but it’s really pretty cool. On the top right you’ll have a legend which tells you what color represents each type of file. On mine, the blue represents MPEG-2 files from my DVR. Each little section of that blue area is an individual file while the whole blue area on the left is a folder. Each color group represents a folder, each smaller highlighted area is an individual file.

4. Looking at this graphic, you’ll be able to see what files and folders are taking up the most room. If you click on each file, WinDirStat immediately shows you what file it is up on the top left section. If there is one particularly huge file, you can then decide if it’s something you want to save or archive or delete.

5. Some areas that WindDirStat will show you are obviously off limits for deletion. Any of the Windows files, for instance, must be left alone. There are two yellow files on the lower right, as an example, which represent two important Windows files; the pagefil.sys and the hiberfil.sys. These are your ‘scratch pad’ files and are about the same size as the amount of RAM in your system. Don’t touch them.

6. Once you’ve spent some time finding the files and folders that are taking up extra space, delete them or archive them to a DVD. Then you can reload WinDirStat and see what the big picture looks like. I keep pretty good track of what’s on my drives but there are always some files that seem to crop up that I could delete. See what you can find on your drive.

Thanks for reading!