Tag Archives: ease of access

Make Text Bigger – two simple ways to make text on your computer screen larger

Is the text on your computer screen looking a bit smaller than normal these days? While this is a natural part of the ageing process, we can help a bit. Here’s how you can increase the size of the text on your computer screen:

1. In any browser, at least the ones that we’ve tested, as well as programs such as Word, simply hold down the CTRL key (control key) and roll your mouse button away from you. To make the text smaller, roll the mouse button towards you.

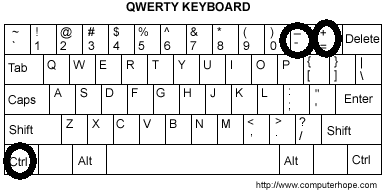
2. Alternatively, just in case you are using a laptop or an older mouse, hold the CTRL key and press the key just to the left of the backspace key, the one that has the = and + symbols on it. This is easy to remember because of the + sign. Conversely, hold the CTRL key and press the – key, just to the left of the + key, to make the text smaller.

Photo of qwerty keyboard.
Here are they keys to look for.


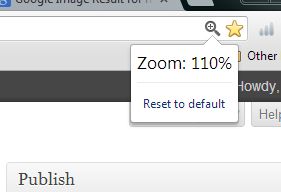
If you’re using a photo editing program, Irfanview for instance, you can zoom in or zoom out using this same key combination. This won’t work on menus but it will work in just about every software program that we’re tried. When you want to change the text back to normal, in Google Chrome anyway, look for the magnifying glass icon up on the top right. Click it and you can instantly set the text back to its default size.


Photo of Chrome Zoom Setting.
This is at 110% but click Reset to bring it back to normal.


While you may not need the zoom all the time, remember this tip for those times when you do. Also, if a friend or a relative seems to be having a problem with this, show them how to make use of this tool.

Thanks for reading!


Ease of Access Magnifier in Windows

We’re starting a series on different aids that are available to computer users who require special tools to assist them while using technology. At this point, we’re gong to concentrate on free aids that are currently available inside Windows itself or in other applications. Let’s start with Magnifier, a handy tool…even if you are not visually impaired.

Head to the start button (the globe down on the lower left of your taskbar in Windows 7). Click it and then click on All Programs. Scroll down to Accessories and click there:

Photo of Magnifier  1
Start, All Programs, Accessories then Ease of Access.


The Ease of Access folder contains different tools to assist various users who need them  but, of course, anyone can use those same mini-apps.

Photo of Magnifier  2
Click on Magnifier.

In this post we’re going to use the Magnifier. Once you click it, everything on your screen gets much larger. Since your actual screen doesn’t get any larger, obviously, you are faced with only one section of your desktop. Move your cursor (mouse) around the screen and the desktop or current application will move around accordingly. Everything seems a lot larger.

Photo of Magnifier  3
Icons, images and type are all larger.


Everything is still there, it’s just magnified by whatever percentage the magnifier is currently using. You can adjust that percentage by clicking on the icon of the magnifying glass.

Photo of Magnifier   4
The – and + icons zoom in or out, depending on which one you click.


Zoom in or out. You can make things a lot bigger or just a bit larger, it’s up to you. When you’re finished, click the X up on the top right of the menu to go back to normal. We’ve found this tool to be very handy when we’re examining old photos or handwritten documents. Details that aren’t visible in the originals are often much easier to see or read using it. Try Magnifier out yourself and we think you’ll find quite a few uses for it.

Thanks for reading! Like us on Facebook to keep up with the latest posts and interesting bits of news: Computers Made Simple on Facebook