Free batch resizing for Facebook and other social networks

With the preponderance of mega-pixel digital cameras these days, many of us are faced with long wait times when we’re uploading albums to Facebook and other social networking sites. Unless you’re going for HD (high definition) albums, here’s a simple technique to save you time and bandwidth.

1. Download Irfanview here.  Don’t use the Cnet site, use Brothersoft or Tucows. Download the plugins while you’re at it.

2. Install Irfanview first then the plugins. It only takes a minute. (You can delete the downloaded files to save space on your drive.)

3. Choose to associate ‘image files only’ during the install process. You can always right click an image if you want to edit it with GIMP or Photoshop.

4. Find a folder on your computer with a bunch of large images that you want to resize. Open one of the images by double clicking on it. (I know this is a duh moment but I get all kinds of visitors and some don’t know the basics.)

5. Click on ‘File’ at the top left and choose ‘Batch conversion/Rename’. The window that opens up is shown here:
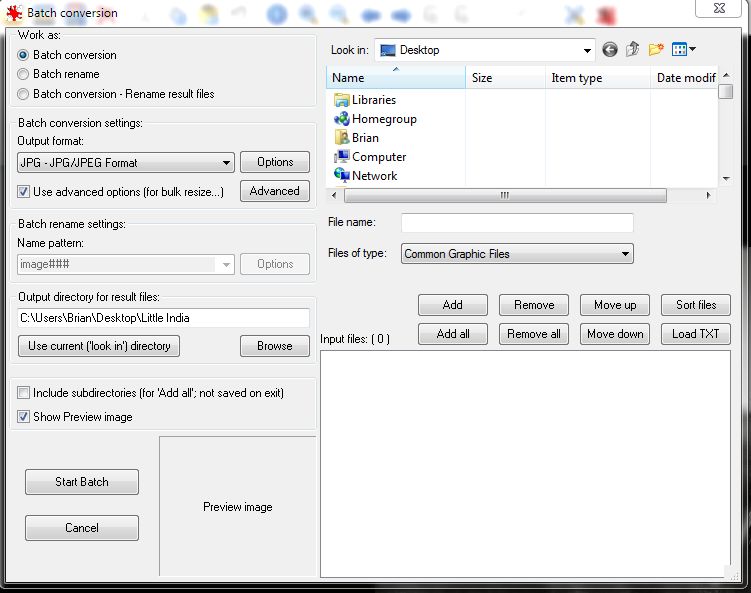
Batch processing menu
This is the batch processing/rename menu in Irfanview.

6. This is where you can choose the images that you want to process. Find the folder in the upper right section and ‘add’ the ones you want to convert/rename/resize.

7. Choose an output directory in the middle left section. I use DESKTOP all the time and make a new folder, as you can see. I name the folder according to the main subject of the photos. (This time it was Little India, a very cool part of Toronto.)

8. Now you’ve got the pics ready and a place to put them but what are you going to do with them? Today, we’re going to resize them. Make sure that everything in your menu is the same as mine (if you want .jpg output). Then click on the ‘Advanced’ button. This is the menu that pops up:
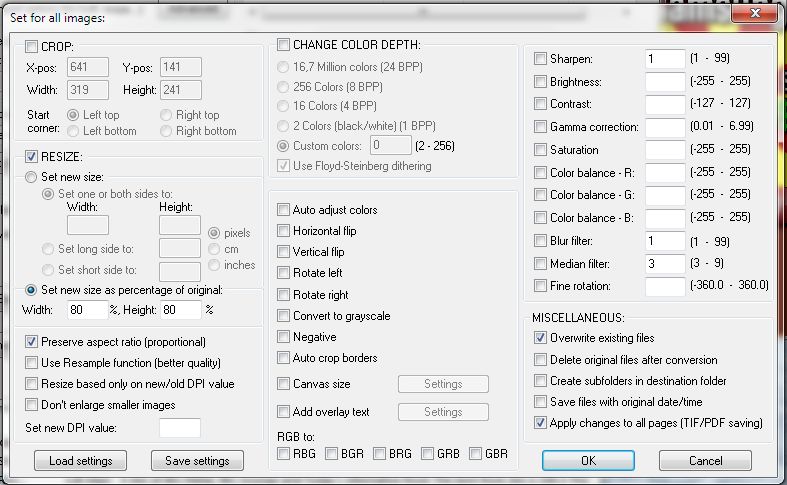
advanced menu for batch processing
This is where you fine tune your 'advanced' conversion settings.

9. Don’t be intimidated by this menu. It’s full of settings but don’t worry, most of them are not for you right now. You will see that I have set the menu up for ‘Set new size as percentage of original’ with a width of 80 percent and a height of 80%. Make sure you put a check beside ‘Preserve aspect ratio (proportional)’. This prevents your photos from looking skewed after you resize them.

10. Nothing else is checked except for the ‘Overwrite existing files’. I use that setting in case I have to do this twice but I would uncheck it if I was putting the resized pics in the same folder as the large ones. Make sure that you put the new, smaller pics in another folder marked ‘such and such small’. I archive the large pics then delete the small folder after I have uploaded them to Facebook or renren (the Chinese version of Facebook.)

11. Click OK and you will be back to the previous menu.

12. For safety’s sake, make sure you have the output directory (folder) somewhere else besides the directory where the original large pics are. Make sense? Hope so. Click ‘Start Batch’ and Irfanview will make each one of your chosen images 80% smaller than it was before.

13. One of my cameras is a Fuji HS10 which has a 10 megapixel CMOS. If I use the .JPG setting (as opposed to the RAW setting) my pics are around 4 megs each. Way to much for Facebook, right? The new 80% smaller pics are all under a meg, usually, and upload time is a fraction of what it was before.

With this easy and quick (and FREE!) setup, you can drastically reduce your upload times when you’re sharing your pics on Facebook and other social media sites.

Thanks for reading. If you have problems, comment below and I’ll answer your queries right away, usually.

Follow me on Twitter:  @_BrianMahoney


Create PDF Files Using Irfanview – Free is Good!

Irfanview is one of the best little programs out there for quick editing of photos as well as batch resizing and renaming. You can use it for timed screen captures and many other things. Recently, I discovered how to create PDF files with Irfanview. Here’s how to do it.

I was faced with the problem of sending a fax using one of those free online services. Since the fax service only allowed me to send one page and my fax consisted of three photos, I had to figure out a way to create on page. After a bit of searching, I learned that I had all the tools I needed right there in Irfanview. Here’s how to do it:

1. Scan the documents into your computer. The format doesn’t matter but a TIFF file or a JPEG is normal (.tif or .jpg)

2. If you don’t have Irfanview, download it and install it AND download and install the Irfanview Plugins after you install Irfanview. Both downloads are available at the Irfanview site here:

http://www.irfanview.com/     (Tip: Don’t use CNET for the download because it installs a downloader program that you don’t need. Choose either Brothersoft or Tucows.)

3. Once you have installed Irfanview and associated image files with it, which I recommend, open one of the images with Irfanview.

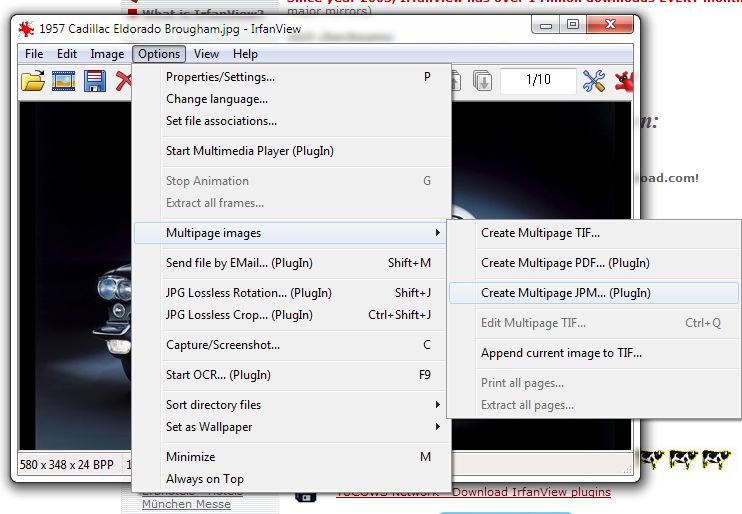
4. Across the top of the window you’ll see Options. Click it and then click Multiple Images then click Multipage PDF …(Plugin).

Irfanview Menu
This is the multipage PDF menu in Irfanview

5. In the next window menu, drag and drop all of the files that you want to put into the PDF file. Arrange them up or down to put them in the proper order. Choose a file name and then choose where you want the file to end up.

6. Click the Create PDF image button. In about one second your PDF is created.

That’s it. A real simple way to complete a tough task. Well, it would be tough using anything else besides Irfanview.

Lastly, Irfanview can be used to many things. From timed screen captures through Optical Character Reading to Lossless Cropping, this little beauty has it all. I’ve been using it for many years, since the late ’90s, and I still discover new things that it can do.

Thanks for reading.

Follow me on Twitter: @_BrianMahoney


Facebook – Adjust your privacy settings for old shared items

When Facebook changed their (your) privacy controls in September of 2011, they allowed one setting to control your old post visibility while giving you more control over your ongoing posts. Here’s how to adjust your settings for things that you’ve posted IN THE PAST.

1. Open Facebook.

2. Click on Account on the top right of any page.

3. Click on Privacy Settings on the drop down menu.

3. Look for the second last section, titled Limit the Audience for Past Posts.

4. Click on the blue link to the right that reads : Manage Past Post Visibility.

5. Read the little blurb menu that pops up.

6. Choose to Limit Old Posts or not, it’s up to you. I would suggest changing ALL old posts to Friends Only but you may have different settings on your old material.

7. Confirm the change in the next menu that pops up if you have changed everything to Friends Only.

That’s it. You’re done. Everything that was shared before with everyone is now only shared with your friends. Everything that you post from now on has to be set to your specifications.

Don’t be shy. Ask questions, comment, scream, yell or just say hi. It’s all good.

Thanks for reading.

Follow me on Twitter: @_BrianMahoney
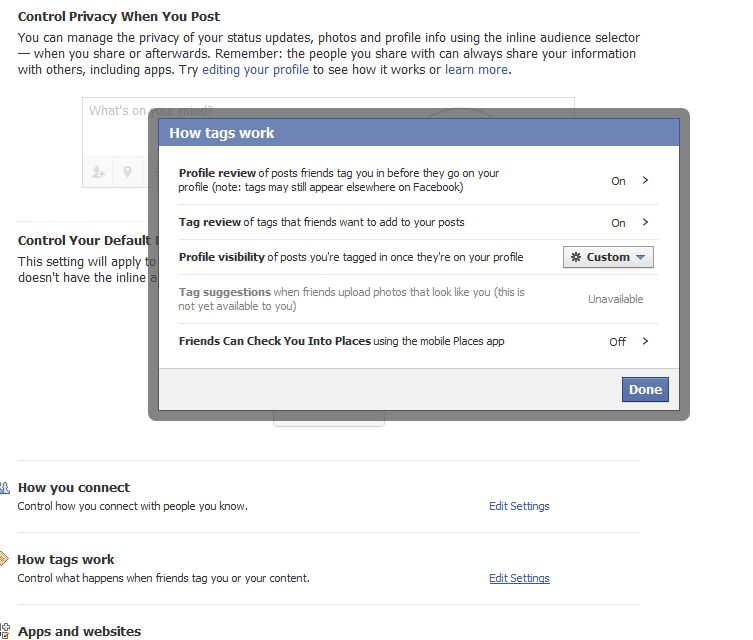


Facebook Privacy Simplified – 10 Easy Steps

My last post seemed too complicated for some people. Too many words, not enough pictures perhaps! Here’s a five step process to ensuring that strangers can’t comment on your shared items in Facebook.

1. Open Facebook (duh)

2. Click ‘Account’ on the top right of any page.

3. Click ‘Privacy settings’ on the menu that drops down.

4. Click ‘Edit Settings’ to the right of  ‘How tags work’.

5. Turn ‘Profile review’ ON (this allows you to approve or ignore any tags BEFORE they appear on your profile.)

6. Turn Tag Review ON (this allows you to approve or ignore any tags that someone else puts on your posts.)

7. Set Profile visibility to your desired settings. Mine are set to ‘* Custom’ then to ‘only me’. I don’t want anyone else to see any posts that I’m tagged in.

8. Set ‘Tag suggestions’ to OFF. (That’s my choice, yours might be different.)

9. Turn “Friends Can Check You Into Places’ OFF. (Again, this is my choice.)

10. Click ‘Done’ on the bottom right of the menu to save your settings.

That’s it for your first round. Pat yourself on the back.

Part two is coming right up. I don’t want to make this too long!

Thanks for reading.

Follow me on Twitter: @_BrianMahoney


Facebook Privacy Changes – recent changes

There’s always a bit of a flap whenever Facebook changes their (or your) privacy settings. Recently, Facebook adjusted some of their settings and some people complained that strangers could comment on their photos and posts. Depending on your privacy settings, which I have described in a previous post, strangers may indeed pop into your life. To prove this I did an experiment to illustrate my point.

I have three Facebook accounts. Don’t ask why, it’s irrelevant! Hahaha. As far as being friends with myself, I have set up a triangle of sorts. Each account is friends with one other me. No account is friends with every me. Each account has its privacy set to Friends as far as sharing photos and posts. There are other settings for each photo album, for instance, but none of my shared material is open to Everyone.

If I post a photo on one account, the account that is listed as a friend can see it, of course. If that friend tags that photo with the name of someone who isn’t a friend, lo and behold that third person, a complete frickin’ stranger, can see the photo unless I have set the new privacy for tags correctly.  Here is where you can make the changes:

Facebook privacy box
This is where you turn tag approval on or off as well as whether those tags appear on your profile.

You’ll notice that I have set the toggle to ‘On’ in order to either approve or disapprove of any tags on any of my material. If someone tags one of my pictures or a note I have written, I instantly receive an alert that will allow me to say yes or no to that tag. The third party who isn’t a friend cannot see my stuff until I say they can.

Here is what the approval box looks like:

Facebook tag approval
Here is the yay or nay box for tags that people have added to your stuff on Facebook

Once you have accepted the tag, the stranger (in this case me) can view and comment on your post. They can also ignore the tag, depending on their own settings for tags. If you don’t want strangers seeing or commenting on your ‘friends only’ items, make sure you change your tag privacy settings.

Finally, now that you’re totally confused, you can also remove these tags from your posts. When you go to the item to view it, you will see the new tags on the bottom. There is an ‘edit’ button there which allows you to delete any tags that are there, some or a few, whatever you want. Basically, you still have full control over your posts, actually more control than before. Sometimes it looks as if Facebook screwed something up but, this time anyway, they didn’t.

It’s that easy. Read my previous post and come back for subsequent posts on this and other tech topics. Follow me on Twitter


a little bit of hi-tech, a little bit of common sense and a lot of fun