With the preponderance of mega-pixel digital cameras these days, many of us are faced with long wait times when we’re uploading albums to Facebook and other social networking sites. Unless you’re going for HD (high definition) albums, here’s a simple technique to save you time and bandwidth.
1. Download Irfanview here. Don’t use the Cnet site, use Brothersoft or Tucows. Download the plugins while you’re at it.
2. Install Irfanview first then the plugins. It only takes a minute. (You can delete the downloaded files to save space on your drive.)
3. Choose to associate ‘image files only’ during the install process. You can always right click an image if you want to edit it with GIMP or Photoshop.
4. Find a folder on your computer with a bunch of large images that you want to resize. Open one of the images by double clicking on it. (I know this is a duh moment but I get all kinds of visitors and some don’t know the basics.)
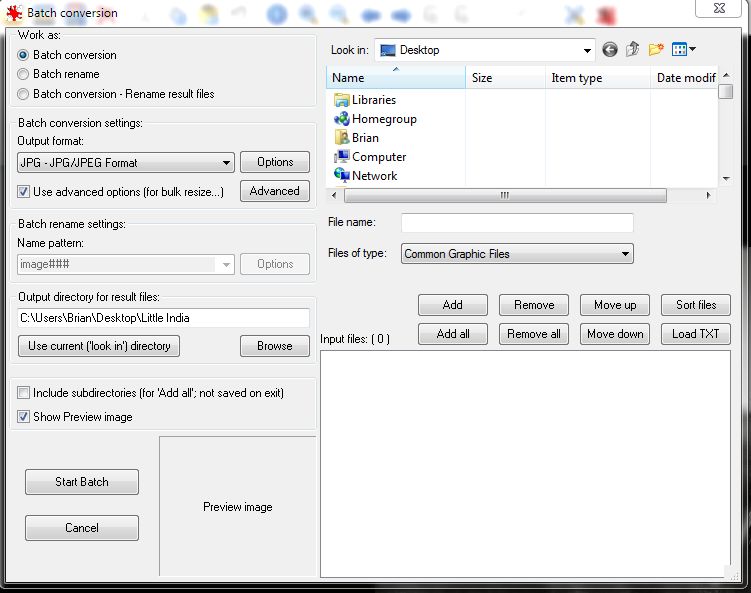
5. Click on ‘File’ at the top left and choose ‘Batch conversion/Rename’. The window that opens up is shown here:

6. This is where you can choose the images that you want to process. Find the folder in the upper right section and ‘add’ the ones you want to convert/rename/resize.
7. Choose an output directory in the middle left section. I use DESKTOP all the time and make a new folder, as you can see. I name the folder according to the main subject of the photos. (This time it was Little India, a very cool part of Toronto.)
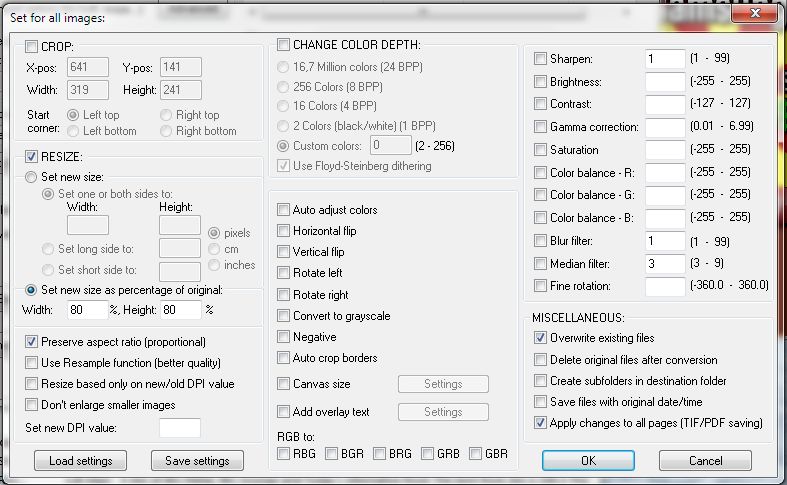
8. Now you’ve got the pics ready and a place to put them but what are you going to do with them? Today, we’re going to resize them. Make sure that everything in your menu is the same as mine (if you want .jpg output). Then click on the ‘Advanced’ button. This is the menu that pops up:

9. Don’t be intimidated by this menu. It’s full of settings but don’t worry, most of them are not for you right now. You will see that I have set the menu up for ‘Set new size as percentage of original’ with a width of 80 percent and a height of 80%. Make sure you put a check beside ‘Preserve aspect ratio (proportional)’. This prevents your photos from looking skewed after you resize them.
10. Nothing else is checked except for the ‘Overwrite existing files’. I use that setting in case I have to do this twice but I would uncheck it if I was putting the resized pics in the same folder as the large ones. Make sure that you put the new, smaller pics in another folder marked ‘such and such small’. I archive the large pics then delete the small folder after I have uploaded them to Facebook or renren (the Chinese version of Facebook.)
11. Click OK and you will be back to the previous menu.
12. For safety’s sake, make sure you have the output directory (folder) somewhere else besides the directory where the original large pics are. Make sense? Hope so. Click ‘Start Batch’ and Irfanview will make each one of your chosen images 80% smaller than it was before.
13. One of my cameras is a Fuji HS10 which has a 10 megapixel CMOS. If I use the .JPG setting (as opposed to the RAW setting) my pics are around 4 megs each. Way to much for Facebook, right? The new 80% smaller pics are all under a meg, usually, and upload time is a fraction of what it was before.
With this easy and quick (and FREE!) setup, you can drastically reduce your upload times when you’re sharing your pics on Facebook and other social media sites.
Thanks for reading. If you have problems, comment below and I’ll answer your queries right away, usually.
Follow me on Twitter: @_BrianMahoney
