Category Archives: Windows

Bulk Photo Cropping


As you probably already know, Irfanview is one of my favorite free programs. I’ve used it for years and every computer in the house has it. Read past posts about Irfanview  here and here and here. Irfanview is fast, fun and works perfectly every time. You can download it and its plugins from Tucows. Get it here: http://www.irfanview.ca/main_download_engl.htm

If you have used Irfanview for a screen capture session, you’ve probably got dozens or hundreds of jpgs that include more of your screen than you need. Irfanview is perfect for captures but sometimes the box you draw around your target is too big. Here’s how you can set Irfanview up to crop those captures in one operation, no matter how many photos you have. How do I know? I’ve used this method before to crop about 2400 photos that I made into a little animated gif. It didn’t go viral but it was fun make.

1. Get all of your jpgs in one folder. Sort them out so that all the photos have the main capture in the same position on the screen. If you moved the window at some point while you were capturing the whole screen, sort those photos out and put them in different folders. You can reorganize them later.

2. Open Notepad or keep a paper and pencil by your hand. You will be writing down a few numbers for each cropping job.

3. Before you actually begin to crop, practice sizing the crop area first. Open one jpg. As with most programs, holding down the left mouse button and dragging the cursor will create a box. Test this out and try to get the correct size, the one that looks best to you. When you have the right box, click anywhere outside the box to unselect the crop.

4. Next, click on the top left corner of the area that you want to crop. Don’t move your mouse, just click once and hold it there. On the top left of the Irfanview window you’ll see XY:(number,number). This is your X -Y reference point. Make a note of those two numbers. This is what you will see:
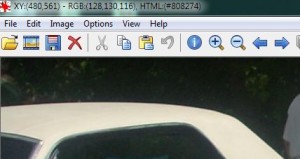
The first crop window
Look for the XY:(480,561) - your numbers will vary.

5. Next, you’ll want to write down the full size of the crop box that you want. Click in the same spot, or as close as you can to it, then drag the box out and hold the mouse button down until you are able to read the numbers that you need. What you’re looking for is the number of pixels that define your crop box’s height and width. In the photo below, you’ll see what I mean.
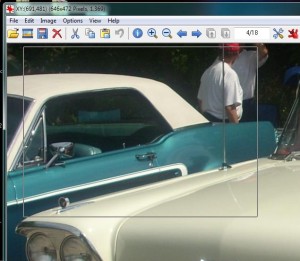
Set the width and height of the box here.
See the (646x472 Pixels, 1.369)? You need the first two numbers: 646 and 472

6. Now you have the numbers that describe where the box starts and the numbers that describe the size of the crop box. You’re all set to start your batch cropping. Look for File on the top left, then Batch Conversion/Rename. The following window will open:
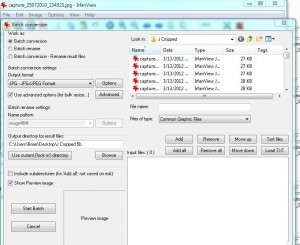
The batch processing window
Here is where you will do two things. Add the photos to crop and choose your output directory.

7. Set up the menu by checking that ‘Batch conversion’ is ticked. Then, on the top right, select the photos you want to crop. Remember when I said to keep your photos separate? This is why I said that. It’s much simpler to choose ‘Add all’ as opposed to picking through the jpgs one by one. Click ‘Add all’ if you have all the right photos in one folder. Then, in the middle left, choose where you will put the cropped pics. Don’t use the same directory as the originals, just in case you make a mistake with your crop window. You still want the originals until you make sure your numbers are correct. Once you’ve done these steps, click on the ‘Advanced’ button. The following window will come up:
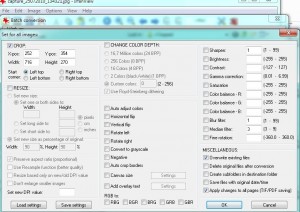
Advanced Crop Window
Don't get nervous. This window looks complicated but it's not that bad.

8. Top left, see the Crop section? This is where you’ll fill in the numbers that you wrote down earlier. Make sure ‘Crop’ is checked then type in the X-pos number and the Y-pos number. Below that, write in the width and the height. Below that, make sure that ‘Left top’ is chosen. You can crop in any corner, just make sure you know which corner you have chosen. I always use top left but you can do whatever you want.

9. Make sure that nothing else is checked. On the bottom right, I have ‘Overwrite existing files’ chosen, simply because it’s easier if I make a mistake. I put the cropped photos in a new folder then I check it after the batch if finished. If I have made a mistake, I redo the numbers and run the batch again. I don’t have to open a new folder.

TIP: If you are doing a few batches, uncheck the ‘Overwrite existing files’ just in case you forget to use a new folder. Make sure this is unchecked if you are using the same folder as the originals, too. I’d advise against that, however.

10. Double check everything then choose OK once to close that menu. The batch menu is still open, of course, and you need to press the ‘Start batch’ button. Once you do that, Irfanview whisks its way through the task at hand. Depending on the speed of your computer, this might take a while. Wait until Irfanview is done then check your results. Chances are you’ll make a mistake the first few times but read through this again and you’ll get it right, sooner or later.

Thanks for reading!


Windows Basics


If you’re just starting out with computers, there are many things that can make you feel lost and confused. Don’t worry, that’s normal. You’re not a dummy, not matter what the book says. No one starts off by knowing what to do with a computer. It’s certainly not intuitive, no matter what Apple or Microsoft might tell you. Stick with Computers Made Simple and we’ll sort it all out for you.

The first thing you see on your new computer is the desktop. This is much like your house or apartment. Everything you need is right there, waiting to be used. Just as you would paint your apartment to change its look, you can change the way your desktop looks. When you go away, sometimes you might have your lights set to come on at a certain time. Your screensaver, the thing that cuts in when you’ve been away from your computer for a while, does the same thing. I’ll explain all of this in another post  but, for right now, we’ll get used to what’s on your desktop and just beneath it.

Your mouse is your steering wheel. With it, you can steer your way through menus and programs, making choices as you go. Since your mouse has two buttons, you might wonder which is which. The left button is the one that says, “Yes!”. The right button is the one that asks questions. If you right click in any area of your screen, whether it’s your desktop, a photo or inside a program, a menu will come up. That right click menu offers choices, basically asking you what you want to do. Try it now. Right click your desktop and choose personalize. This will bring up the program that is standard with Windows. It lets you choose how you want your desktop to look.

TIP: If you have Windows Starter Edition, the one that comes with most netbooks (those little laptops), you can’t change much on your desktop. Don’t worry, it’s not worth the extra money to upgrade Windows on a basic computer such as a netbook.

Every app or program has a different right click menu. If you’re stuck and can’t figure out how to do something, try right clicking anywhere on the screen to see what choices are offered.

The left mouse button is the one you use to select things. If a menu is open, one click will select the item you want. If you’re on the Internet, one click will open a link and a right click will offer different options to choose from. On your desktop you’ll have to double click to open a program or a folder. Sometimes you might double double click and get two things running at the same time but, no worries, just close one down by clicking the X up on the top right corner of the program screen.

Holding the left mouse button down is used for selecting things on your desktop or in something that you are working on. If you click and drag with your left mouse button in Word, for instance, you will highlight a section of text. On your desktop, holding the left mouse button after you click on an icon will allow you to drag that item around. Try it. Click once and hold the button down to drag any icon around your desktop. Cool huh?

That’s all for now. Thanks for reading!

Back to Basics – Windows


Instead of getting deeper and deeper into computer technology, I’ve decided to start at the beginning. Many blogs deal with technology but not many of them are targeted at beginners. Tech people like to hide behind jargon. We will try to clear the air and the confusion, using plain English instead of buzzwords. Computers Made Simple will help you figure out what’s going on behind the scenes with your computer. If you understand the basics, I think you’ll discover that computers aren’t so mysterious after all.

Since I am a PC guy mainly, much of what you read here will pertain to the Windows Operating System (OS). Some of the posts will be cross-platform so if you’re a Mac person, keep reading. Windows and OS X are both operating systems and this post will help you figure out what an OS does.

Inside your computer are many, diverse bits and pieces. In order to make them work together, in order to simplify your work, you need an OS. This isn’t too much different from your car. It, too, has many diverse bits and pieces. Somehow, all of these pieces have to be controlled. You don’t want to be driving down a busy highway wondering whether your fuel will run out, right? There’s a gas gauge on your dashboard which takes care of that worry for you. That dashboard, full of gauges and lights, is essentially the same as Windows is on your computer. It’s the interface between the mechanical or electronic bits and pieces of your car and you. The Windows and the OS X interfaces are different but they do essentially the same thing; they control everything that is running behind the scenes while you work. They make life simpler, although that might be a questionable statement.

When you start your car, it takes a few minutes to boot or start. The engine has to get some fuel, it has to get a bit warm and it has to figure out if anything is missing that would cause a problem for you when you finally take off. It takes a look at things like seatbelts, air bags, tires (sometimes), oil pressure and so on. Once your car (actually a computer that controls your car) decides that things are running fine, it finishes the boot process and waits for you to drive off.

Windows does the same thing. When you start your computer (laptop or desktop are the same here), Windows checks hundreds of things before it is ready for you to start using it. We’ll go over some of these things in future posts but, for now, let’s say that Windows looks at file system integrity, the drivers that run the different pieces of hardware, the anti-virus software that keeps your safe as well as all of the little programs that are set to run when you start or boot your computer. Depending on your set-up, this could take just a minute or, sometimes, much longer.

Behind Windows (and OS X) is a massively complex sub-system which uses very complicated language to control everything inside your computer case. Just as you don’t actually have to know how the fuel from your tank gets into your engine to make it run, you don’t have to know how a file is saved to your hard drive, either. That in itself is a very complex process, both electronically and mechanically, but, because you are using Windows, you don’t have to think about it. It just happens.

There are some who would say that Windows has made computing more complex but if you think about the new cars, well, they are complicated, too. They do many things that cars didn’t do ten years ago. Computers, too, were simpler ten years ago but there is no reason to be afraid of them. Stick with Computers Made Simple and we’ll sort it all out together.

Thanks for reading!

What to do when Chrome crashes.


Google’s Chrome browser is getting more popular every year. It’s been my browser of choice since it came out. It’s fast, light and translates every page I throw at it. But it’s not perfect. If it was perfect, it wouldn’t crash, right?

Chrome is constantly updated, according to Google. If you are familiar with it, however, you’ll know that it sometimes freezes and then crashes. A little menu will come up and tell you that Google has crashed, that such and such a page or plugin is not responding. Should Chrome wait for it to get better or do you want to close the program? Believe me, it’s frustrating.

What to do about it? Google doesn’t seem to be able to come up with a solution. Believe me, I’ve tried to find an answer to this online. There are ample forum posts about it but no real answers that I could find. We all know that it has something to do with Flash but Chrome is updated on a continuous basis, isn’t it? Hell, you can’t even upgrade Flash using Chrome because every time you try, Chrome says that you’re using the most up-to-date version already. OK, if that’s the case, why the hell does it crash?

Here’s the solution that worked for me the last few times Chrome has crashed. Step by step, it’s pretty easy. Let’s say that it’s a fix, not a real solution. Google will still crash at some point but this is how you can get it working again for a few months.

1. Close Chrome.

2. Go to your Control Panel then to Programs then to Uninstall a program.

3. Look for Adobe Flash, highlight it and delete it. Make sure all of your browsers are closed. You’ll also have to close MSN, Yahoo and QQ, if you have them open.

4. Reboot your computer.

5. Open Internet Explorer or Firefox or Safari or Opera, any other browser BUT Chrome.

6. Head over to the Adobe site and download Flash. Here is the link: http://get.adobe.com/flashplayer/ 

7. Install the latest version, then close your current browser.

8. Start Chrome and surf away. Your days of frustration are over.

I don’t know why this solution works. It doesn’t make sense at all. Chrome won’t allow you to install Flash on its own but it seems to depend on the Flash version that is installed on your computer, even though it says you are using the most current version.

Whatever the reason, this works. Good luck!

Thanks for reading!

Lost Desktop Folder


I ran into this problem this morning. Somehow I had lost a folder on my desktop. Maybe Windows got confused. Maybe I had moved it off-screen. Maybe it was under another folder. Whatever the reason, I couldn’t get it back Here’s how I solved the problem.  (It’s so simple that you’ll kick yourself for not thinking of it. I know I did!)

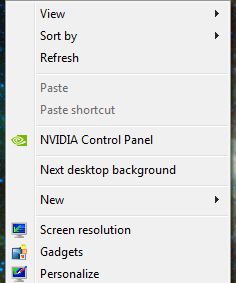
1. Right click your desktop. The following menu appears:

A Selection of Options for Your Desktop
Right click then choose 'Sort By'

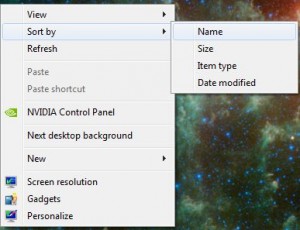
Once you see this menu, choose ‘Sort by’ and this next menu will come up:

Right Click the Desktop to Get This Menu
Choose any arrangement you want. They all work to recover the lost folder.

These are the choices to sort all of the items on your desktop. If you sort by type, everything will be lined up on the left side according to file type with folders at the upper left. Your missing folder will be among them…hopefully.

If the folder still isn’t there but you can see it in Windows Explorer, see if you can find out where it is by choosing ‘open file location’ in the right click menu. Then you can track it down. Good luck!

Thanks for reading.