Category Archives: Windows

Windows Disk Management – Initialize your disk

We added two new hard drives to one of our computers this week. It had two drives already but we wanted to install Windows 8 and decided that a new drive would be a good thing to add. We had a 2 terabyte drive ready to install then we and a 3 terabyte to the collection. That gave us four, one for Windows 7, another for Windows 8, one for Linux Ubuntu (already installed) and the last one as a spare for storing important files.

Before we could partition the drives, we had to initialize them. What does that mean? Contrary to popular belief, it does not mean ‘formatting’. Let’s say someone gives you a book. There is nothing on the outside of the book to tell you what it is. Therefore you have to look inside it to see what it is. You ‘initialize’ the book when you look inside. Now, that book has nothing in it but once you open it, you know it has nothing in it. At this point you recognize that book as a book with nothing in it. This is a rough description, of course. In reality Windows puts its own little notes on the drive so it will know what that drive is. There are two types of notes that Windows uses. Here’s how to figure it all out.

1. Add the new drive to your computer. That part is quite simple but if you have a problem with it, enlist the aid of a techie friend.

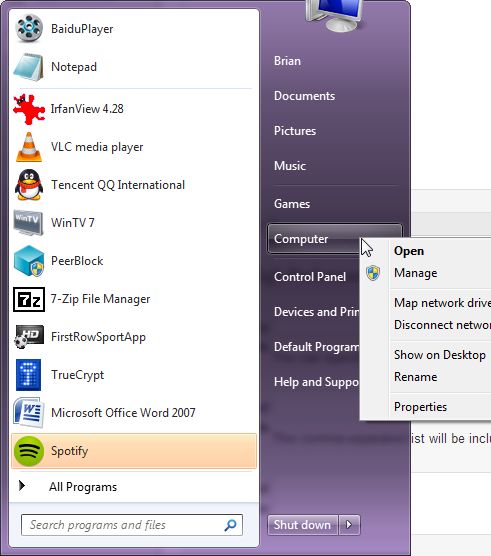
2. Start your computer and, once it’s booted up, click on the start button the look for the word Computer. Right click Computer and choose Manage. This is what this all looks like:

Photo of Window's Disk Manager  1
Start then Right Click the word Computer.


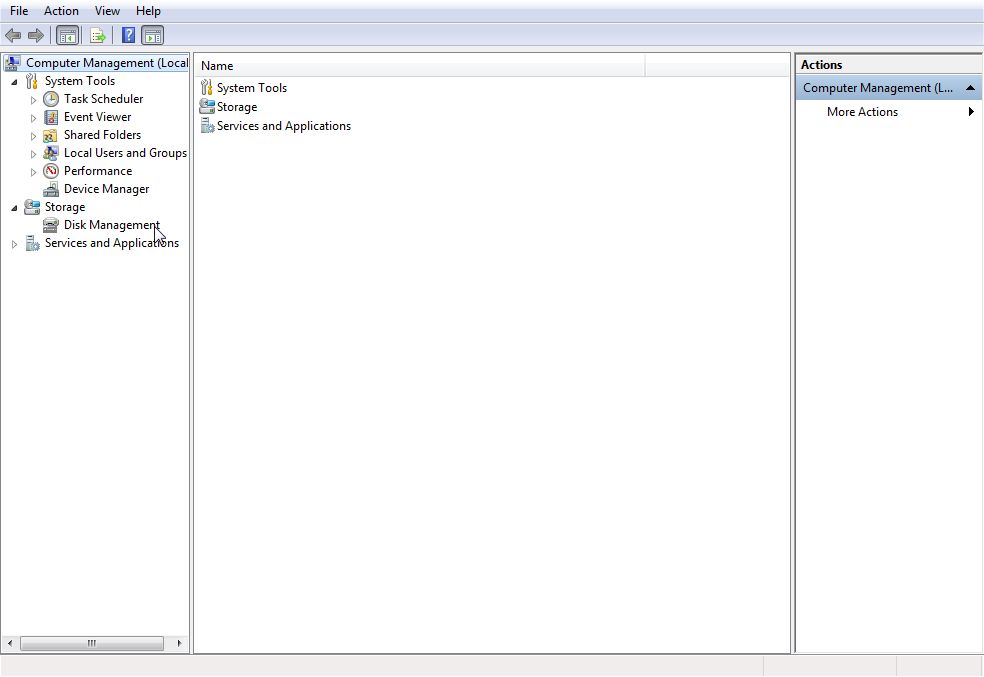
2. When Computer (used to be My Computer) opens, look for Disk Management down on the lower left:

Photo of Window's Disk Manager  2
Disk Management is what we want.


3. Windows will take a few moments to think about your request then, when it sees that one or two drives are not initialized, you’ll see this menu:

Photo of Window's Disk Manager  3
MBR or GPT?

4. We installed two drives at the same time. As it turns out, we could use the MBR partition style for one drive but not the other. Remember that one drive was 2 terabytes while the other was 3 T? MBR only works for drives smaller than 2 Terabytes or for partitions smaller than 2T. Since we wanted a full 3 T partition on one drive, which would allow Windows 8 to do what it wanted to the drive on installation, we opted for GPT on the larger drive.

5. We could use GPT on both drives, keep that in mind, so your choice might be just to opt for GPT right from the start. Unless you are using Windows XP, you are quite safe using GPT. No worries.

6. Once you initialize your drive, this is what you’ll see:

Photo of Window's Disk Manager  4
Now the drives are showing their correct size and you can interact with them.

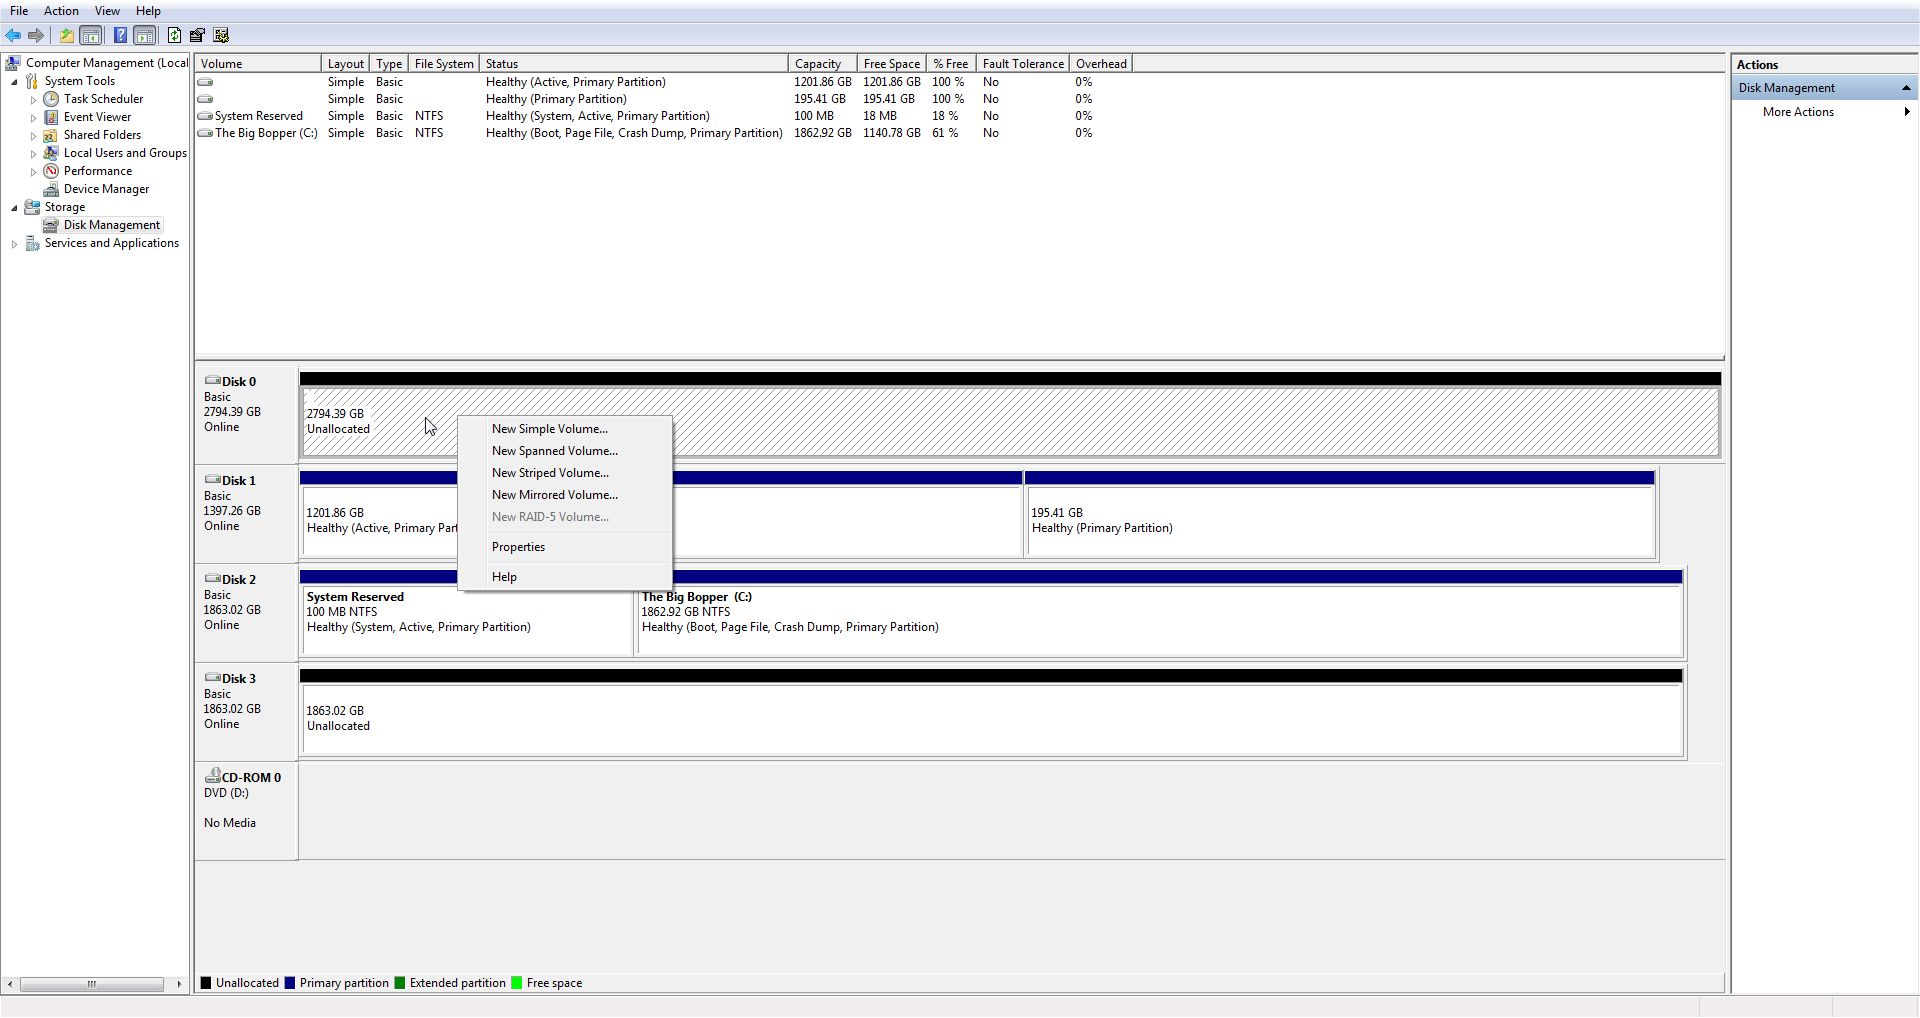
Across the top you’ll see that two of the drives are unformatted but Windows knows what they are and tells you the size, etc. Down in the middle, you can right click and choose what kind of volume you want. Since there are a number of options, we’ll leave that for you to investigate. We might do another post on that later on but, for now, we’ll leave this as it is.

TIP: If you’re starting out with a new computer, a new drive and a new installation of your operating system, that operating system will take care of all of this.

How did we get into this? We tried to install Windows 8.1 on one of the new drives. During the early stages of the installation we saw a message that we’d never seen before, and we’ve installed Windows at least 50 times over the years, maybe more. At that point we thought that if we initialize the disks, Windows would install itself on one of the new drives. We were wrong.

We’ll give Windows 8 a shot next to see if it works but at least we were able to teach you about initialization, right? If you have questions, make a comment below and we’ll answer it as soon as we can. Better yet, like our Facebook page and you can ask us on it. Here’s the link: Computers Made Simple on Facebook. 

Thanks for reading!


10 Windows Tricks and Tips for Beginners

Windows can be confusing by times, even for experienced users. Here are ten tips that will help you spend more time working and less time getting frustrated.

1. Multiple Windows Explorer windows: We use Windows Explorer often. Many times, we’re moving stuff around from one folder to another. If you have one window open while you do this, it takes time to do just about anything. Here’s how to get two or more windows open. Click on the folder icon on the bottom left of your taskbar to get one window open then right click the same icon and choose ‘Windows Explorer’.  A second window will open up which will allow you to move things around from window to window, one folder in the left and another folder in the right. How do you move stuff around? Read #2.

Photo of Two Explorer Windows
Drag things from one window to the other. You can have more than two, too.

2. Dragging and dropping is easy, right? Select something with your left mouse button but don’t release that button. As long as the button is pressed, the thing you selected can be dragged around your screen, even from one folder to another. If you want to move a file to another folder, just click on the file, hold the button and drag it to the folder you want it to end up in. You’ll know when to let the button go when the target folder turns blue. Want to select more than one file? Read #3.

3. Multiple file/folder selection: There are several ways to select more than one file. If you click anywhere inside a folder, hitting CTRL and the A key at the same time will select everything in the folder, single files as well as folders. If you click on one file in a line of files, move your mouse down to the last one you want to choose then hold down the shift key and click your left mouse button. That will select the first and last file and/or folder and everything in between. Want to select only a few files? Hold down the CTRL button and click on every file or folder that you want to select. Read #4 to see what you can do with the files or folders after you select them.

4. Right click menus; Your right mouse button is very handy once you have selected something in Windows. Right click a selection and read the menu. There are all kinds of things you can do from that menu. Right now, we’ll choose Copy and Paste. Once you choose Copy, the whole selection you’ve made is copied into Windows memory (RAM). It will stay there until you select something else or until you Paste it all into another folder. Once you decide on a location, click anywhere in the white area (or on a folder if you want to Paste it all into that folder), right click and choose PASTE. Read #5 for a faster way to do this.

Photo of Right Click Menu
There are many choices when you right click a file or folder.

5. Shortcut Keys: If you select something, there are several shortcut keystrokes that you can use to interact with that selection. You have to press two keys at the same time but, believe us, it’s a lot faster than using your mouse. Here are some shortcuts you can use: CTRL/a (select everything inside a folder), CTRL/c will copy any selection, CTRL/x will ‘cut’ any selection (cut removes the selection from its current location while copy leaves the selection where it is and puts a copy somewhere else when you choose Paste later on), CTRL/v will paste anything that is in Windows memory into whatever you choose to paste it into, CTRL/s will save something that you’ve already saved again or it will open up the ‘save as’ window if you haven’t already saved your selection or file, CTRL/z will ‘undo’ whatever action you’ve just performed. Remember this last one. If you move a file or do something drastically wrong, hit CTRL/z and that action will be undone. There are more shortcuts but that’s enough for now.

6. Screen Captures: Sometimes you want to save a photo or part of something that is on your screen. You can’t always save an image you see so you have to do a ‘screen capture’. On your keyboard, and it varies from computer to computer and laptop to laptop, look for a key near your F (function) keys. It will have ‘PRTSCN’ or something similar on it. Sometimes you have to press another key to make it work but normally you just have to press the key itself. Do that and your whole screen is saved temporarily in Window’s memory, waiting to be pasted into an image program. We use Irfanview for all of our basic image work and we recommend that you do the same. Just open any photo in Irfanview, hit CTRL/v or right click and choose Paste, and the copied screen is pasted into a new photo window, ready to be saved as a picture.

7. Highlight sections of text:  Remember we told you about ‘drag and drop’? Well, you can use drag and drop to highlight whole paragraphs on the Internet or in a document, or single words or sentences for that matter. Click your mouse on the first word but don’t let the button go, then drag the mouse over what you want to copy until you reach the end. Everything that is selected or highlighted will turn blue. Right click in the blue section (or hit CTRL/c) and then open Notepad or Word and choose Paste or hit CTRL/v. This is a fast way to copy bits and pieces of text from one area or folder or document to another.

Photo of Drag Selection
The text in blue can be copied or cut.

8. Zip to the top (or bottom) of a page:  If you’re on Facebook and you’ve scrolled all the way to the bottom of the page and want to get back to the top instantly, just press 7 on your keyboard number pad. If you want to get to the bottom of a page, press the 1 key. Note that this only works on a keyboard with a number pad and Numlock has to be off. Some laptops have the number pad, some don’t.

9. Safe Ejection: If you’re using a flash drive or something similar, Windows doesn’t always let you eject it. Windows insists that some program is using the drive and you have to wait until it’s finished. Don’t just yank the drive out, it can be ruined. The quickest way to get it to eject is to log off then back on again. It’s reasonably quick and very effective when a drive and/or Windows is stuck and won’t let you safely eject it.

Photo of Logoff menu.
Switch user will work just as well.

10. Permanent File Deletion: We’ve saved this one till the end, mainly because it can backfire on you. You all know how to delete something, right? Select it, right click and choose ‘Delete’. Whatever it is that you selected is sent to the Recycle Bin. What if you want to get rid of that item permanently? Simply hold down the Shift  key and then select Delete. Windows will ask you, Are you sure you want to Permanently Delete this file? It’s your choice to say Yes or No to that. If you choose Yes, that file is gone forever. You’ve been warned….

Photo of Ten Tricks and Tips
Make sure before you select Yes.


If you send the item to the Recycle Bin, it can be restored. Use this tip carefully, just in case you make a mistake.


Thanks for reading! Hey, why not Like us in Facebook? Keep up with our posts and updates. Here’s the link: Computers Made Simple on Facebook

Copy and Paste from Windows Command Window

If you know what a ‘command prompt’ or command window is, you may not know how to copy and paste from it. Here’s the trick:

1. You can get the window to appear in at least three ways. Type cmd into the search line after you click the start button; right click in most folders while holding the shift key and choose ‘open command window here’, or navigate to All Programs then Accessories and choose Command Prompt.

2. Once the command window opens, it’s DOS from then on. Enter your parameters, something like ‘tracert brianmahoney.ca’ and your window will fill up with all of the steps it takes to get to this site.

3. What if you want to copy and paste that data into another program, Notepad for instance? It’s easy! Here are the photos to show you:

Photo of Command  1
The command window showing the trace route path to Yahoo.


On the border of the command window, right click. This will come up:

Photo Command  2
Right click on the border, move down to Edit then choose Mark.


Click on where you want to start the copy action. We chose the T on tracert.

Photo of Command  3
Click on the first letter of where you want the copy to start.


Hold down the shift key and click on the LAST letter or number of what you want to copy:

Photo of Command  4
The selected text will turn white as soon as you click the last letter/digit while holding down the shift key.


Back up to the border of the command window, right click and choose Edit then Copy:

Photo of Command  5
Choose Copy.


Open Notepad, right click anywhere in the white part and choose Paste:

Photo of Command  6
There is the text that you copied from the command window.


You may never need to use this but now you know how it’s done, just in case you ever need it.

Thanks for reading!


Fix Microsoft Software Problems

Every now and then, Microsoft’s Office or Word Starter simply won’t work. Either they won’t start or they won’t close down, something screws up somewhere. What do you do? You let Windows fix the problem. Here’s how:

1. Click on Start or the Windows icon down in the lower left corner of your taskbar and look for Control Panel.

Fix   1
Open your Control Panel


2. When the Control Panel opens up, look for Programs:

Fix   2
You want to click on the words ‘Uninstall a program’.


3. You don’t really want to uninstall a program, all you want to do is fix one, but this is how you get to do that. Once the program menu opens, scroll down to the Microsoft program that you want to fix. In this case, we’re going to pretend to fix Microsoft Office:

Fix   3
Click once on the program that you want to fix, to highlight it.


4. Up on the blue bar, part way down from the top, look for the words ‘Organize   Uninstall    Change”.  We want to click on Change.

Fix   4
Change is what you want. Click it.


5. Once you click Change, you’ll see a menu that will let you Add or Remove Features (you must have the CD or DVD handy), or Repair the installation. We want Repair.

Fix 5
Choose Repair, then Continue.

Follow the prompts and Windows will repair the software for you. In the case of Office or Word Starter, you should probably delete all the user settings, just in case they are causing the problem. Repair will ask you if you want to do that, we would suggest ‘yes’.

The final two screens may not look the same as ours, depending on which Microsoft program and which version of it you are using. This fix only works with Microsoft software, unfortunately. We used this when the free edition of Word, named Word Starter, wouldn’t…start, that is. This solution fixed everything up quite nicely.

Thanks for reading!  Why not ‘Like’ us on Facebook and keep up with all the latest tech news and tips?   Computers Made Simple on Facebook 

Make Text Bigger – two simple ways to make text on your computer screen larger

Is the text on your computer screen looking a bit smaller than normal these days? While this is a natural part of the ageing process, we can help a bit. Here’s how you can increase the size of the text on your computer screen:

1. In any browser, at least the ones that we’ve tested, as well as programs such as Word, simply hold down the CTRL key (control key) and roll your mouse button away from you. To make the text smaller, roll the mouse button towards you.

2. Alternatively, just in case you are using a laptop or an older mouse, hold the CTRL key and press the key just to the left of the backspace key, the one that has the = and + symbols on it. This is easy to remember because of the + sign. Conversely, hold the CTRL key and press the – key, just to the left of the + key, to make the text smaller.

Photo of qwerty keyboard.
Here are they keys to look for.


If you’re using a photo editing program, Irfanview for instance, you can zoom in or zoom out using this same key combination. This won’t work on menus but it will work in just about every software program that we’re tried. When you want to change the text back to normal, in Google Chrome anyway, look for the magnifying glass icon up on the top right. Click it and you can instantly set the text back to its default size.


Photo of Chrome Zoom Setting.
This is at 110% but click Reset to bring it back to normal.


While you may not need the zoom all the time, remember this tip for those times when you do. Also, if a friend or a relative seems to be having a problem with this, show them how to make use of this tool.

Thanks for reading!