Category Archives: Uncategorized

How to Enter Safe Mode – here’s an easy way to do it.


Most people know that hitting the F8 key during the boot process brings up a menu that lets you boot into Safe Mode . What’s Safe Mode? Why would you want to use it? Here’s a rundown on it.

Safe Mode is a very slimmed-down version of Windows that allows you to repair the regular version without hindrance. When your regular Windows is running, hundreds of things are going on in the background. In Safe Mode, this background noise is minimized, allowing you access to settings that are sometimes locked in other modes. Renaming system files, for instance, can’t be done any other way than using Safe Mode. Some viruses don’t allow themselves to be removed unless you are in Safe Mode so it’s a good idea to run your virus software sometimes in it. Very often Windows itself will ask you to reboot into Safe Mode. How do you get into it? Here’s my way:

1. Go to the Start button and type ‘msconfig’ into the Search slot (without the apostrophes). Like this:

msconfig in search slot
Type msconfig into the search slot

2. Hit enter and wait for a few seconds. If you have an older computer, it might take more than a few seconds.

3. The msconfig menu will pop up in due time. It looks like this:
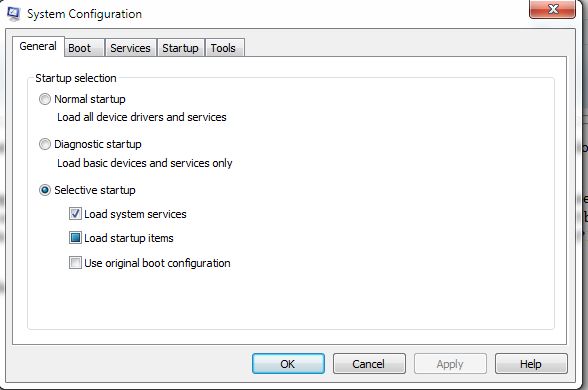
msconfig menu
Here's the very handy msconfig menu

4. There are five tabs. The one we want to use right now is ‘Boot’. Click on it and you will see this:
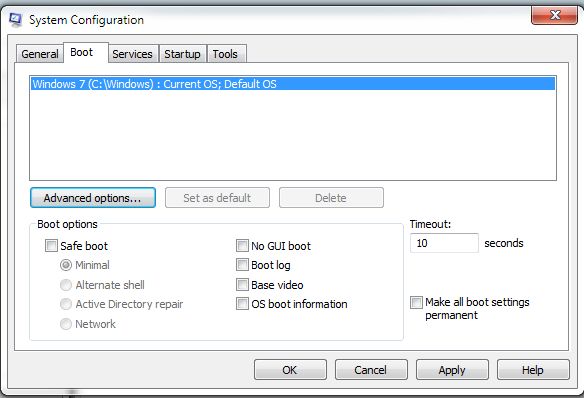
boot tab on msconfig menu
This is the tab we want to boot into safe mode.

5. Choose the box ‘Safe Boot’ and ‘minimal’. There are other uses for this, you’ll have to use Windows Help to figure out which one you want but I use ‘minimal’. Once you can get into this menu, there are many other things you can do. I’ll write about some of them in subsequent posts.

6. Choose Apply then click OK. You can now re-start your computer and it will be in Safe Mode.

7. Do your repairs and then reverse this process to get back into the full Windows that you’re used to.

TIP: Your screen won’t be the same. This isn’t a problem. Because there are no drivers (the things that run your video settings), your screen is set to its default mode. Huge icons and a mish-mash of things on your screen are normal in Safe Mode.

Thanks for reading. Follow me on Twitter if you have questions.


Defragging explained – a free, easy way to speed up your computer


Defragmenting your computer’s hard drive should be a regular part of your maintenance routine. Is it? If it’s not, and if you don’t know what the heck defragging is, read on.

If you’re like me, but who is, you probably download pictures, music and software quite a bit. Once you’re done with whatever it is you’ve downloaded, then you delete it. Right? The more you do this, the more your hard drive gets ‘fragmented’. Let’s consider what Windows tries to do when you’re using your computer. Like any other stressed worker, Windows feels the need to hurry up and get things done. I know, sometimes it doesn’t seem that way but Windows does the best it can do.

When Windows is putting your stuff away, that is putting your files where it thinks it has room, sometimes it just throws everything everywhere. This is similar to someone getting ready for an evening out. Clothes fly here, shoes fly there and, at the end of the preparations, the person looks great but the room is a disaster. That’s what your drive is like after a few weeks or months of adding and deleting files.

Windows knows where everything is, it just takes longer to find things because of the mish-mash on the drive surface. It’s the same thing as the person’s room in the example above. Everything is still there, nothing has disappeared but things take time to find.

Defragging is simply a cleaning up process that puts all of the ‘fragments’ of the files in order, more or less. Windows sorts out the bits of files, puts them back in order and creates an empty space, known as contiguous space. Basically this is like a landing zone where Windows can start to throw stuff again when the defragging is finished. If you haven’t used a defragmenter lately or, god forbid, you have never used one before, make sure you get at it. Here’s how:

1. Before you go to bed or before you head out somewhere and know that you won’t be using your computer, turn off everything except the computer itself. Of course, leave your anti-virus on but turn off things that run in the background: chat engines, software updates and things like that.

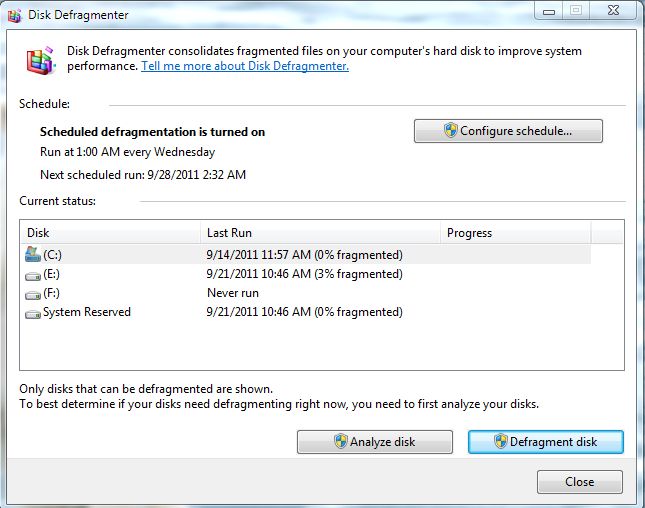
2. Go to Start, All Programs, Accessories then System Tools and choose “Disk Defragmenter”.  You’ll see a menu like this:

disk defragmenter menu
All of your drives are listed here, ready to be analyzed and defragged.

3. Click on your main drive, almost always (C:) and click on ‘Analyze disk’. Windows will then take a peek at your hard drive and see how messy it is.

4. If the drive is anything above 5% defragmented, I would suggest degragging it. I just did this on my two year old netbook that I use infrequently for file downloads. After two years of more or less daily use, the drive was 14% defragmented. After defragging, the computer was noticeably faster.

5. Once the analysis is finished, click ‘Defragment disk’ if it is sufficiently fragmented. Right now, the hard drive on this computer is 8% defragmented. However, this drive is a 2 terabyte drive and, while I probably need to defrag it, I will wait until I go to bed tonight. The larger your hard drive, the longer it takes to defrag. I can see the defragging on this drive taking several hours or more.

6. Once the defragging is done, reboot your computer and, hopefully, you’ll notice a difference in speed. There are other ways to speed up your computer so stay tuned to this spot for more help.

TIP : If you have one of the new SSD drives, you don’t have to defrag it. In fact, Windows should turn off automatic defragging as soon as it has sensed the type of drive you have. Automatic defragging can be set in your Task Schedule but, hey, who remembers to set that up?

Thanks for reading. Questions are welcome. Follow me on Twitter (top right of this page).


Fotobounce – download whole Facebook albums quickly


Want to download a whole Facebook album without having to click the download button on each pic? Fotobounce will help you do just that. For small albums the download clicking works just fine but some albums have hundreds or even a thousand or more photos. Here are the steps to downloading those Facebook albums quickly and easily. Oh, Fotobounce is free. Did I mention that?

1. Download Fotobounce here : http://fotobounce.com/  and install it. There are two versions, one is ad supported and one is not. The one that isn’t ad supported costs money, obviously. There is even a free version for Macs.

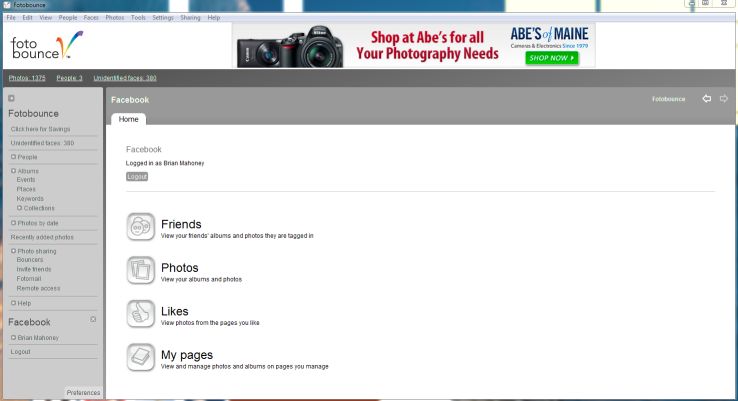
2. When Fotobounce opens, you’ll see the word Facebook down on the lower left side. Click that and sign in, Fotobounce doesn’t save your password unless you want it to. Once you are logged in, you’ll see a menu like this:

Fotobounce Facebook Menu
All of your friends are listed here, as well as your likes.

3. Fotobounce lists your friends as well as your ‘like’ pages. You can also download your own albums.

4. Click once on friends or likes, whatever you want to see next.

5. Double click on whoever you choose.

6. Right click and select ‘download’ then specify a name that will identify the downloaded album on your computer. You might want to create a new album every time. This would make it easier later on to find the albums.

7. Once you have named the album, hit enter and Fotobounce will download the complete album from Facebook. The albums are saved in your Pictures folder. On my computer, the Pictures folder wasn’t available to explore while Fotobounce was open. If you want to see the photos you have just downloaded, close Fotobounce then head to your Pictures folder (under Libraries in Wondows 7).

Tip: Keep in mind that the photos you see in Fotobounce are not high-res pics. They look crappy in the program but the ones that are saved to your computer are just fine, don’t worry.

That’s it! Quick and easy and, best of all, free. There used to be an extension for Google Chrome that did all of this for you. Facepad, unfortunately, doesn’t seem to work anymore. No matter, we now have Fotobounce. This program also does other things, check it out, but the point of this post was to let you know how it works with Facebook.

Thanks for reading. If you have comments or questions, add me on Twitter or comment here. Good luck!


Fatcow hosting – good or bad?

For a few months now, I’ve been using Fatcow for my different sites. Why did I choose them? I had read some reviews and didn’t come across anything bad, at that time, plus their shared hosting rates were pretty cheap, amazingly cheap as a matter of fact. Now, after several months of use, I’ve decided to write a review of Fatcow, just in case you’re looking for a new host for your own sites.

Shared hosting means that your site’s actual serving computer serves other sites as well. Dedicated serving costs much more than shared but if you don’t have a huge site and you don’t really care too much if your site is a bit slow to load, shared hosting is fine.

One caveat that you should be aware of is the problem with WordPress. While WordPress is a superb front end for your website, it also uses a fair bit of serving oomph as far as putting a load on your server. WordPress uses a database to keep track of everything and this database, MYSQL, puts a drain on the computer that runs it. The bigger the site, the bigger the database and, of course, the bigger the drain. Pure HTML doesn’t use a database and all of my HTML sites load like greased lightning. My WordPress sites, however, can be agonizingly slow by times.

There are different settings in WordPress that can affect the loading speed and, according to Fatcow’s help department, you can also optimize your databases. Having done most of these things, suffice it to say that the sites sometimes take a long time to load.

As far as Fatcow’s tech support, they are efficient and seem to be capable, at least for the few times that I have used them. I should warn you now that Fatcow does NOT use CPanel. If you’re used to the CPanel interface, you will be sorely disappointed with Fatcow. I grew up with CPanel, at least as far as working on websites is concerned, and was dismayed that this was something I didn’t check before I signed up. That is an LAL (Live and Learn) moment, certainly not an LOL one.

For now, Fatcow is filling the bill for me. Either I switch all my sites, eleven of them,  to HTML and put up with coding in Dreamweaver or I shut up about slow load times. I’ll see what happens. I would give Fatcow a B. At times when my sites have been slow, I would rate then a C- but things aren’t too bad right now.

Finally, there was talk a while ago about some kind of spiff from Fatcow if any of my readers signed up with them. Well, the link to that program is completely dead (did it ever work?) and it seems that this was another brilliant idea that lost its steam.

Thanks for reading. If you have questions or comments, tweet me. Link is up on the top right.

Filezilla FTP – how to use it


Filezilla is an FTP client, meaning that it’s a piece of software that links your PC to an FTP site. Usually, the FTP site is your own hosting account. You would use Filezilla to send files up and down to your website host. There are FTP sites which host files but the thrust of this post is to show you how to upload files to your website.

1. Once you have a hosting account set up, head to your account page. You’ll find ‘Path to FTP’  or something very similar to it somewhere on that page. It looks like this: ‘ftp.mysite.com’, depending on your site name and whether it’s a .com, .ca or whatever. This is the address that points to the root folder of your hosting account.

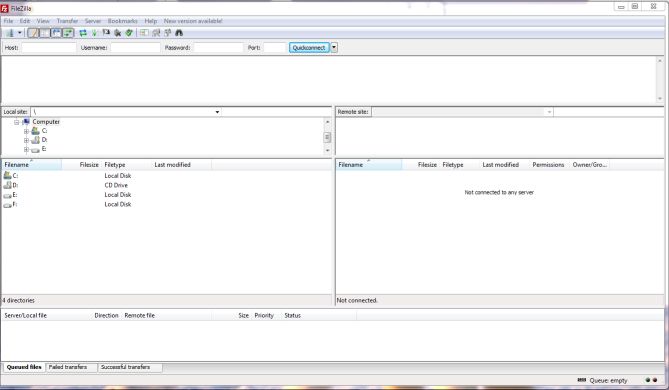
2. Download Filezilla  and install it. Open Filezilla and you’ll see an image something like this :

Filezilla first menu
This is the menu you see when you first open Filezilla

Don’t let this menu intimidate you. The areas you want to focus on are the slots for ‘host’, ‘username’ and ‘password’. Don’t worry about ‘port’.  The window below those slots is the activity window. It’s empty now.

Below that is a view of two things, the left is your computer’s file system and the right, which is empty now, represents the file system of your hosting account.

3. Fill in the address that you found on your account page, the ftp.mysite.com thing. Then enter your username and password. If you own the site, this is your username and password that you enter to view your account in your browser. Leave the port slot open.

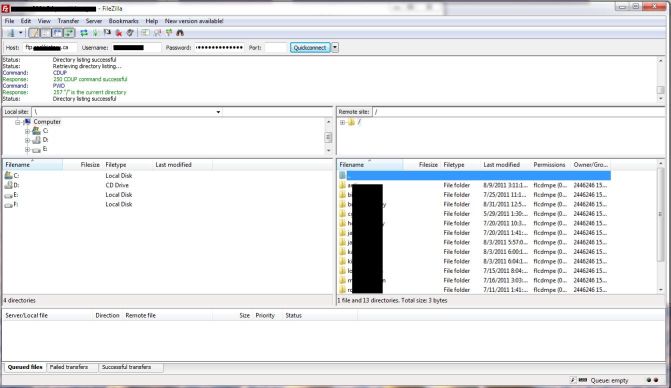
4. Once you have the info entered, click on the Quickconnect button. Filezilla will fly into action and attempt to connect to your host server. If you’ve entered all the correct information, you’ll see a menu that looks like this :

Filezilla menu showing both sides of the file systems.
This is the menu showing both sides of the file system and the activity window.

5. Don’t do anything yet except look at the menus. On the left are your files, usually on your C: drive. On the right are the folders that are on your host’s server. Nothing new here if you’ve been using Windows Explorer for years like most of us have.

6. All of your web files and images should be in one folder on your computer, I keep mine on my desktop in a folder named ‘Web Folder’. Simple, huh? On the right side you will see your root menu. I have 11 sites which are served from one account at Fatcow.com (not sure if I can recommend them or not yet. Read the online reviews first, OK?). Each of these sites has a folder which contains ALL of the files for each site. Of course there are sub-folders and directories but when I am uploading files to this site, I use the brianmahoney folder.

7. You should set up your folders using the file manager on your host account. Why? Because you have to tell your host where the files are for each website. You can’t go putting stuff up there without letting your hosting server know where those files are, right? Once you have the basic directories or folders set up there, then you can use Filezilla to upload more.

8. OK so you have your web folder on the left and the web folder for your website up on the right. The folder on the right should be empty, pretty much. Just make sure that you’ve got the correct folder open or your site won’t open.

9. Highlight one file or folder or highlight a whole bunch of files and folders by clicking the top one and scrolling down to the bottom then clicking the last one while holding down the shift key. Then right click that set of files and choose ‘Upload’. Sure, you can drag and drop the files too, but I prefer right click/upload simply because I make less mistakes that way. I sure don’t want to dump a whole WordPress folder in the wrong place. Open the right folder on the right, then the web folder on the left and right click/upload. Simple, easy and relatively quick.

10. At the bottom of the menu you’ll see the number of files that are queued, failed transfers (if any) then successful transfers. Obviously the first and last should match. You’ll also the the full number of files to be uploaded and the number of files left to upload. Once Filezilla is finished you will see the ‘Directory Listing Successful’ in the top activity screen.

That’s pretty much it. Disconnect Filezilla by clicking on the button with the red X on it. Head over to your hosting account and check the file manager there. Your host folder will now have the files that you’ve sent up over FTP.

Questions? Comment or ask me on Twitter. I’m around all the time.

Thanks for reading!