Filezilla is an FTP client, meaning that it’s a piece of software that links your PC to an FTP site. Usually, the FTP site is your own hosting account. You would use Filezilla to send files up and down to your website host. There are FTP sites which host files but the thrust of this post is to show you how to upload files to your website.
1. Once you have a hosting account set up, head to your account page. You’ll find ‘Path to FTP’ or something very similar to it somewhere on that page. It looks like this: ‘ftp.mysite.com’, depending on your site name and whether it’s a .com, .ca or whatever. This is the address that points to the root folder of your hosting account.
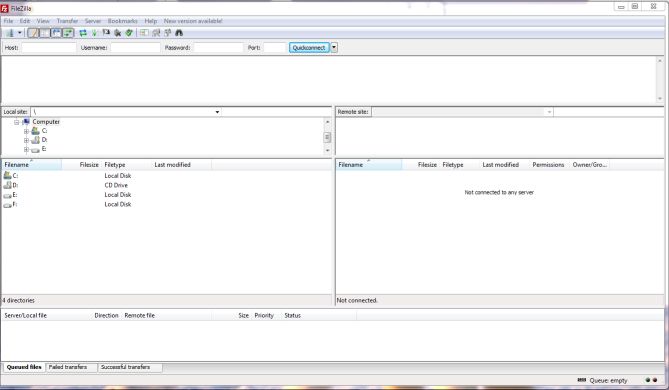
2. Download Filezilla and install it. Open Filezilla and you’ll see an image something like this :

Don’t let this menu intimidate you. The areas you want to focus on are the slots for ‘host’, ‘username’ and ‘password’. Don’t worry about ‘port’. The window below those slots is the activity window. It’s empty now.
Below that is a view of two things, the left is your computer’s file system and the right, which is empty now, represents the file system of your hosting account.
3. Fill in the address that you found on your account page, the ftp.mysite.com thing. Then enter your username and password. If you own the site, this is your username and password that you enter to view your account in your browser. Leave the port slot open.
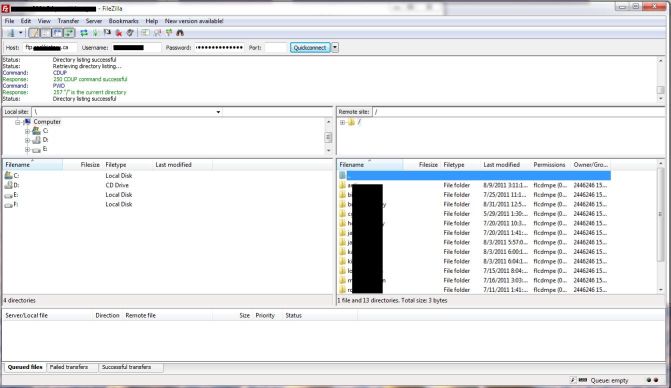
4. Once you have the info entered, click on the Quickconnect button. Filezilla will fly into action and attempt to connect to your host server. If you’ve entered all the correct information, you’ll see a menu that looks like this :

5. Don’t do anything yet except look at the menus. On the left are your files, usually on your C: drive. On the right are the folders that are on your host’s server. Nothing new here if you’ve been using Windows Explorer for years like most of us have.
6. All of your web files and images should be in one folder on your computer, I keep mine on my desktop in a folder named ‘Web Folder’. Simple, huh? On the right side you will see your root menu. I have 11 sites which are served from one account at Fatcow.com (not sure if I can recommend them or not yet. Read the online reviews first, OK?). Each of these sites has a folder which contains ALL of the files for each site. Of course there are sub-folders and directories but when I am uploading files to this site, I use the brianmahoney folder.
7. You should set up your folders using the file manager on your host account. Why? Because you have to tell your host where the files are for each website. You can’t go putting stuff up there without letting your hosting server know where those files are, right? Once you have the basic directories or folders set up there, then you can use Filezilla to upload more.
8. OK so you have your web folder on the left and the web folder for your website up on the right. The folder on the right should be empty, pretty much. Just make sure that you’ve got the correct folder open or your site won’t open.
9. Highlight one file or folder or highlight a whole bunch of files and folders by clicking the top one and scrolling down to the bottom then clicking the last one while holding down the shift key. Then right click that set of files and choose ‘Upload’. Sure, you can drag and drop the files too, but I prefer right click/upload simply because I make less mistakes that way. I sure don’t want to dump a whole WordPress folder in the wrong place. Open the right folder on the right, then the web folder on the left and right click/upload. Simple, easy and relatively quick.
10. At the bottom of the menu you’ll see the number of files that are queued, failed transfers (if any) then successful transfers. Obviously the first and last should match. You’ll also the the full number of files to be uploaded and the number of files left to upload. Once Filezilla is finished you will see the ‘Directory Listing Successful’ in the top activity screen.
That’s pretty much it. Disconnect Filezilla by clicking on the button with the red X on it. Head over to your hosting account and check the file manager there. Your host folder will now have the files that you’ve sent up over FTP.
Questions? Comment or ask me on Twitter. I’m around all the time.
Thanks for reading!

One thought on “Filezilla FTP – how to use it”
Comments are closed.