Category Archives: Irfanview

Batch Conversion/processing in Irfanview – a general guide


Irfanview, available here: Irfanview , is our favorite ‘free and fast’ photo software. While we don’t use Irfanview to manipulate images (retouching, etc.), we depend on it for cropping and resizing. One thing that we really love is the batch conversion feature. Our post today is a short guide about how to use this menu:

1. Download and install Irfanview. Accept the screen that asks you if you want Irfanview to associate itself with your image files. You can always change that later but there is no reason to do that.

2. For this lesson, double-click on one image in a folder of many images. Irfanview will open the image.

3. On the top left, look for File and click on it. The menu that comes down looks like this:
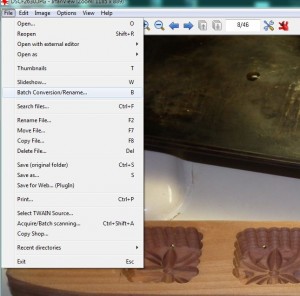
Photo of Irfanview File menu
Look for Batch/Conversion Rename


4. Click on Batch/Conversion Rename and this menu will pop up:
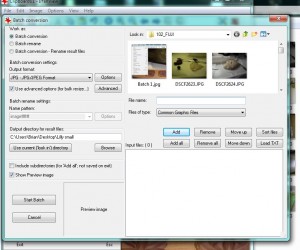
Photo of batch menu
Make sure you’ve opened one photo in a folder of many photos.


5. First, let’s ‘Add’ some photos from the top right box to the bottom right box. Either choose a few or choose ‘Add all’. The bottom pane will fill up accordingly as shown here:
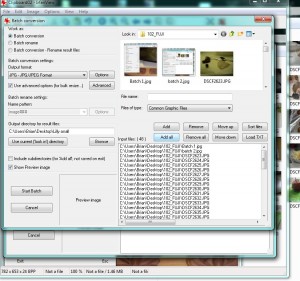
Photo of Batch menu with photos added.
The box is full.


6. Those are the images that we will work on today. Next, look for the Advanced button shown here:
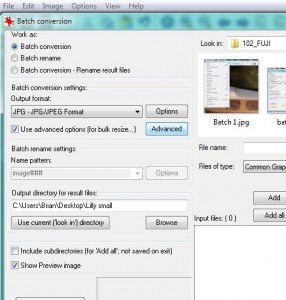
Photo of Advanced button highlighted.
Click on the Advanced button.


7. Once you hit the Advanced button, this menu pops up:
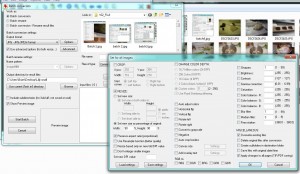
Photo of Advanced menu in Irfanview
This looks complicated but it’s not too bad.


8. With this one menu, you can crop, resize, flip, convert to grayscale and so on. Today, we’re going to resize all of the photos in the selection box to 90% of their original size. Make sure that Resize is checked then choose a percentage of the original, in this case 90%. Then, make sure that you have selected Preserve aspect ratio (proportional). We don’t use the Resample function but you can judge for yourself if this is necessary. Once all that is done, click on OK.

TIP: The most important thing in the previous menu is the ‘Overwrite existing files’ selection. Make sure that you uncheck this if you don’t put the processed results in another folder. If you don’t, you’ll lose the original files. Not a good plan, Stan.

9. Back to the main Batch/Conversion menu. In the ‘Output directory for result files’ , create another folder for the smaller files. We have named this ‘102_fuji SMALLER’ in this example. Doing this means that you keep the originals as they are and you’re putting the smaller versions in a completely different place. Smaller images are handy  when you are uploading an album to Facebook, for example. Then, look for the Start Batch button.
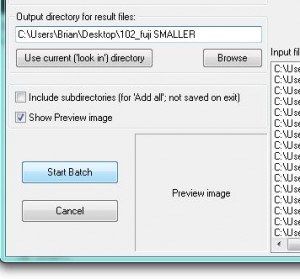
Photo of Start Batch button
Click the Start Batch button to start the processing.


10. Here’s what you see when Irfanview is processing the images:
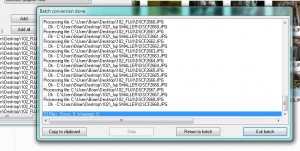
Photo of batch processing menu in Irfanview.
Irfanview has finished the processing with no errors. Yay!


11. Depending on the speed of your computer, the size of the original photos and some other variables, this process might take a while. As long as you have chosen a different directory for the output files, as opposed to replacing the originals, you’re safe. If you’ve made an error, usually done when cropping a group of photos, then you can simply delete the process folder and start over again. Whatever you do, don’t overwrite the originals.


If you have time, play around with this menu. Someday when you have 100 pics to adjust, you’ll be ready.


Thanks for reading!

How to Crop a Photo Using Irfanview


As you may know, we’re working on another blog, http://ww1diary.com/ . That blog requires us to crop photos of a 100 year old diary. Some of the text isn’t legible or decipherable, meaning that the photos of the original words are necessary in case there is a mistake. Hopefully, as the blog becomes more popular, readers will point out our mistakes. Here’s how we crop the photos that we use in our blogs.

1. Download Irfanview and install it. Make sure you download it from Tucows, fourth or fifth down the list here: http://www.irfanview.com/main_download_engl.htm . The other download sites often insist on downloading a special program first, which it total bunk. Head to Tucows and get it there.

2. When you install Irfanview, it will ask you if you want to associate your image files with it. This means, “Do you want to allow Irfanview to be the default program for image files”. We always say yes to that but you may have different preferences. Irfanview is fast, free and very dependable. We have relied on it for years.

3. Choose the photo that you want to crop. Here is one that we will work on today:

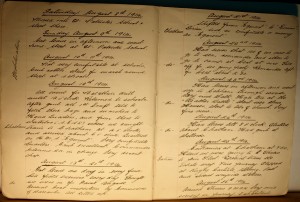
Photo of original diary page
This is the full page that we have to break up into day to day sections.


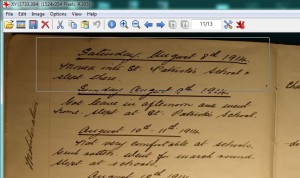
4. When you are cropping a photo, you’re essentially cutting out everything except the part you want. That could involve taking people out of a photo that aren’t part of the final image that you want, for instance. Drag your cursor across the image while holding down the left mouse button. You will see a box shape forming as you move from left to right. Practice this a few times to get it right. If you don’t get the right section, click once outside the rectangle to start again. You want something that looks like this:

Photo of crop rectangle on original photo.
We are cropping the first entry. You see the faint rectangle shape here.


5. Once you have the box formed around what you want to save, release the left mouse button and press the Control key and the y key at the same time. Instantly, the box that you formed will become the full photo.

6. Press the Control key and the s key at the same time and the Save dialogue will come up. Make sure you change the name of the image file to something else, otherwise the original photo will be replaced by the cropped image. 

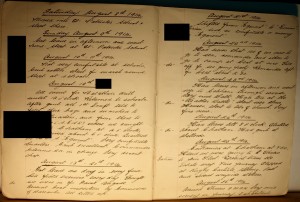
Tip: Just as you can crop a photo by hitting Control/y, you can keep the original but cut out sections by hitting Control/x instead. You’ve seen the photos of someone with a rectangle around the spot where there eyes would be, in order to disguise them. This is done using Control/x instead of Control/y. Here’s an example of that:

Photo of image with sections cut out.
This photo has had sections cut out of it.


We use GIMP for fine photo editing, using its cloning tools, etc., but Irfanview is our go-to tool for cropping, cutting, batch resizing, etc. Try it. We guarantee you’ll wonder what you did without it.

TIP: Although it is a bit more difficult, you can use Irfanview for batch photo cropping as well. You have to make sure that your photos are all EXACTLY the same except for some partial content, a series of screen captures comes to mind. We will deal with bulk processing in another post.


Thanks for reading! Check out our Facebook page here: https://www.facebook.com/ComputersMadeSimple?ref=hl Remember to like it, OK?


Bulk Photo Cropping


As you probably already know, Irfanview is one of my favorite free programs. I’ve used it for years and every computer in the house has it. Read past posts about Irfanview  here and here and here. Irfanview is fast, fun and works perfectly every time. You can download it and its plugins from Tucows. Get it here: http://www.irfanview.ca/main_download_engl.htm

If you have used Irfanview for a screen capture session, you’ve probably got dozens or hundreds of jpgs that include more of your screen than you need. Irfanview is perfect for captures but sometimes the box you draw around your target is too big. Here’s how you can set Irfanview up to crop those captures in one operation, no matter how many photos you have. How do I know? I’ve used this method before to crop about 2400 photos that I made into a little animated gif. It didn’t go viral but it was fun make.

1. Get all of your jpgs in one folder. Sort them out so that all the photos have the main capture in the same position on the screen. If you moved the window at some point while you were capturing the whole screen, sort those photos out and put them in different folders. You can reorganize them later.

2. Open Notepad or keep a paper and pencil by your hand. You will be writing down a few numbers for each cropping job.

3. Before you actually begin to crop, practice sizing the crop area first. Open one jpg. As with most programs, holding down the left mouse button and dragging the cursor will create a box. Test this out and try to get the correct size, the one that looks best to you. When you have the right box, click anywhere outside the box to unselect the crop.

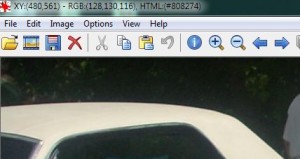
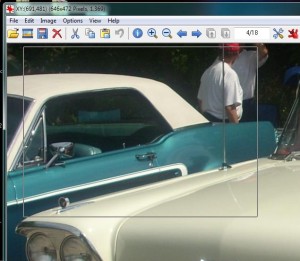
4. Next, click on the top left corner of the area that you want to crop. Don’t move your mouse, just click once and hold it there. On the top left of the Irfanview window you’ll see XY:(number,number). This is your X -Y reference point. Make a note of those two numbers. This is what you will see:

The first crop window
Look for the XY:(480,561) - your numbers will vary.

5. Next, you’ll want to write down the full size of the crop box that you want. Click in the same spot, or as close as you can to it, then drag the box out and hold the mouse button down until you are able to read the numbers that you need. What you’re looking for is the number of pixels that define your crop box’s height and width. In the photo below, you’ll see what I mean.

Set the width and height of the box here.
See the (646x472 Pixels, 1.369)? You need the first two numbers: 646 and 472

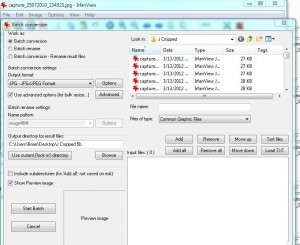
6. Now you have the numbers that describe where the box starts and the numbers that describe the size of the crop box. You’re all set to start your batch cropping. Look for File on the top left, then Batch Conversion/Rename. The following window will open:

The batch processing window
Here is where you will do two things. Add the photos to crop and choose your output directory.

7. Set up the menu by checking that ‘Batch conversion’ is ticked. Then, on the top right, select the photos you want to crop. Remember when I said to keep your photos separate? This is why I said that. It’s much simpler to choose ‘Add all’ as opposed to picking through the jpgs one by one. Click ‘Add all’ if you have all the right photos in one folder. Then, in the middle left, choose where you will put the cropped pics. Don’t use the same directory as the originals, just in case you make a mistake with your crop window. You still want the originals until you make sure your numbers are correct. Once you’ve done these steps, click on the ‘Advanced’ button. The following window will come up:

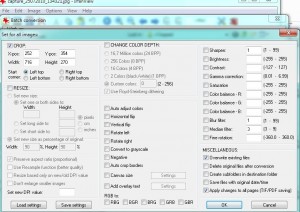
Advanced Crop Window
Don't get nervous. This window looks complicated but it's not that bad.

8. Top left, see the Crop section? This is where you’ll fill in the numbers that you wrote down earlier. Make sure ‘Crop’ is checked then type in the X-pos number and the Y-pos number. Below that, write in the width and the height. Below that, make sure that ‘Left top’ is chosen. You can crop in any corner, just make sure you know which corner you have chosen. I always use top left but you can do whatever you want.

9. Make sure that nothing else is checked. On the bottom right, I have ‘Overwrite existing files’ chosen, simply because it’s easier if I make a mistake. I put the cropped photos in a new folder then I check it after the batch if finished. If I have made a mistake, I redo the numbers and run the batch again. I don’t have to open a new folder.

TIP: If you are doing a few batches, uncheck the ‘Overwrite existing files’ just in case you forget to use a new folder. Make sure this is unchecked if you are using the same folder as the originals, too. I’d advise against that, however.

10. Double check everything then choose OK once to close that menu. The batch menu is still open, of course, and you need to press the ‘Start batch’ button. Once you do that, Irfanview whisks its way through the task at hand. Depending on the speed of your computer, this might take a while. Wait until Irfanview is done then check your results. Chances are you’ll make a mistake the first few times but read through this again and you’ll get it right, sooner or later.

Thanks for reading!