Category Archives: Facebook

The Ultimate Facebook Like Guide – Part Two

Our last post detailed how to hide or unhide your Facebook Likes ‘box’. Here’s that post: Part One of the Ultimate Facebook Likes Guide  In that post, we showed you how to control the privacy of each like. Since that part is a bit confusing, here’s a guide to the whole ‘Like’ section.

Before we begin, some explanation is required. The ‘likes’ we are talking about here are those that pertain to your interests, things such as Music, Television, Books, etc. None of this applies to photos or comments that you click ‘like’ on. As you know, those ‘likes’ are controlled by the owner’s privacy settings, not yours. Are we clear on that? If you like Ally’s photo, only Ally controls who sees either the photo or the fact that you like it. The only way to hide your ‘like’ is to ‘unlike’ it. Same goes for your comments, your liking a comment, etc. You control things that you post. You do not control anything that you do not post.

Second point: Some things, such as Music and Film, can only be hidden or shown as a group. If you like the Beatles and want to show everyone that you do, you can show them ALL of the music you like. If you like the Backstreet Boys and DO NOT want anyone to know that, you have to hide ALL of the music that you like. If you’ve got your main section settings set to ‘Friends’ or ‘Public’, and you happen to add Britney Spears to your Music likes, everyone will know. The ONLY way you can hide it is to remove poor old Britney from your list or hide the whole section.

Let’s get started. From your Timeline, click on Update Info. The rest of this post flows down from the top to the bottom of the page that comes up next after you click Update Info.
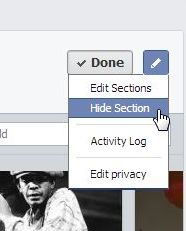
Photo of Ultimate Guide  1
Hide everything by clicking the Edit icon and selecting Hide Section.


Working down from the top, let’s see what you can hide and what you can’t.

1. About – You can hide different parts of your information. Click the Edit icon in each section to see what you can hide.

2. TV programmes – It’s all or one for this. Show everything or hide everything.

3. Books – All or none.

4. Films – All or none

5. Music – All or none.

6. Music – All or none.

7. Friends – Show all or hide all EXCEPT for mutual friends. If you have a mutual friend with someone, you can’t hide that.

8. Photos – You have complete control of all of your photos EXCEPT your Timeline cover photos. Please remember that you can’t hide your cover photos. We said that twice simply to emphasize it. If you have a questionable cover photo, everyone who sees your Facebook profile, even if they are not friends of yours, can see it.

9. Games (Recent Games, actually) – All or none.

10. Places – All or none.

That’s it for the sections of your ‘likes’ or your favorites. (Maybe everyone should start to use the term favorites instead of likes. It gets confusing otherwise, right? Read on….)

OK, now we are into the last section of these favorites. Conveniently, Facebook has named them Likes! The final section is divided up into these categories:

Other Likes, Inspirational People, Sports, Sports Teams, Athletes, Games, Activities and Interests. 

In previous posts, we’ve used the term ‘page likes’ for these items. Until recently, you could hide some of your individual likes but now it’s different. For better or worse, you only get to show or hide ALL of each category.  Click on any of the topics at the top of your Likes section. Most of them would probably be under the heading ‘Other Likes’, at least they were for us. Now you don’t have to worry about hiding some but showing others. It’s easy to hide them all. Click the edit icon on the right side and choose Edit Privacy. Here’s what you see:
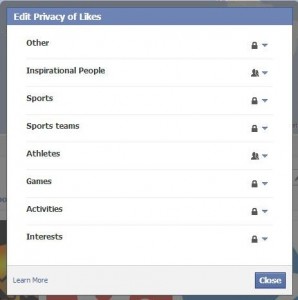
Photo of Ultimate Guide  2
Choose your privacy settings here.


If a Facebook page doesn’t fall into one of the main categories, it will be placed under ‘Other Likes’. Keep that in mind. As you scan your individual likes, you’ll see a sub-heading under the name. Some may be Theatre or Travel Agency or something completely different. Weixin, for instance, is listed as an ‘Interest’ under ‘Activities’. Weixin or WeChat really isn’t an activity, it’s a bit of software.  Somehow it’s shown as an interest. Go figure.

We mention this because you may decide to show your ‘like’ of Inspirational People. Well, if you look at the list of inspirational people, you may be quite surprised at who Facebook deems ‘influential’. You may be expecting Mother Theresa but Charlize Theron shows up in the suggestion box. If you’ve chosen to Like Theron and expect her to show up under ‘Other Likes’ that you’ve hidden, you’d be surprised to find out that she’s in the Inspirational People section that you’ve chosen to show. See what we mean?

TIP: Facebook uses your Likes and Interests (Favorites) to tune the ads that you see on your pages. If you like Guitars, you will see Guitar ads. It’s that simple. Choosing a certain genre of movie or a certain type of music will almost certainly put you into an age demographic that Facebook will mine for ads that you just might click on. If do, they make money. Keep that in mind when you’re blithely ‘liking’ things that you see on Facebook.

There’s more to this than meets the eye, isn’t there? In our next post we’re going to get into these likes in more detail. Now you know what you can hide and what you can’t, we’ll work on some deeper concepts next time.

Thanks for reading!


The Ultimate Facebook Likes Guide – as of April 23, 2013

It seems that Facebook changes their own rules every week. They probably don’t change every week but in the last few months, many of our previous posts on Facebook likes have been made obsolete. Here we go with our latest how-to on this topic. If you’re lost your ‘Likes’, we’ll get them back. If you want to hide them from everyone but yourself, we’ll show you how. Grab a coffee, open your own Facebook profile and let’s get started.

How to Hide (or un-Hide) Your Likes on Facebook

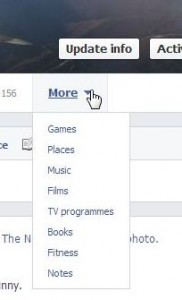
1. Everything you do is done from your Timeline so start there. You will notice that the various boxes (photos, friends,likes, etc.) have been replaced by the words Timeline, About, Friends, Photos and, finally, More. Clicking on More brings down a menu, as seen here:

Photo of Facebook Likes   1
No likes here!

2. We’ve hidden our Likes from this menu. How do we get them back? Click on the words Update Info:

Photo of Facebook Likes   2
Update Info is where we start.


3. On the right side of the page that comes up, click on the pen/pencil icon on the far right. When the menu pops down, choose Edit Sections:

Photo of Facebook Likes   3
Click Edit Sections to bring up a new menu, one we haven’t seen before.


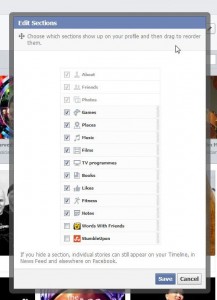
4. Here’s the new menu:

Photo of Facebook Likes   4
Here’s where you choose which topics show up on your Timeline when a friend clicks the word ‘More’.

Simply decide which sections of your favorites you want to show to your friends. There are three sections that you can’t hide, About, Friends and Photos, but you can certainly hide parts of each ‘section’ listed on that list. What can’t you hide? You can’t hide your Mutual Friends from anyone. Bummer, huh? Yes, you can hide your Friend list but you can’t hide Mutual friends. Keep that in mind, folks.

5. Notice that this time we’ve selected ‘Likes’. Click Save and then go back to your Timeline and click the word More.

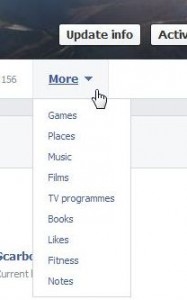
Photo of Facebook Likes   6
What’s this? The ‘Likes’ are back? Cool!

Guess what? Our Likes are shown in the drop-down list. Pat yourself on the back! You’ve completed your assignment. This has been a short and simple way to get the Likes ‘box’ back. You’re right, it’s not a box but people still use that term to describe it so we will too. Obviously, perform the opposite steps if you want to hide your list of likes. What do you see when you actually click on the word ‘Likes’ on that menu? Here’s what we see:

Photo of Facebook Likes   7
Here they are, broken down into groups. These groups may vary from person to person.


Now you’re asking, “Who can see what?” right? Time to hover. Move your mouse (cursor) to the right of the words under each ‘Like’. You’ll see an icon that reflects your privacy settings for each of the ‘Likes’ shown.

Photo of Facebook Likes   8
Click on the icon if you want to change the privacy settings for each ‘Like’.


OK folks, that’s it for today. We’ve got the Likes box back or we’ve hidden it, it’s up to you. Next, let’s take a look at some privacy settings in your Likes area.

Questions, comments, oatmeal cookies…we love them all. Let us know what you can or can’t do and we’ll see what solutions we can come up with. Follow us on Facebook (just click Like) and keep up with all of our updates, posts and interesting stuff. Here’s the link: Computers Made Simple on Facebook

Thanks for reading!


Facebook – Use Your Head!

Mothers used to say, “Use your head” whenever we did something stupid. Today we’re saying the same thing to you. Use your head when clicking and sharing things on Facebook. Here’s an example:

Photo of Bill Gates
Don’t even think of clicking anywhere on this photo or link when you see it on Facebook.


This one came up this morning but it’s quite old from what we know. We’ve left the sharer’s name on this because this particular person has started dozens of these idiotic shares. It’s very obvious that the paper has been photoshopped but, more than that. how could anyone possibly send you money for sharing a photo on Facebook? Why would anyone have their Paypal account linked to their Facebook account? Use your head! Unless you are a cretin or drunk, you should be able to see through these things.

Here’s another:

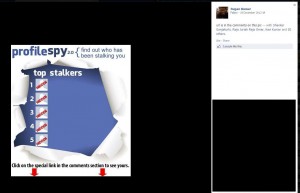
Photo of Facebook scam
There is no way anyone can find out who has looked at their profile.


This is actually a malicious link. If you happen to click on it, you’ll be taken out of the comparative safety of Facebook to a site that, very likely, will ask for your Facebook sign-in information. You know what happens then, right? Your precious Facebook account will be hijacked. Again, we have left the person’s name on this photo because of the vast number of these malicious/misleading/ridiculous posts that he or she has created and shared.

Yet another:

Photo of Lucky Coin
How can clicking on a photo bring you luck? How can anything bring you luck?


Does this remind you of anything? Maybe a chain letter? Did you know that forwarding a chain letter is illegal in most countries? Think about it. This is no different. If you share or click like on something such as this, you’re simply adding to the noise that’s on Facebook every day.

Edit: Here is another photo that you should not interact with:

Photo of cow and snake.
Looks like there are 81,000 sick people and almost a million stupid ones. There is no magic, none at all.

Don’t reward these idiots by clicking or by typing in a word (that won’t work anyway) on these posts.

Lastly, don’t help Facebook use you to tune their demographics. More and more, Facebook shares unwanted ads and posts with you. Whatever you do, don’t share these ad and/or posts with your friends. Facebook is using you as bait to fish for information on your friends. Be smart. Facebook isn’t paying you so don’t let them use you to make money.

Thanks for reading!

Facebook – control posts on your timeline

Have you ever something posted on your Facebook Timeline that wasn’t appropriate? Something that upset you? Have you recently been tagged in some crazy photo or video? Here’s how to stop things like this from ruining your day.

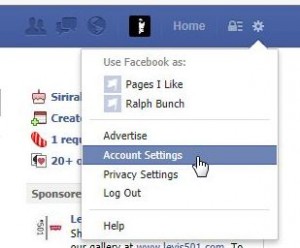
1. Head over to your Account Settings:

Click on the gear (settings) then Account Settings.


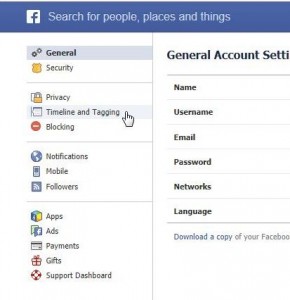
2. Click on Timeline and Tagging:

Photo of Privacy 2
Timeline and Tagging.


3. Click on the word Edit up on the right. Start at the top and work down.

Photo of Privacy     3
Click on Edit.


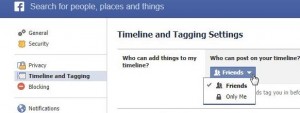
4. Who can add things to my Timeline? You can choose to block all of your friends. Unfortunately, you can’t block only some of your friends. It’s all or nothing.

Photo of Privacy    4
Tough decision here, right?


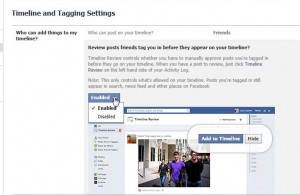
5. If you choose to allow your friends to post on your Facebook Timeline, make sure you also choose to review those posts:

Photo of Privacy    5
Review posts before they show up on your Timeline. Read the warning note, though.


TIP: Make sure you read the note in the photo above, the one that says that nothing is private on Facebook. Quote: Note: This only controls what’s allowed on your timeline. Posts you’re tagged in still appear in search, news feed and other places on Facebook.

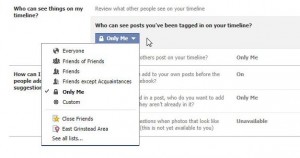
6. Limit visibility of posts that you’ve been tagged in:

Photo of Privacy    6
Set this to ‘Only Me’. No one else has to see the posts, right?


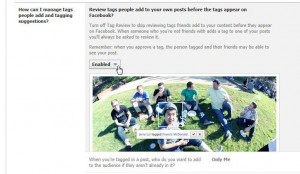
7. Continue on down the list and edit each one so that they match your own level of security and privacy. Here is an important one:

Photo of Privacy    7
Make sure you review tags on your own posts BEFORE they show up on your Timeline.


We hope this tour of your Timeline privacy settings helps you keep unwanted posts and tags off your Facebook page. Remember that you can block someone who posts troublesome things on your Timeline. Choose your friends wisely, right?

Thanks for reading!

Follow us on Facebook. Just click Like and you’ll get all our updates and tech tips as soon as we post them: Computers Made Simple on Facebook


Facebook Chat – How to hide from some friends

Facebook chat can be a lot of fun. It’s a quick way to send an instant message without using a third party application. On the other hand, Facebook chat can sometimes be a pain in the butt, right? Maybe you don’t want to chat with all  of your friends. Maybe you don’t ever want to chat with a few particular friends. Maybe you only want to chat with one or two friends. Can you see what we’re getting at here? If you’re constantly being interrupted but you don’t want to turn Facebook chat off, here’s how you can exclude different friends or groups of friends from bothering you.

1. First, you need a list of those friends you want to avoid. Use our post here: How to make a list of friends on Facebook  to make a ‘restricted’ list. We use the term restricted but you can call it anything you want.

2. Facebook chat resides on the lower right side of your Facebook page. Here’s how to access the settings menu:

Photo of Facebook Chat 1
Look for the gear or settings icon on the lower right side of any Facebook page.

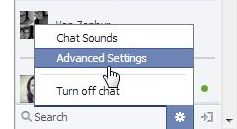
2. Hover your cursor (mouse) over the gear icon and click on Advanced Settings:

Photo of Facebook Chat 2
Hover then click on Advanced Settings.

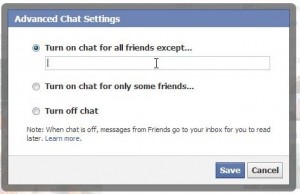
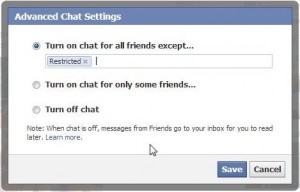
3. In the next window that opens up, click on the top (default) choice ‘Turn on chat for all friends except…”: 

Photo of Facebook Chat 3
On this menu, click the top choice and then click in the slot.

4. Start to type ‘Restricted’ and Facebook will fill in the rest for you:

Photo of Facebook Chat 4
Friends who are on your Restricted list will no longer see you on Facebook Chat.


Using the same menu box, you can hide from individual friends too. Just start to type their Facebook name and choose from the list that drops down. Do that one by one or create a list and use that. Either way, you won’t be bothered by these people any more.

Thanks for reading! Join us on Facebook: Computers Made Simple on Facebook