Category Archives: Computers

How to Update Google Chrome – When it won’t update automatically

There’s a new twist in the Windows 8/Google Chrome situation. For whatever reason, Windows 8 won’t allow Chrome to update itself to a new version. One of the main reasons to use Chrome is that it updates itself, if necessary, every time you open it. That’s changed for Windows 8 users and, perhaps, for users of older versions of the Microsoft O/S. Here’s one version of the error you get when you try to update Chrome when it says your version is outdated:

Photo of Google Chrome error message.
The error message has more than one form but this is a typical one.


Here’s how to get Chrome to update itself.

Note: This technique requires you to have admin privileges on the computer you are updating. If you don’t, get the person who does have them to do this. It might be better to print this page so you don’t have to go back and forth between windows.

1. This update requires you to install a template. Don’t worry, you can’t break your computer doing this so relax. A template is a small file that you ask Windows to install for you. After that, you change some of the parameters in the template. No big deal, no chance of ruining something. If you miss a step, Chrome can’t update until you go back and fix things. Everything else will work fine if you follow the steps as we describe them. Get the template here: Google Chrome Group Policies Template That should be a direct download. If it doesn’t work, go here and download it. The file should go to your Downloads folder. If it doesn’t, you’ve changed the settings so make a note of where the file is saved.

2. Next, we’re going to find and use the Run dialogue, the one that used to be just above the Start button. Press the Windows key on your keyboard and r (at the same time). A small window will open, like this:
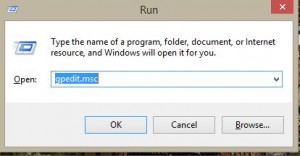
Photo of run dialog.
Enter the letters are you see here.


3. When it does, type gpedit.msc in the box, exactly as you see in the photo. Another menu will open after a brief pause while Windows thinks about it. This is what you’ll see next:
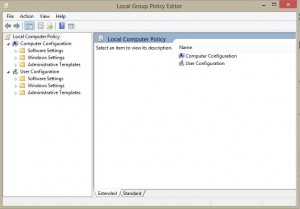
Photo of GP Editor.
Here’s the group policy editor. Two panes, left and right. We will be working in both.


4. You’re going to be working in the right pane later on but right now, look for Administrative Templates in the left pane. Right click it and choose Add/Remove Templates. This tells Windows that you want to add the file (template) that you just downloaded.
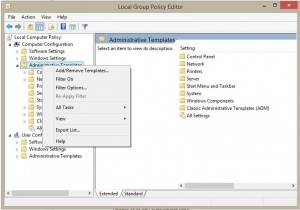
 

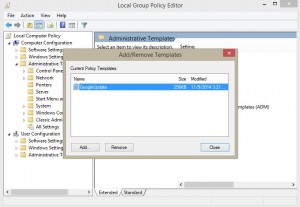
Photo of Add/Remove Template
You want to Add a Template so choose the Add/Remove line.

Another menu pops up, like this:

Photo GP Update box
We have already added the template so it shows up here. Your window will probably be empty.


5. Note that your menu should be empty while ours has the Google Update already installed. Don’t worry if the box is empty, click on Add.


6. Navigate to your Downloads folder. The only file that should show up, other than any folders you have there, is the ‘adm’ file from Google. Click it then click Open down on the bottom right.
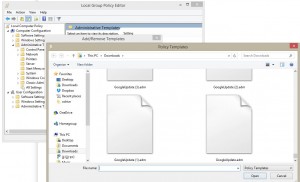
Photo of add adm template.
As you can see, we checked our link four times. The adm file is the only one that shows up…four times.


7. In the previously blank menu, you should see Google Update, a file size and today’s date. Click Close to add the template to Window’s list of templates. Note: This window is a bit confusing. Normally, the ADD button would ‘add’ the template but here it’s only used to find the template on your computer. Once you see the template in the menu box, close the box and the adm file is added to the list of templates.

8. Back to the left side again. You should probably click on the box to the left of the X icon. That will open the menu to full screen. (Print this post so you can keep track of what you’re doing.) On the left side, click on the following arrow icons, just to the left of the words you will see next: Administrative Templates then Classic Administrative Templates (ADM) then Google then Google Update. If you’ve followed us so far, this is what you’ll see on your screen:
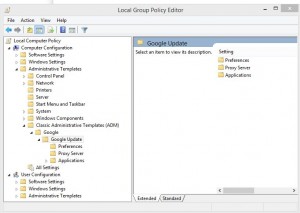
Photo of Google ADM update
Left pane/right pane. You choose what you want to edit in the left one then edit it on the right.


9. Here’s a tip to help you navigate through these menus. In the left pane, you just have to click on one of the folders to open it. In the right pane, you have to double click a folder to open it. The folder we want to open first is the one that reads Preferences. Once it’s open, this is what you’ll see:
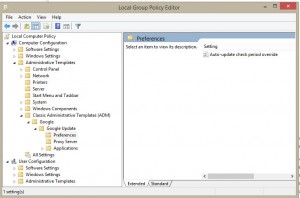
Photo of Auto-update
Click on the folder in the left pane then you’ll see the file in the right pane that you want to edit.


10. Over to the right side now. Under the Setting tab, you’ll see Auto-update check period override. You can open this two ways, first by double clicking it or simply by clicking one and choosing the link ‘policy setting’ that pops up. Make sure your box looks exactly like ours, click Enabled to choose it and set the minutes to 1400, if that is not set already. Click OK to save this step.
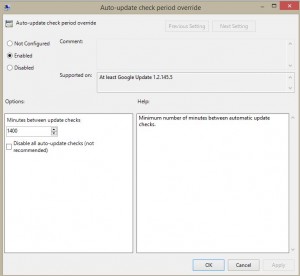
Photo of enabled menu dialog thingy
You want all of the boxes that you edit to read Enabled and/or allow updates.


11.  We’re finished with Google Update so let’s look a bit farther down the list on the left and find Applications. Click the word Applications once and a full list of folders opens up in the right pane. Guess what? The one we want is waaayyy down at the bottom of the list. Scroll down until you see Update policy override default. Our setting is Enabled but yours won’t be until you change the settings. You can either double click that line or highlight it by clicking once then clicking on the words ‘policy setting’ up at the top in the same pane. This is what comes up next:
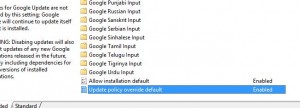
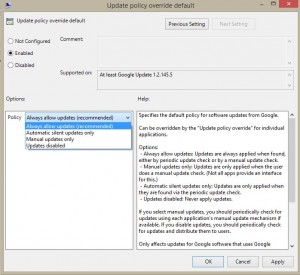
Photo of update policy override dialog
On the bottom of the right pane are two settings that you have to open and change separately.
Photo of Update Policy overrige
Enabled and then Always allow updates. Click Apply then OK.

12. Make sure you choose Enabled then click on the arrow in the Policy pane and choose Always allow updates (recommended). Click Apply then OK to save your changes. Next, go back to the bottom of the right window and open the ‘Allow installation default setting’. It’s right above ‘Update policy override default’ that we just changed.
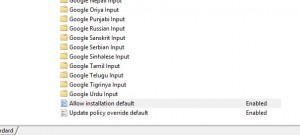
Photo of Allow installation
Second from the bottom.


13. In this window, choose Enabled then press Next Setting. In that window, choose Enabled also. Then click Apply and OK.

14. You’re almost done, don’t worry. At this point you’re a pro so we won’t hold your hand for the next four steps. Move back to the left pane and look for two folders: Google Chrome is one. Google Binaries is the other. They aren’t too far from the top. Once you’ve found the first, Chrome, change the two settings on the right EXACTLY the same as you did for step 11 and 12. Click Apply and OK for Chrome then move to Chrome Binaries and do the same thing for it. Two boxes, change them to Enabled and Always allow updates. That’s it!

15. In total, you have added one template and changed seven settings. Close the Local Group Policy Editor down, close Chrome then reopen it. On the top right of the page, click on the three horizontal lines and choose About Google Chrome. If you’ve done everything correctly, Chrome will run through the update routine and install the latest and greatest version of itself. Pat yourself on the back and smile. You did great!

Yes this is a long post but it’s not something we could do in two parts. If you have problems, let us know. We’ll see what we can do to help.

Comments and questions are welcome but  Likes on our Facebook page get immediate attention.  Here’s the link: Computers Made Simple on Facebook 

Thanks for reading!


Tech/Computer Gift Ideas

It’s that time again, the holidays are approaching. We realize that our readers come from many different parts of the world but everyone gives gifts at some point during the year, not necessarily on Christmas but for birthdays, anniversaries, etc.  We’ve come up with some cool gift ideas for any occasion, not just December 25th. Here we go!

Get on the list: No, not the naughty or nice list. We’re talking about email lists, of course. Dell, HP, NCIX, RadioShack (TheSource in Canada) and many other retailers send out weekly emails which highlight their current specials. The more lists you subscribe to, the more informed you will be about current prices. This goes for anything you buy, of course, but we tend to subscribe to tech companies. We even have separate email accounts to handle these subscriptions. If you’re going to make a purchase in the near future, make sure you open these emails as soon as you get them. The best deals go fast!

Watch out for shipping costs: Many online retailers ship for free. Some don’t. If you don’t live in the U.S., make sure the retailer will ship to you at reasonable cost. We’re in Canada and many of our retailers ship for free, sometimes with next day delivery at no extra cost. On the other hand, if we buy from a U.S. shop, we often get hit with high customs charges, etc. Make sure you know how much the total will be before you click the words ‘Place Order’.

Gift Ideas: 

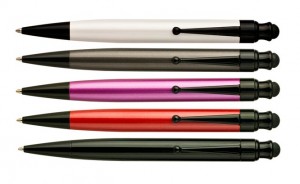
1. Touch Stylus: Everyone has a smart phone or tablet. To make the most of apps like Snapchat, they’ll need a stylus. Using your finger to swipe and doodle is fine but a stylus can be much more precise. With a stylus, fingernails don’t get in the way either. We’ve seen them for under $5.00 so a basic one won’t break the bank. Ours have pens on the other end so they do double duty..analog and digital!

Photo of Stylus
A pen at one end and a stylus on the other. Cheap and fun, these make great gifts for almost everyone.

2. USB Battery Pack/Charger: Smart phones are always running out of juice, right? Usually at the most crucial point of the movie, too. Pick up a USB charger/battery pack and your troubles will be over. Plug it in before you head off on your day trip, for example, and you’ll be able to text, film, photograph all day long. When your phone’s battery gets low, plug it into the battery pack and you’ll get a charge in jig time. Many of these devices will charge your phone several times as well as holding their own charge for months. Small and light, these go for under $40.00. Get one for everyone on your list plus yourself. Some of these units add a flashlight to their array of tools. That’s something to look for when you’re shopping.

Photo of USB Battery Backup
This one fits in your wallet or purse. Light and good for one charge. There are many choices so do your shopping first.

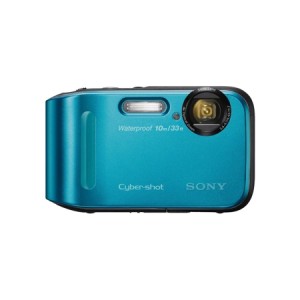
3. Small Weatherproof Camera: You’ve all seen the fantastic Go-Pro HD videos; the crazy guys on top of the tall buildings, the bungee jumpers, etc. While your life might not be quite as exciting, some of your friends may be into some sports activities which they’d like to record. Go-Pros are expensive but a small and light weatherproof digital camera with HD video capability will suffice in most cases. Olympus makes several models, some can be bought on sale for under $200.00. There are also different versions of Go-Pro copycats for less than $100.00 but make sure you read the reviews carefully before you buy. If you’re checking reviews, Amazon.com has lots of comments for just about any product out there. Try to sift through the false-positive comments however. Some sites don’t tell you that they’re being paid to write positive reviews.

Photo of weatherproof digital camera.
This small Sony records HD video plus still photos. It’s cheap, under $100.00 too.

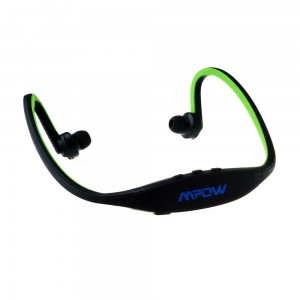
4. Bluetooth Accessories: These days, Bluetooth is gaining in popularity. It seems there is no limit to the number of accessories you can get for mobile devices and tablets, all connecting wirelessly using Bluetooth. Most newer cars allow you to set up your mobile phone using the vehicle’s sound system instead of an earpiece. That’s done via Bluetooth. We’ve seen keyboards, earpieces, headphones etc. that make life much easier while you exercise, type emails on your phone or walk and talk to your friends. USB devices are cheaper, at least at this point, but at this time of the year you can pick up some pretty good deals on Bluetooth accessories.

Photo of Bluetooth Headset
This isn’t a recommendation but this set looks like it would be comfortable and fun to wear.

5. App Store Gift Card: Whether your friends or relatives spend money on music or apps, it’s easy to pick up a gift card from their mobile store, be it Apple or Android. In Canada, gift cards don’t expire but that may not be the case where you live. Make sure there is no time limit on spending or, if there is, make sure you tell the recipient about how long they have to make a purchase.

There’s five main  ideas to start. As we get closer to January, we might revisit this topic, specially if we see prices coming down in certain tech areas. Other suggestions would be flash drives, external hard drives, USB earphones and headsets as well as USB microphones, cameras and so on. We prefer shopping online, obviously. Online or bricks and mortar, there’s lots of cool stuff out there. Have fun!

A free gift that you can offer to anyone is a link to our Facebook page. Comments and questions are welcome but  Likes on our Facebook page get immediate attention.  Here’s the link:

Computers Made Simple on Facebook 

As always, thanks for reading!

My Laptop Died! (Maybe it just sleeping…)

When your laptop stops working, it’s hard to figure out exactly what the problem is. Here are some simple tips to try and resuscitate it. These tips are based on several scenarios. Sometimes you can see something on your screen, sometimes you can hear sounds, sometimes it’s deader than a door-nail. Here we go:

1. Simple fixes. Make sure your battery is charged and/or your power supply is plugged in to a working outlet. Some laptops won’t start until they have a certain amount of charge in the battery. You could try booting the computer without the battery, just in case it is at fault. Resetting the memory chips is another simple solution, one that you can easily do yourself. Find the repair manual for your model online. It will tell you which little door on the back covers the single or double memory chips. Make sure they’re firmly in place.

Make sure that you don’t have anything connected to your laptop that might be preventing it from working. By this we mean things like USB drives, digital cameras, external hard drives, etc.

2. If you can see something on your screen, that means that your laptop is trying to boot up. For different reasons, it doesn’t quite make it. It could ‘hang’, meaning that it gets partway through the boot process and stops, or it doesn’t get past the setup screen, meaning that something is wrong with your operating system.

In these cases, try booting from your optical drive. Put your current operating system CD in the drive and try to boot from it. Your laptop can usually spot a boot CD in the drive and will shoot up a message, something like ‘press any key to boot from CD’. That means  hit any key to instruct the computer to start up using the CD in the drive. If you don’t have an internal optical device (CD/DVD drive), you can use a USB stick.

If you don’t have your original operating system on CD, find your recovery disks. You can use those disks to reset your laptop back to its original condition.

Another path you could take is to use a bootable anti-virus disk/USB stick to bypass your hard drive’s boot system. If a virus is preventing you from starting your computer, a bootable anti-virus disk can help. It will start your laptop and give you the option to scan your hard drive for viruses and/or malware.

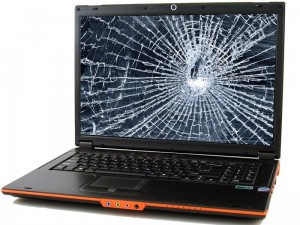
Photo of broken laptop
Hopefully your laptop doesn’t look like this.


3. If you can’t see anything on your screen, there are a couple of options for you. Virtually every laptop has a VGA port which will allow you to connect an external monitor to it. This makes it the same as a desktop computer, you’re just bypassing the laptop’s own screen. Some laptops have a keystroke combination which tells it to use the VGA port instead of its own screen. Get out your instruction manual or look for it online and see if you have to press a couple of keys to get it set up.

Many modern computers have HDMI ports. These are a bit like the VGA ports but you use a different cable and connect to an HDTV instead of a computer monitor. You can use the same cable that runs from your BluRay DVD player or your Apple TV, basically anything that is already connected to your HDTV. Once the HDMI connection is made, make sure your HDTV is set to receive a signal from the port that the HDMI cable is feeding. Many HDTVs have multiple HDMI ports. Make sure it’s set to ‘see’ the right one. If you can see your laptop’s output on your TV, that means your laptop’s screen is not working. Time to send it back under warranty or get a new laptop. You could continue using the TV screen, too. It’s up to you.


4. If there is a blinking dot or if your laptop tells you that it can’t find a boot device, this usually means that your hard drive needs to be removed and backed up, if that is possible, before you do anything else. If you have important photos and documents on your drive, you must back these up immediately. Don’t keep trying to start your computer, get the drive out and backed up. If you can’t do that yourself, ask a trusted tech friend to do it for you. You can use TestDisk or Recuva to do this. Both are free. Our last post explains how to connect the drive to another computer. 


5. Noises. Some noises are good, some are bad. If you have used your laptop for a while, you know what its normal sounds are, all of those buzzing and whirring noises. If you can hear them but you can’t see anything on your screen, things are bad but not a total disaster. You can attach your computer to a monitor and use it that way or you can remove the hard drive in order to back it up. If you’re a bit of a techie yourself, you could try to reset any of the cards that may be attached to the laptop’s motherboard. Normally this isn’t possible but it’s worth a shot.

If your hard drive is making noises, stop what you’re doing and go back to number 4 above. If the problem is in your hard drive, back it up and buy a new one or get one under warranty. The important thing now is to back up  your drive in order to save your photos and documents. Once you get that done, you can get a new drive, install the operating system and software, then start all over again.

There are many different ways that our laptop can let you down but, in general, they are very dependable. We’ve got some laptops that are very old, we’re talking more than ten years, and they still work just the same as they did when they were new. The new laptops are almost as well built as the older ones, some that have SSDs in them are even more dependable. An SSD is a solid state hard drive with no moving parts. No moving parts means that you can’t really damage the hard drive. With the various cloud options that are out there, storing your data on a hard drive is  almost a thing of the past.

Thanks for reading. If you have computer problems, use the comment form below to ask us for help. Better yet, head over to our Facebook page and ask us there. Here is the link:Computers Made Simple on Facebook.


How to Rescue Your Hard Drive

We just ran into a situation at Computers Made Simple that looked like helpful topic for a post. One of our laptops died. It wasn’t a slow death either. One day it worked, the next it appeared dead. Nothing showed up on the screen, the Caps Lock key blinked slowly and the normal boot-up noises just weren’t there. After a few minutes of trying to get it to boot, we decided to simply buy a new laptop. Here’s how we rescued the information from the old hard drive.

1. Most laptops allow you to get at the hard drive bay quickly and easily. Find the model number and search on Google using terms such as  ‘CQ42 remove hard drive’. That worked for us and in a matter of minutes, the hard drive was out of the laptop. Since most hard drives have moving parts inside, they shouldn’t be dropped or bumped, specially when they are being used.

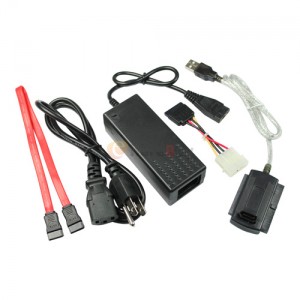
2. We have quite a selection of computer tools in the office but one of these tools is absolutely essential if you’re going to attempt to recover information from a hard drive. Here’s what this tool looks like:

Photo of Hard Drive Recovery Kit
It looks confusing but really isn’t. Connect some of the pieces to the drive, connect the drive to your computer and you’re away.

Ours isn’t exactly like this but they are all pretty much the same. There is a power supply that connects to the power connector on the hard drive. The other connectors, in this case the red one, connects to the data port on the drive. Once that is in place, the unit is linked to the computer through a USB port. Two separate things are going on here. The first is a power feed to the drive. The second is a data stream. Once you get this set up properly, the hard drive will appear in Windows Explorer, allowing you to sort through the information on it. At that point you simply copy and paste that information onto your computer.

3. When you find the drive in Windows Explorer, click on it. If the old laptop had a password, Windows detects that you’re probably not the owner of the drive. A menu pops up that says something like ‘you don’t have access (or permission)’ to complete this action. It will have a Continue button, just press that.

4. Windows will slowly open the drive which allows you to see the contents of it, just be patient. All of this depends on which version of Windows you are using. If your old hard drove had Windows Vista on it, the process is much more complicated. This post is about Windows 7 and/or Windows 8. Vista requires you to change the permission for each folder and sub-folder, a daunting job even for an expert.

5. Once you can see the old hard drive in Windows Explorer, right click the icon of a folder down on your taskbar and choose ‘File Explorer’. This will open another instance of Windows Explorer. Navigate to your desktop, then right click in the open space on the right side of your screen and choose ‘New Folder’. Give it a name, something like ‘Files from Old Laptop Drive’ or something similar. Hit enter to set the new name then hit enter again to open the new folder.

6. Your job now is to copy and paste your data from the old hard drive to the new folder. Remember that you can search for files using universal parameters, we’re talking about ‘*.jpg’ for instance. If you type *.jpg into the search slot, Windows will find every jpg file (photo file) on the drive or folder you are searching. *.doc or *.docx works the same way. The asterisk represents ‘any’ and the letters after the period represent the type of file you want to search for.

7. Alternatively, you could copy complete folders from one drive to the other. The problem with number 6 above is that Windows stores some files in two places. Inside of Windows/File Explorer files with the same name will appear. In any other folder in Windows, you cannot have two files of the same name; separate folders yes, same folder no. If you copy all of your photos from the old drive, you will most likely run into a filename conflict. In that case choose to keep both files but let Windows rename one. If there are hundreds, and there often is, put a check in the little space that reads ‘do the same for the next 300 conflicts’. That will save you lots of time, believe us.

8. If you think about where you store data on your computer, it is easy to find that data and transfer it. There are some key files to look for: photos, documents, music and video. Remember that all of these types of data may have different file types. You may be searching for MP3s thinking that all of your music is in that format. iTunes, however, stores its music as MP4s. If you’re not sure what you’re doing here, get some help or simply ask Google ‘where are my music files in iTunes’, for example.

Good luck! Remember that we are always here to help. Use the form below to ask questions. We usually get back to you in a day or two.

Lastly, this whole post assumes that your old hard drive is still functional. We’ve written other posts on what to do if the drive itself is dying and/or dead. Our next post will tell you how to diagnose laptop problems. Stay tuned for that and thanks for reading!


We’re back!

Starting September 2nd, we’re back here writing about tech and social media. Our first post will be about our new FitBit wristband followed by updates on Facefeed, Facebook and WeChat as well as the normal tech tips we’re known for. We hope you’ve had a great summer. We’re looking forward to helping as many people as we can with our new posts. Tell you friends, share the links, help us out a bit. We’d appreciate it!

Thanks for reading.


The New Shed
This is what we spent the last few months making. It’s a DIY shed, built from scratch, and it’s as solid as Gibraltar. We may do some articles on this site or another new site on how to do this kind of thing yourself.