All posts by Computers Made Simple

Facebook Privacy Shortcuts

Facebook recently introduced a new interface (the thing that you see when you check out your Timeline). You may not have noticed the new privacy shortcuts, however. Here’s a quick guide to how to use them.

1. Click on your profile photo from anywhere in Facebook to get to your Timeline. Up at the top are some new icons. Here is what they look like:
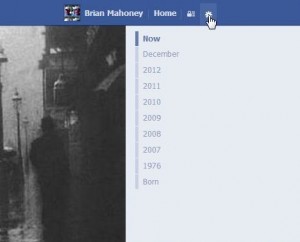
 

Photo of Facebook Privacy Shortcuts 1
Look for the gear and padlock icons.

The gear icon hasn’t changed much. It leads to your account and privacy settings. The ‘Advertise’ link is new, we’ll explain that another time, but the links are pretty much the same as before. Here they are:
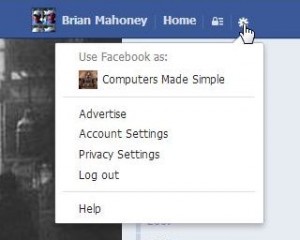
Photo of Facebook Privacy Shortcuts 2
Same old, same old except for ‘Advertise’. What the heck is that? Details later.


2. To the left of the gear, look for the padlock icon. It’s the one that we’re dealing with today. Instead of going to a completely different Facebook page, you can adjust your settings from your Timeline. Here’s a rundown of the different menus:
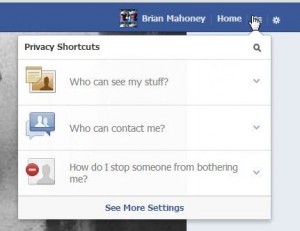
Photo of Facebook Privacy Shortcuts 3
Three icons with a down arrow to the right.

Here’s where you can change ‘Who can see my stuff?’ and ‘Who can contact me’ as well as ‘How do I stop someone from bothering me?’


3. One by one :
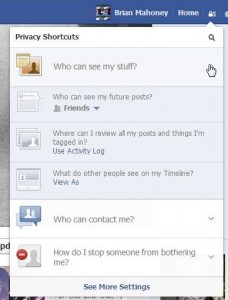
Photo of Facebook Privacy Shortcuts 3
Adjust your post setting here. There are two links to other tools, your Activity Log and the View As feature.


4. Next we have the ‘Who can contact me?’ settings:
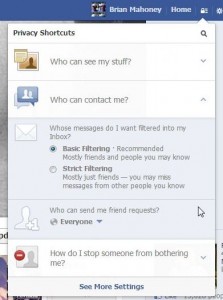
Photo of Facebook Privacy Shortcuts 5
This setting is quite odd, isn’t it?

If you can tell us why Facebook uses such nebulous English, we’d love to know. It seems to us that ‘Basic Filtering’ would let your friends contact you but prevent strangers from sending you messages. Instead, neither setting makes any sense. Why would you want to receive messages from some friends and not others? How can you determine who can send a message?

As for the ‘Strict Filtering’, why would you miss messages from some friends? The ‘Mostly just friends’ line seems to say that only certain friends can get through the filter. This is, bluntly, absurd.

Lastly, choose who can send you friend requests.

5. If you have blocked someone on Facebook, you’ll remember that the process was fairly difficult. With the new shortcuts, it’s substantially easier.
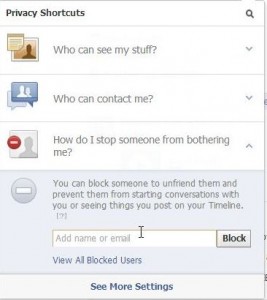
Photo of Facebook Privacy Shortcuts 6
Start typing a name, then click Block when you find the right person.


6. The See More Settings link down at the bottom leads to this page:
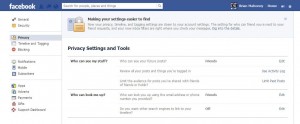
Photo of Facebook Privacy Shortcuts 7
These are more settings that you can adjust. We’ll do another post specifically on this page at a later date.


That’s enough for today. Play with the settings here to control who sees what and who can contact you, etc. Again, Facebook has made this more confusing than necessary but, at least, the controls are easier to find. Let us know if you have a problem with any of this.

Thanks for reading!

Hiding Likes on Facebook – it’s back!

We’ve written quite a few posts on hiding your likes in Facebook. After months of confusion, it seems that Facebook has reverted back to their old system of hiding or showing likes. Here’s the latest, January 2013, version of hiding your likes:

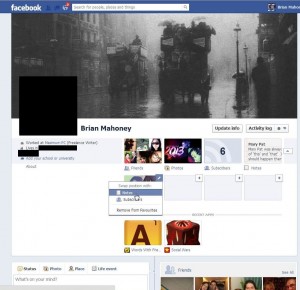
1. Go to your Timeline page by clicking on your name up on the top right. Once you’re there, look for the boxes of favorites, the ones marked Friends, Photos, etc. Here’s what you are looking for:

Photo of Likes Box
If your Likes box is on the top or bottom row, doesn’t matter. Click either the word Likes or inside the box.


2. If you can see your Likes box, click on it. If you can”t see your Likes box, it might be in the second row of Favorites. (There are only two rows and only eight possible boxes.)  Click on the little arrow to the right of the first row to bring the next row into view. Like this:

Photo of two rows of Favorites.
The second row is now visible, so click on the word Likes or in the box.

When you can finally see your Likes box, click on it.


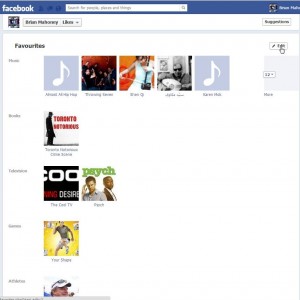
3. Once you see the page that reads ‘Favorites’ (mine says ‘Favourites’ because we’re in Canada), look up on the top right for the word Edit and click on it.

Photo of Favourites Page
Click the word Edit.


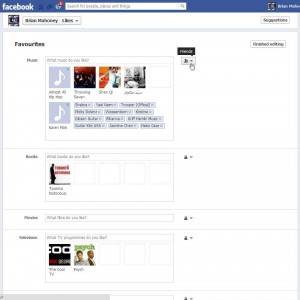
4. For each section of your Favorites, there is an icon that controls who sees it. Click the icon to set the privacy level of each Favorite. Standard Favorites are Music, Books, Movies and Television, etc. but you can always add other categories.

Photo of Facebook Likes Page 4
Set the privacy level for each category here.

You cannot hide some ‘Likes’ in each category and unhide others. If you like Madonna, that will be visible to all of your friends if you choose to make your Music ‘likes’ visible. To hide the fact that you like Madonna, you have to hide all of your Music ‘Likes’.

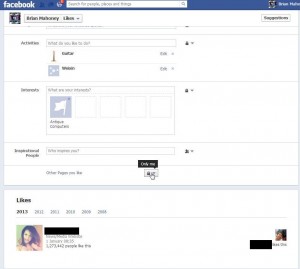
5. Finally, as far as ‘Page Likes’ go, you can hide them all or make them all visible to whoever you want. You cannot hide some pages and make others visible. Better to hide all of your page likes, just to avoid trouble. This is the way we’ve got our’s set:

Photo of Page Likes
Even though this icon controls the pages that you like, the heading is ‘Likes’. Confusing, isn’t it?


Very Important Tip (please read this): If the page you like is set to a category that you haven’t hidden, the fact that you like that page will be visible to whoever your settings allow. Let us explain that further. Let’s say that Madonna has her page set to be a ‘Music’ page or a ‘Movie’ page. Even though her Facebook page looks the same as our Facebook page (Computers Made Simple), the fact that you like it will show up in your ‘Favorite: Movie” box. Keep that in mind, please.

We’re going to update all of our other ‘Facebook Like’ pages to lead to this one. As of January 2013, this page is valid, at least in North America. Facebook may have different settings, depending on which country you are in at the present time. Europe seems to have better privacy guidelines, from what we’ve seen. Bravo to Europe for making Facebook tow the line!

If you have comments, problems or suggestions for topics, let us know. Thanks for reading!


While you’re here, why not add our Facebook page to your Likes? Here’s the link: Computers Made Simple on Facebook. 


Gift Ideas for Geeks

It’s that time of year again. With Christmas looming, only six days away now, we’re finally getting around to looking for gifts for our ‘geeky’ friends. That’s not a derogatory term, not to us anyway. We’re proud of our geekiness…as long as it doesn’t extend to clothing. That’s where we draw the line! Here are some cool ideas for your tech savvy friends.


1. A subscription to Maximum PC. We’ve been fans and subscribers to MaxPC since it was called Boot, many years ago. For the ultimate in hardware and software tips and updates, MaxPC is the best gift to find under the tree. Here’s the link: Maximum PC

Gift List  1
Maximum PC, geek central.


2. We’re always looking for extra storage, whether it be internal or external. Things like flash drives and external hard drives are never sneered at, believe us. We’d love to have a 32 or 64 gig  flash drive hanging around for our Linux projects and this is the time of year when these things are fairly inexpensive. Check Dell or New Egg or even Amazon. Compare prices carefully and make sure you get a brand name. It’s worth the extra few bucks to get something with a name you recognize since it will likely come with a decent warranty. For external hard drives, something by Seagate or Western Digital is fine but, again, check out the warranty.

Gift List  2
1 TB is the minimum, 3 TB is superb!


Gift List  3
A 32 gig flash drive is just about right.


3. Blank optical media is another good idea. Recordable DVDs or BluRay discs are always appreciated. Unlike external hard drives, discs are pretty much indestructible. If your friend/relative doesn’t have a BluRay writer, you can pick one up for well under $100.00. Each BluRay disc holds about 25 gigs of data, though they are a bit more expensive than a regular DVD. Better to stick to Verbatim media, from our point of view. No-name discs are a no-no.


4. Wireless routers are getting substantially cheaper these days. Even a basic unit can be used as an access point in some out-of-the-way place in a house or large condo. We’ve described how to set up an access point in an earlier post:  Setting up a wireless access point  Make sure the router uses at least the N protocol. The description will be on the side of the box. Prices can be as low as $20.00 for a brand name model.

Gift List  4
Netgear makes good quality items.


5. Gamers love hi-tech keyboards and/or a hi-tech mouse. Check out the Maximum PC site for the latest and greatest versions. Best of the Best at Maximum PC.   Prices on gaming mice and keyboards can knock you out so be careful. We’re talking hundreds of dollars here. Make sure you buy from a vendor where returns are easy.


6. We’re into running and exercising here and if your friend/relative is too, we suggest something like a GPS watch or some workout apps for their smartphone. We use the MapMyRun app (free) on our phones. The pro model does a bit more in terms of timing laps, etc. and it’s relatively cheap. A basic GPS device can be had for under $100.00. GPS lets you record your route, keeping track of distance, speed and, in some cases, heart rate and calories used.  These gadgets make exercising a lot more fun, guaranteed.


7. For someone with a new laptop or netbook or even a tablet of some kind, a mini-mouse tends to make surfing a lot more fun. Check to see if the person has Bluetooth before you buy. Some tablets don’t have USB connectors which means only Bluetooth devices are available for use. For someone with a tablet, an external keyboard is a good idea as well. Prices can be quite low for these items, usually under $40.00 when they’re on sale. There are even some cool keyboards that fold up for travel. These are good for occasional use, not for day to day typing.


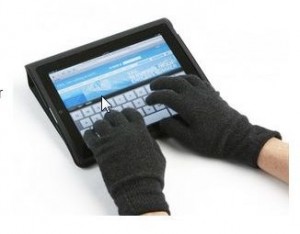
8. Along the same line as number 6, we’d suggest a pair of touch sensitive gloves for a geeky hiker or outdoors person. These gloves make use of a material on the tip of each finger to maintain the conductive properties needed to use a touchscreen while wearing them. If you can, make sure you get them with the material on every fingertip instead of just one or two. This makes typing a snap in cold weather.


Gift List  5
Touch sensitive gloves, a godsend for cold weather computing.


These are some good suggestions for the geek on your list. Let us know what you’d like to receive under the tree this year. Maybe we’ll add your suggestion here.

Thanks for reading!
DVD Covers – Create your own for free

We’ve shown you how to create DVD movies and DVD slideshows in our last two posts. Since many of the DVDs that you create will be gifts, why not dress them up with an attractive cover?

DVD cases, at least the basic plastic ones, are about five inches by five inches. This refers to the size of the image that you’d want to create. For the front cover, a combination of words and images would work well and for the back cover, perhaps some notes or a dedication would be better. Either way, the covers are easy to create.

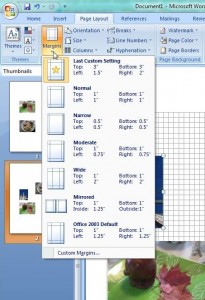
Here’s how we prepared a cover in Word. Setting the margins to leave a five by five square in the middle of the page works best. We used a top and bottom margin of three inches and one and a half inch on the left margin, two inches on the right. Then we chose to show a grid so we would know what our actual working space was. Here’s how it looked in Word:

DVD Cover
Use the Custom Margin setting.


Arrange the photos in the square and dress them up a bit using the menus in Word. Here are a couple of the settings that you can use:

cover 3

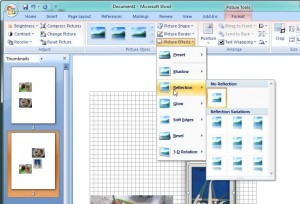
DVD Cover  2
Choose the borders and other effects in this menu.


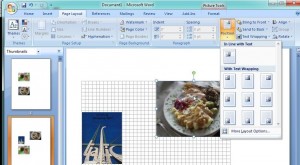
DVD Cover  3
Place each image with this menu.


There are almost an infinite set of choices for your covers in Word. We’ve given you some ideas about the basics but you’re on your own as far as finalizing everything else. Once you have the photos set up, type in the words and print it up. Remember to leave a bit of wiggle room around the edge for cropping after you print. Keep your words away from the edge as much as you can. Our five by five dimensions are approximate, right?

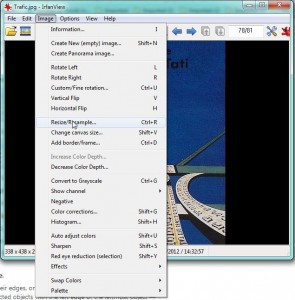
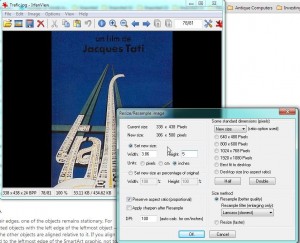
If you’ve created a DVD movie or copied a movie that you own, you can download cover art from the IMDB site, for example. Original movie posters abound on the Internet. Save the image to your computer, open it in Irfanview and adjust the size until one of the dimensions is about five inches. Since photos aren’t ever square, use your discretion as to which dimension you set to five inches. In our experience, setting the height to five inches is usually best, leaving the width to be settled according to the height you choose. You must preserve the aspect ratio in order for the image to look normal. Here are the menus you need when you’re editing a photo in Irfanview:

DVD Covers 4
You want to resize the image.


DVD Covers 5
Set the new height (usually) to 5 inches and make sure you select Preserve Aspect Ratio (Proportional) in order for the width to look appropriate. If you set the height, the width is set automatically.

That’s about it, folks. Create the DVD using Windows DVD Maker, then use Word and/or Irfanview to create the cover. If you take your time, you’ll be able to come up with very professional results. If you have the program already, use Photoshop or GIMP to do the same thing. Most people have Word already, that’s why we chose it.

Thanks for reading! We love to hear your comments so don’t be shy, say something down below.
Free Slideshow Software

Slideshow 01
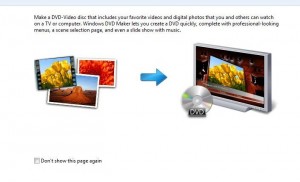
The splash screen for Windows DVD Maker.

We’ve all seen those magical slideshows before, right? Ken Burns has done whole movies using them. Baseball and the American Civil War came to life by using a relatively simple slideshow technique. Now, if you’re using Windows 7, you can release your inner Ken Burns by creating your own slideshow, complete with music accompaniment. Here’s how:

1. Most versions of Windows 7 and one version of Windows Vista, come with Windows DVD Maker. We mentioned this software in our last post, describing how to create DVD movies using AVI files. Here is that post: Making Movies using Windows DVD Maker  . The same software will also create a cool slideshow. You can either insert a blank writeable DVD or go to All Programs and run the program from there. Here is the first menu you see:

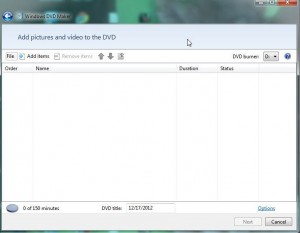
Slideshow 1
This time we are going to add photos (pictures) to the DVD menu.


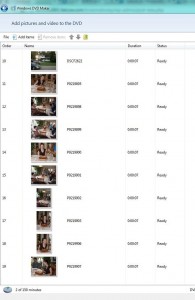
2. You can  drag and drop photos into the blank space or use the standard Window’s browse menu. We dragged a series of photos from a folder into the open space in the window. Here’s what we ended up with:

Slideshow
Select the photos one by one holding the CTRL key down, then drag them all to the window.


3. Once the photos are in place inside the software, they are in a folder that Windows uses to create the DVD slideshow. Double click on the folder on the menu, the one that reads Slide show (? photos), and you will be able to rearrange them in the order that you want. If you do this beforehand, it’s probably easier but feel free to experiment. Drag the first photo to the first space and continue on through your photos. There is room on the DVD for a lot of photos, probably 140 or more, so if you want a specific order for them, it will take time. Here’s what the menu arrangement menu looks like:

Slideshow 02
Drag the photos up or down the line to arrange them.


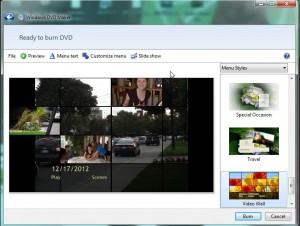
4. Once the photos are arranged, click next and continue to design your slideshow. On the main menu, look to the right side and experiment with the different menu styles by clicking on any that look interesting. This sets up the menu or splash screen that you’ll see when the DVD first opens. There are lots of good ones so scroll through them all. Here’s what you’ll see:

Slideshow 03
Menu styles are on the right.


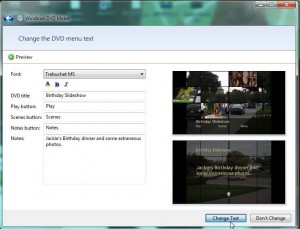
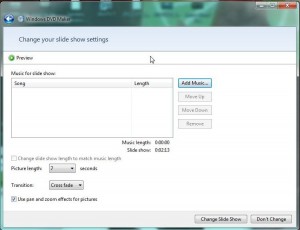
5. There are other parameters that you can set for the slideshow. On the top of the menu above, you’ll note where to change the Menu text, customize the menu or adjust the slideshow itself. The following photos show some of these settings:

Slideshow 06
Add a title, change the names of the buttons and add notes.


Slideshow 07
Add music, change the interval between slides and use different transitions.


The tools in the menu above are quite powerful for such a simple program. You can add music to fit the length of the slideshow, change the length of time each photo is on the screen; you can even change the way slides are presented in sequence. Once you’ve got some settings arranged, press the preview button and you’ll be able to run through the slideshow in test mode to see if everything works the way you want it to. If not, go back and change things again.

If you aren’t ready to burn the slideshow now, make sure you save the project for another time. If you are ready to record it to a DVD, simply press the burn button on the main screen.

TIP: Besides making video DVDs and slideshow DVDs, Windows DVD Maker will let you make multimedia DVDs as well. Add photos and slides to the same project and WDM will sort it all out and come up with an amazing DVD that will amaze your audience. You can record a narration track and add it to the slideshow, too. Use your own creativity to explore this free software.

Thanks for reading! We hope you enjoyed our last two posts. We also hope you will create wonderful DVDs for your friends and families, just in time for the holidays.