
We’ve all seen those magical slideshows before, right? Ken Burns has done whole movies using them. Baseball and the American Civil War came to life by using a relatively simple slideshow technique. Now, if you’re using Windows 7, you can release your inner Ken Burns by creating your own slideshow, complete with music accompaniment. Here’s how:
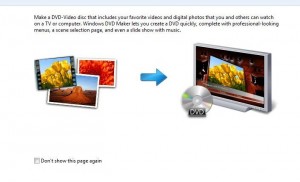
1. Most versions of Windows 7 and one version of Windows Vista, come with Windows DVD Maker. We mentioned this software in our last post, describing how to create DVD movies using AVI files. Here is that post: Making Movies using Windows DVD Maker . The same software will also create a cool slideshow. You can either insert a blank writeable DVD or go to All Programs and run the program from there. Here is the first menu you see:
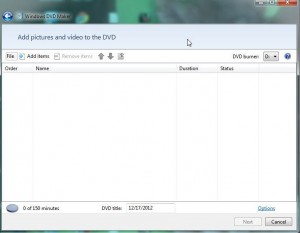
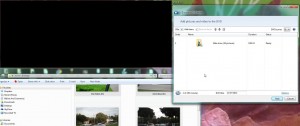
2. You can drag and drop photos into the blank space or use the standard Window’s browse menu. We dragged a series of photos from a folder into the open space in the window. Here’s what we ended up with:
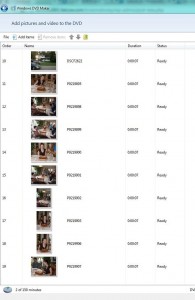
3. Once the photos are in place inside the software, they are in a folder that Windows uses to create the DVD slideshow. Double click on the folder on the menu, the one that reads Slide show (? photos), and you will be able to rearrange them in the order that you want. If you do this beforehand, it’s probably easier but feel free to experiment. Drag the first photo to the first space and continue on through your photos. There is room on the DVD for a lot of photos, probably 140 or more, so if you want a specific order for them, it will take time. Here’s what the menu arrangement menu looks like:
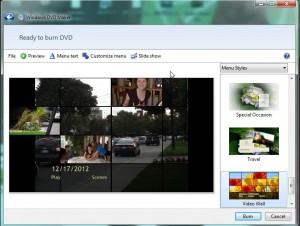
4. Once the photos are arranged, click next and continue to design your slideshow. On the main menu, look to the right side and experiment with the different menu styles by clicking on any that look interesting. This sets up the menu or splash screen that you’ll see when the DVD first opens. There are lots of good ones so scroll through them all. Here’s what you’ll see:
5. There are other parameters that you can set for the slideshow. On the top of the menu above, you’ll note where to change the Menu text, customize the menu or adjust the slideshow itself. The following photos show some of these settings:
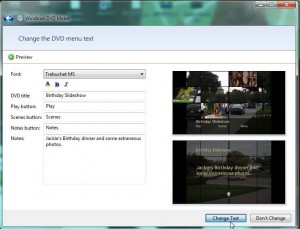
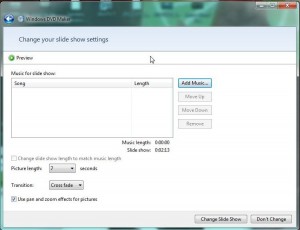
The tools in the menu above are quite powerful for such a simple program. You can add music to fit the length of the slideshow, change the length of time each photo is on the screen; you can even change the way slides are presented in sequence. Once you’ve got some settings arranged, press the preview button and you’ll be able to run through the slideshow in test mode to see if everything works the way you want it to. If not, go back and change things again.
If you aren’t ready to burn the slideshow now, make sure you save the project for another time. If you are ready to record it to a DVD, simply press the burn button on the main screen.
TIP: Besides making video DVDs and slideshow DVDs, Windows DVD Maker will let you make multimedia DVDs as well. Add photos and slides to the same project and WDM will sort it all out and come up with an amazing DVD that will amaze your audience. You can record a narration track and add it to the slideshow, too. Use your own creativity to explore this free software.
Thanks for reading! We hope you enjoyed our last two posts. We also hope you will create wonderful DVDs for your friends and families, just in time for the holidays.