All posts by Computers Made Simple

Spotify in Canada

Photo of Spotify site
Soundtrack your life, sounds good! That’s Spotify. 


We like to listen to music while we work. Doesn’t everyone? Most streaming music sites don’t let you choose your music. That’s OK some of the time but, every now and then, it’s fun to choose your own songs. Spotify lets you do that, for free! Unfortunately, Spotify is only available in certain areas of the world. Canada is not one of those places. Here’s how we managed to get Spotify working for us here in Canada.

1. Make sure you’re using Chrome. If you’re not, you should be using it to surf the web. Don’t use Internet Explorer. Download Chrome and install it now. Here’s the link: Google Chrome

2. Chrome makes use of different extensions or plugins to perform tasks that a normal browser can’t manage. One of these extensions is MediaHint. When we try to access the Spotify site, it’s obvious that we are in Canada. MediaHint hides that fact and allows us to download the Spotify app. Go here: Chrome Web Store and search for MediaHint.

Photo of MediHint Extension
Click on Add To Chrome. (We’ve already added it. That’s why is reads: Rate it.)

3. Choose ‘Add to Chrome’.

4. Once MediaHint is installed, you do not have to configure it. Simply head to the Spotify site, click on the Get Spotify button and wait. The Spotify software will download automatically.

5. Once the SpotifySetup.exe file is fully downloaded, click on it in Chrome or double-click on it in your Downloads folder. The little seed app will download the full Spotify program.

6. Instead of creating a new account, simply sign in with Facebook, that’s the easiest way to do it. It’s fine to use your Facebook password, just the same as with any other major app.

7. Sort your way through the various setup screens  then sit back and enjoy the music!

Photo of Spotify App
Lots of choices, search for a song, add it and rock out!


If you live in another country, the MediaHint extension will probably work for Spotify and other restricted sites. We’re not a fan of DRM (Digital Rights Management) and if we can beat it, we will. DRM is making the world a much smaller place. That’s not what we need right now, in our opinion.

Thanks for reading!

Youku Downloader – Part Two

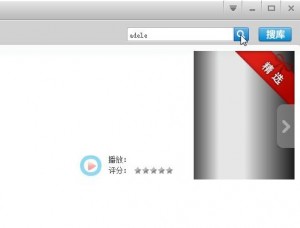
Now that we’ve got the Youku app installed (read the post here: Youku Downloader ), let’s see how it works. From the main window, look for the search box up on the top right side.

Photo of Youku search menu
We’ve typed ‘adele’ into the search slot.


Type in your search term, in this case we used ‘adele’ , then click the icon of the magnifying glass. In a moment, you’ll see the results of this search.

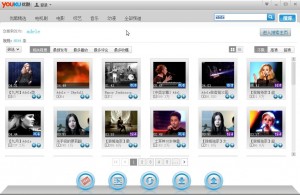
Photo of Youku Search Result
The results show many Adele videos, just the same as Youtube. except the titles are mostly in Chinese. 


The cool things about the player come out next. Click on any video that looks interesting. In another window on the same player, the video will start. Unlike using Youtube in your browser, the search window is still there and can be accessed with the click of your mouse. Additionally, you can download the current video with another click of your mouse. Here’s what to look for.


Photo of Youku buttons
The left button brings up the search page, the right one brings up the current video window.


If the video you are viewing isn’t the one that you want, clicking the button with the red film icon on it will bring up the search window again with all of the same videos still there. Click the button with the blue arrow on it to get back to the video window. How do you save a video to your hard drive? Go to the video window, then look for this character on the lower left of the menu.

Photo of Youku download button.
This is fairly obvious, right? Click this button to bring up the download menu.


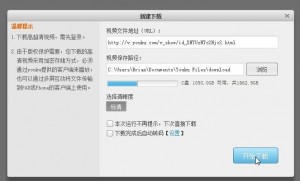
Once you click this button, the following menu pops up:


Photo of Youku Download Menu
Click the big blue button and the download will start.


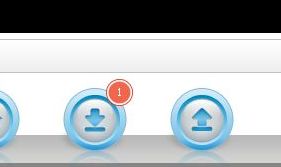
In the photo above, you can see that the download folder is in the Documents folder for the current user. This will help you find the videos should you wish to archive them at a later date. Quite honestly, we don’t know what all of the words mean but we’re not too concerned about it. The videos are downloaded, that’s all we care about. Once you click the blue button, you can confirm that the video is being downloaded when you see this:

Photo of Youku Downloading Confirmation
The red 1 means that one video is being downloaded.


Another great thing about the Youku app is that you can download more than one video at a time. Simply head back to the search results and click on another video and repeat the process. We’ve had four videos downloading at the same time. There is probably a limit to the number of simultaneous downloads but we haven’t found it yet.

The videos that are downloaded may be in different formats. We’ve see the normal .flv files, which will play in any media player, but we’ve also seen proprietary formats that will only play in the Youku player. We’re working on the problem now, trying to determine if the proprietary format can be changed to another, more popular, format. We’ll update this when we find the answer.

Have fun downloading! If you need help, let us know. Comments and questions are always welcome.

Thanks for reading!


Youku Downloader

Youku is the Chinese version of Youtube. As you probably know, the people of China are behind a firewall and cannot access Youtube, Facebook or Google, nor thousands of other sites. Because of this, China’s government allows companies to copy popular Western sites and offer them to the public instead. Youku is pretty much the same as Youtube but offers a different selection of videos. If you want to experience what life in China is like, you can download the mobile Youku app for your PC. Once you have the software installed, it is much easier and faster to access Youku than through your browser plus you can download any video with it. Unlike Youtube, Youku splits the larger videos up into various pieces, making them nearly impossible to download without the Youku player. Here’s how to get and install the Youku player.

1. This is a direct link to the site where you can download the software. Youku Mobile App   Don’t be put off by the word ‘mobile’.  As with Miro  , this is a standalone application for any modern Windows computer. The link is to the PC software but there are apps for Macs and mobile phones, too.

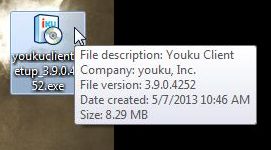
2. The app itself is :

Photo of Youku Downloader 1
Make sure you have the correct file before you download it.


3. Double click the file to install it. Windows will ask if you want to let this software change your computer. Click OK and proceed. The menus are all in Chinese so we’ll guide you through the process.

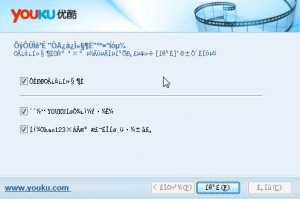
4. This is the first menu that you’ll see:

Photo of Youku Downloader 2
Click the prompt with the N on it.


5. Next comes the agreement that you have to accept:

Photo of Youku Downloader 3
Click the indicated prompt, the one with I on it.


6. Next, make sure you uncheck the next box. This is how it looks by default:

Photo of Youku Downloader 6
Uncheck these boxes.


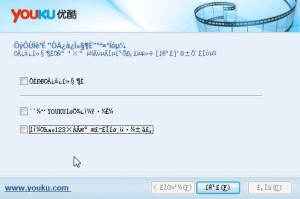
7. This is how the final box should look:


Photo of Youku Downloader 7
Make the menu look like this and then click the prompt shown, the F one.

That’s it! We’ll run through the process of using the app in our next post. When you first run it, you will see a series of how-to screens. If you can read Chinese, fine. If you can’t, just wait for our next post. We don’t want to make these too long.

Thanks for reading!


Hide Recently Opened Files

For whatever reason, there are times when might want to hide the list of files that you’ve recently opened. If you hover your mouse over the Windows Explorer icon just to the right of the start button, you’ll probably see a list of the files that you have recently opened.

Here is what that icon looks like:

Photo of Windows Explorer Broken
Windows Explorer Icon. Hover over this and see what files have been recently opened. 

Maybe you share a computer or you have been snooping, whatever, there should be a way to stop Windows from recording your activity, right? Well, there is. Follow these steps to stealth computing!

1. Right click the start button down on the lower left of your taskbar. This one:

Photo of Windows-Start-Button
Right click this button.


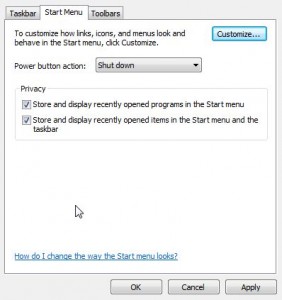
2. Click the word ‘Properties’ and this menu will pop up:


Photo of Properties Menu 1
Right now, this is the way the menu probably looks.


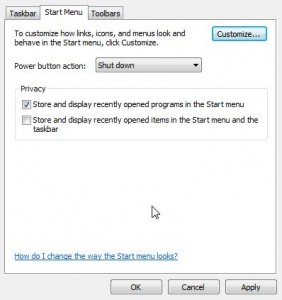
3. All we’re concerned with now is the second line in this menu, the one that reads ‘Store and display recently opened items in the Start menu and the taskbar’. Let’s uncheck that line to make our menu look like this:

Photo of Properties Menu 2
Uncheck the second line then click Apply or OK.


4. Once you have unchecked the menu, click OK (or Apply then OK), and the change will be made. No more record of what files have been opened. Yay!

Thanks for reading! If you have a problem that you can’t solve, make a comment on any page and we’ll see what we can do. Better yet, ask a question on our Facebook page: Computers Made Simple on Facebook  and then ‘Like’ the page. Thanks!

Setting Up a New Computer – Part Four

One of the final steps in setting up your new computer should be to install and use Dropbox. We’ve written about Dropbox before, here are some links:

Dropbox 1 – Six reasons to use it. 

Dropbox 2 – How Dropbox can save your bacon

Photo of Dropbox logo
This free site/software is compulsory for your new computer.

Even if you only use one computer, Dropbox (or something similar) should be part of your daily routine. Here’s an explanation of the concept, just in case you don’t know about this handy piece of free software.

Imagine for a moment that you lost your purse or your wallet. Big stress moment, right? What if you had an exact duplicate of that purse or wallet in another room? What if you had an exact duplicate in another pocket or drawer? We think the stress would be substantially lowered. When we say ‘exact duplicate’, we mean just that. A perfect copy of your lost item, down to the old pennies at the bottom and the fluff in the corners.

Dropbox keeps duplicate copies of one folder, the Dropbox folder, on your computer and on the Dropbox website. If you have another computer at work or at the cottage,  your Dropbox folder is synchronized as soon as you fire up that computer. No matter what kind of computer, even a tablet, Dropbox keeps track of everything that’s in the folder and syncs them all almost instantly, you only need an Internet connection.

What if your wallet had ten dollars in it before you lost it? Let’s say you find your wallet and the ten dollars is missing. No worries. The duplicate copies still have the ten dollars in them, wherever they may be. Dropbox keeps records of your current files as well as previous copies of those files in an archive folder online. If you accidentally delete an important file from one of your Dropbox folders, that file will still be available in the Dropbox archive folder. You’ll need to access your online folder to get it but that’s easy to do. Read the link above, the one about ‘saving bacon’, to get an idea of how important this is.

Dropbox gives you 2 gigs of free storage, more if you refer a friend to the site. 2 gigs is more than enough to store your documents, important photo files and family videos. Once you archive those files to a DVD, you can delete them from Dropbox. Any current documents should be saved to Dropbox in order to access them from any computer anywhere in the world that you have an Internet connection.

You can also share files with other people. There is a public folder that you can share as easily as sending an email. Dropbox has a complete set of easy-to-follow instructions which explain all of its features. Trust us, don’t use a computer without it. Dropbox is worth its weight in gold…but it’s free, of course!

Thanks for reading!