All posts by Computers Made Simple

Routers 101 – Talking to your router

Whether you have a DSL/ADSL or cable connection to the Internet, you most likely have a router somewhere between you and your ISP (Internet Service Provider). It may not be a separate unit, it might be part of a modem/router combination but we’re quite sure most of you have one.

A router ‘routes’ the signal it gets from your modem, separating it into different sections then sending those sections to the various computers that are connected to it. The connections could be wired, as when you use an Ethernet  cable to hook your desktop up, or wireless, such as with most modern laptops and other handheld devices. Not all routers provide a wireless signal but most modern ones do.

The next several posts will take you inside your router. showing you how to take control of parts of it. Why? Because in order to set up our back office ‘recreation’ room, we had to figure out how to make one of our game consoles see one of our PCs. For that, we had to delve quite deeply into our old main router and another that we had sitting around. The next few posts will allow you to do the same thing or something similar. Here are two things you should read before we begin:

Warning! If you are working on the router that connects you to the Internet, you may accidentally change something that will stop that connection. This will entail a call to your ISP unless you have your current settings saved. We strongly suggest leaving your Internet router alone until you know what you are doing. Sure, you can look at it from your browser but don’t change anything.

TIP: If you have a new router, you must link it to your computer with an Ethernet cable. Once it is connected, you can communicate with it via your web browser. (If you are already connected to the Internet, you can communicate with your router the same way but you don’t have to do any other physical or wireless type of connection, other than the one that is already in place. If you can read this webpage, you are already connected to a router.)

Today, let’s figure out how to communicate and control a router. No tech talk, just plain English. Here we go:

1. Just as this website has an address, your router has one too. To talk to your router, all you do is open your favorite browser, we suggest Google Chrome, then type in a series of up to 12 numbers, separated into groups. How do you find out what those numbers are? You can find the paper manual for your router or, in some cases, the CD that came with it. If you don’t have either of those, you do a search on Google. Simple, right?

2. Get the model name and number of your router and do a search, making sure to keep any hyphens in place. Don’t worry about capitals but make sure you get the numbers and letters right. With any router that we’ve ever worked with, we’ve been able to find the manufacturer’s site and the PDF which describes how to access the router.

3. Once you get the number, open a new browser window and type that number into the address slot. Most router addresses are similar to this: 196.168.0.1 as you will discover in the manual. Some switch the 0 and the 1 while others have a 254 or something similar in the third set. Regardless, make sure you type the periods and numbers in the order specified.

4. Next, an admin window will usually pop up. Let’s assume that you have purchased a new router. The default username and password is usually admin and admin. Here’s a list of default usernames and passwords for most routers that you’ll encounter:

List of Default Router Passwords and Default Router IP Addresses. 

Here’s what you should see after you type the correct IP address into your browser:

Photo of Router Screen 1
One of our routers has 192.168.1.1 as its IP address. This is where you type in the username and password.


Once we type everything in, this is what we see next:
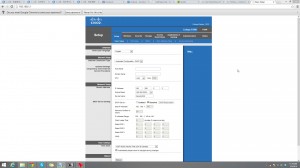
Photo of Router Screen
Don’t be intimidated by this. You’re just looking…for the moment.


All of the inner workings of your router can be adjusted from this screen. Many of the terms will seem obscure for now but some of them will become much clearer later on. At this point, just take a look around. The router defaults to the setup page that you see above. On this screen you can adjust the Basic Setup, the IPv6 setups and so on. These are in blue just on top of the white section.

Above the blue bit, you’ll see things like Wireless, Security, Storage, etc. Clicking on any of those will bring up a different set of adjustments and controls. Here’s what you will see if you were to click on the word Wireless:
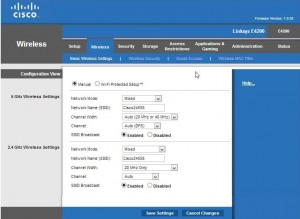
Photo of Router Wireless Settings.
Here is where we setup the wireless signal for some of our computers.


As with the last screen, there are sub-settings, shown in the blue section here, that control Wireless Security, Guest Access and Wireless MAC Filter. This Cisco router is what they call a ‘two channel’ model, one with a 2.4 GHz signal and one with a 5 GHz signal.

For the time being, snoop around a bit and see what you can find. Make sure you don’t change anything, just take a peek to see what you could change if you wanted to later on.

TIP: With a new router, you can change anything you want and not worry. Why? Because every router has a reset button that will undo any changes and set the router back to its default, factory settings. All you need to do that is a paper clip. Hold the reset button in for a short time, usually about ten seconds, then everything is back to the way it was when it left the factory. If you buy a used modem, this is the first thing you should do.

That’s it for today. Your homework is to find the IP address of your router and gain access to it. Make sure you jot down the IP address and password so you can access it next time without looking everything up.

Thanks for reading! If you have questions or comments, please let us know. Better yet, Like us on Facebook and you’ll get every one of our updates as soon as we post them. Here’s the link: Computers Made Simple on Facebook

__________________

Here’s a link that might help us if you are interested in hosting your own blog with Fatcow Hosting. We’ve signed up to become an affiliate and we make a bit of money if you sign up for hosting via this link: FatCow Hosting Thanks!


Here’s What’s New for 2014 at Computers Made Simple

After a break for the holidays, we’re back in fine form for the upcoming year of posts. Here are some of the topics we’re considering for the new year:

1. Everything to do with routers. Routers can seem complicated and hard to manage until you get to know them. We’ll sort out these small but powerful pieces of electronic wizardry in a series of posts starting in January.

2. Entertainment centres. Over the holidays we rebuilt a ‘man cave’ and decided that the connections and setups needed an explanation. As always, we won’t make things complicated. Once  you read our posts, the terms HDMI, DLNA and others will not be a mystery for you.

Photo of mancave
Our mancave doesn’t look like this but we do love guitars.


3. Social networking. We’ve written dozens of posts about Facebook but in 2014 we’re going to expand our horizons and cover some of the newer social networks out there. Stay tuned for rundowns on Snapchat, Instagram and many other cool apps.

4. Security and encryption. Yes these are boring topics but we feel a need to show you how to protect your online identity, mainly from crooks and criminals but also from certain governments who have no business snooping into your personal files or communications.

5. Dozens of things that we think you should know explained in simple, non-jargon. Stick around. We think you’ll be happy you did.

Thanks for reading! Join us by liking our Facebook page. Here’s the link: Computers Made Simple on Facebook 

Two-Channel Authentication – Wazzat?

When a site asks you to set up a type of two-level security, you might wonder what they’re talking about. Here’s what you should know about this relatively new way to protect your online identity…and your money!

If you’ve ever called your credit card company, you’ll remember that they always ask a few qualifying questions before they discuss your account. You have to prove that you are you, essentially. When you’re online, most everything you do is secured by a password. What happens when you lose that password or, worse yet, someone steals it? This is where multi-level protection comes in.

Take online banking, for instance. Most banks use a second level of security, taking the form of a question that you must answer correctly after you enter your password. If your bank doesn’t use this type of account lock, you should really consider moving to a more secure banking facility. Additionally, make sure your answers do not have anything to do with the question. If the question chosen is ‘Name of your first pet’, set the answer to be anything but the name of that pet. Your birthplace? Same thing. Almost anyone can pick up bits and pieces of your personal information from many different sources. Lock up your bank account(s) with cryptic answers to all security questions.

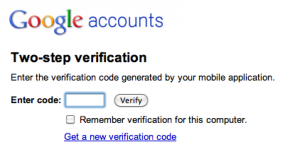
Photo of Two Factor Authentication
You want to use privacy protection like this. It makes everything more secure.


For Facebook, Twitter, Gmail, Outlook, etc. make sure you sign up for two-step confirmation. For all of these sites, you can use your mobile number to receive a code that lets the site know it’s OK to let you change your password or log in from a new device. Look for ways to activate this. Facebook has been using this technique for quite a while. Outlook now makes it mandatory. Sure, it is a bit of a pain but they’re doing this for you, not for themselves. Protect your identity and personal information with as many levels of security as possible. You’ll regret it if you don’t.

Thanks for reading! Here’s a link to our very own Facebook page: Computers Made Simple on Facebook   Like the page and you’ll get all of our updates instantly.


Facebook Follow Button – Less choice than before

There might be a new look to your Facebook page soon. We have it on two of our accounts but not on the others. Here’s the scoop on the changes:

In the older versions of Facebook, you could choose which news events would show up on your timeline. You could turn off some friend’s game updates, for instance. Now, in what seems to be a move to streamline things, Facebook only gives you one choice. That’s a step backward, in case you missed it. Facebook is now offering you less choice, not more. Let’s take a look at the changes. 

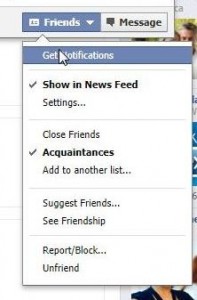
The old way to trim your friends’newsfeed: 

Photo of Facebook Follow    1
The old way. Hover over Friends then choose ‘Settings’.


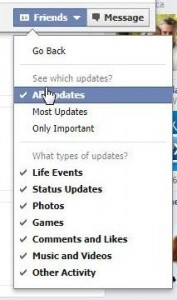
Photo of Facebook Follow    2
You could easily choose which news events you would see.


The new ‘limited choice’ way: 

Photo of Facebook Follow    4
Now, you follow or you don’t. Simple but far fewer choices.


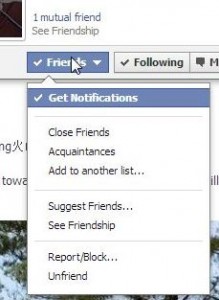
Photo of Facebook Follow    5
The ‘Get Notifications’ is a toggle. The words are in bold and checked if you are ‘getting notifications’.


The settings are a bit confusing, aren’t they? If you Follow someone, you’d think that you’d get their updates, right? Why then is ‘Get Notifications’ a toggle? We suspect that if you ‘unfollow’ someone, you get no notifications at all. If you Follow someone, you’d get their important updates but not all of them. Following someone and choosing ‘Get Notifications’ may mean that you get ALL of their news. Only time will tell. Meanwhile, let us know if you think this is a step forward or, as we do, a step backward.

TIP: There is no way to download or get this update yourself. Facebook does all of this on its own. You can’t rush it along, no matter what you do.

Thanks for reading! By the way, we have our very own Facebook page. Head over and Like it, would you? Thanks. Computers Made Simple on Facebook

Using WeChat on a Computer – Introducing Web WeChat

We love WeChat! Sometimes, however, it’s a pain to tap tap out messages on a small screen when we’re sitting at our computer or using our laptop. Here’s a quick and easy tutorial on how to use WeChat’s new feature, Web WeChat.

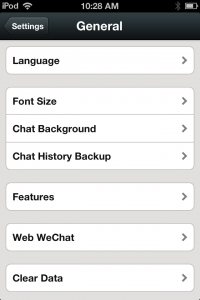
1. Press ‘Me’ on the lower right of any screen. Press ‘Settings’ then press ‘General’ on the next screen. Down near the bottom, look for ‘Web WeChat’.

Photo of Web WeChat   1
There is Web WeChat, down near the bottom.


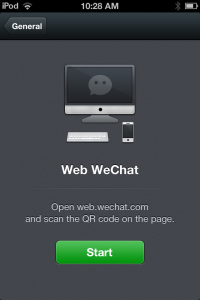
2. This whole process involves scanning a QR code that shows up on your computer monitor so make sure you have a new browser tab open. WeChat asks you to open web.wechat.com so do that now.

Photo of Web WeChat    3
This is what you see after you press ‘Web WeChat


3. Click on ‘Scan the QR code with WeChat’ link that appears on your screen.

4. After a short wait, a large QR code appears. Scan that with your phone/mobile device. Make sure your fingers aren’t in the way and that you move back enough to let your device’s camera scan the full code:

Photo of Web WeChat   2
Here is the QR code that you scan with your mobile device’s camera.


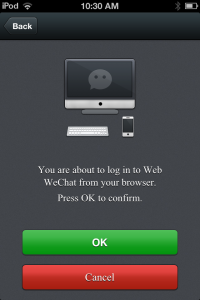
5. Once the code is scanned, your mobile device double-checks that you want to login to WeChat on your computer:

Photo of Web WeChat  9
Click OK.


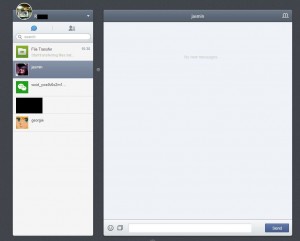
6. At this point, a chat windows opens up inside your browser, complete with contacts on the left and a chat window on the right. How cool is that?

Photo of Web WeChat    6
That’s what you’re looking for, isn’t it? Your keyboard is faster, the interface is bigger. Win win!


Web WeChat is so much faster because you can use a keyboard for messaging plus all of your contacts and chats are visible. There is a audible notice of new messages. If you don’t want that, it can be turned off quite easily. Click on the little down arrow icon just to the right of your display name. Enjoy!

TIP: It goes without saying that Shake and People Nearby won’t work on your computer, right? Well, we said it anyway.

Thanks for reading. Like us on Facebook to keep up on all of our new posts and videos. Computers Made Simple on Facebook