
Today we will add a wireless (WiFi) access point to our network. Not only will reception improve in some parts of the office but we will be able to stream HDTV and video through the new N router to our Xbox 360 without the need for Ethernet cables. Plus, most modern laptops and wireless devices use the N protocol. Their network traffic speed will increase dramatically.
1. Any wireless router can serve as an access point. You can buy a pre-fab access point but why spend the money? Access points are very expensive. Routers are very inexpensive. We’ll take the router anytime.
2. Find a spot in your home that has the three things you need. The first is an electric socket to plug the router in. The second is access to an Ethernet cable that is connected to your main router. This cable can be a few feet long, meaning that you can put the second router near your main router or modem/router, or it could be fifty feet long. That means you could put it in another room, perhaps closer to your family room or entertainment center or, even better, right beside the PC that you are going to use for streaming. Why? Because both units, your Xbox and your Media Center PC must be connected to the same router. (In this case your second router is acting like a network switch but that’s just semantics.)
3. Log in to your main router, the one that gives you Internet access. What you’re looking for there is the IP range that it uses. The IP range is a set of 255 numbers that are assigned to the various devices that connect to that particular router. The numbers will be in a very standard format, let’s say from 192.168.0.1 to 192.168.0.256, something like that. Once you find the range, write the numbers down.
4. Now, hook up your new wireless router via an Ethernet cable to your computer, preferably a laptop. We’ve always found a laptop to be easier because we can turn off the wireless adapter which forces the computer to use the Ethernet connection. On a desktop it gets a bit confusing. Open a browser window and type in the address to the new router, log in as the admin and look for the main screen.
5. Here is what you’re looking for:
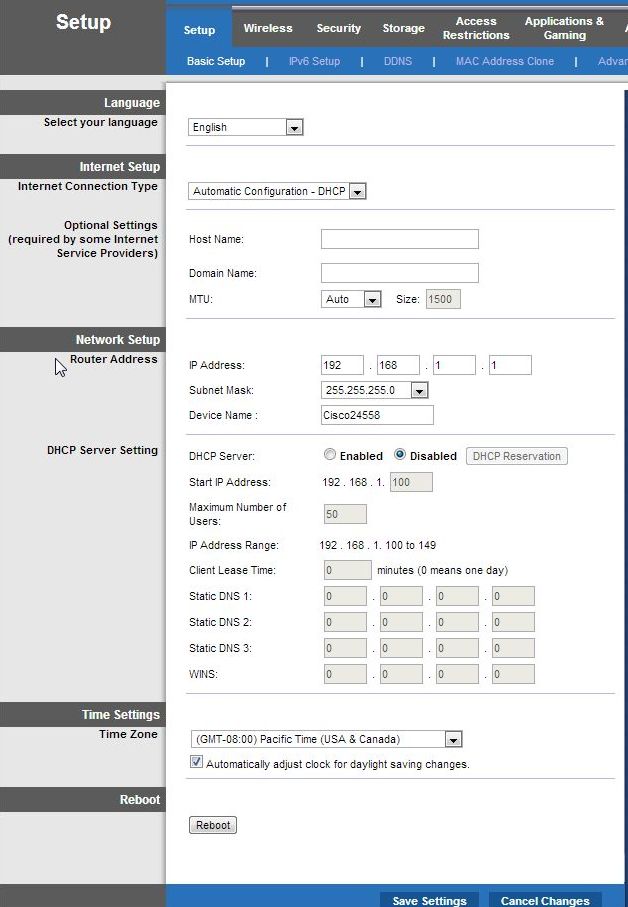
6. You have to change or check two things on this menu. Since you already have one router that serves out DHCP numbers, you don’t need another. Make sure that this router’s DHCP server is disabled. Next, you want to set the IP address of your new router to an address that is not in the same range as your main router. For us, this was simple. We knew the range of our main router was already different from our new access point. We didn’t have to change anything.
If your main router uses a range such as 192.168.1.1-192.168.1.256, you can give your new router an IP address using 192.168.0.1, for instance.
7. When you are finished changing and checking everything, make sure you save your settings by clicking the save button down at the bottom.
8. Disconnect your new router and carry it to its new designated location. On the back of the router you will see several Ethernet ports. Here’s an example:
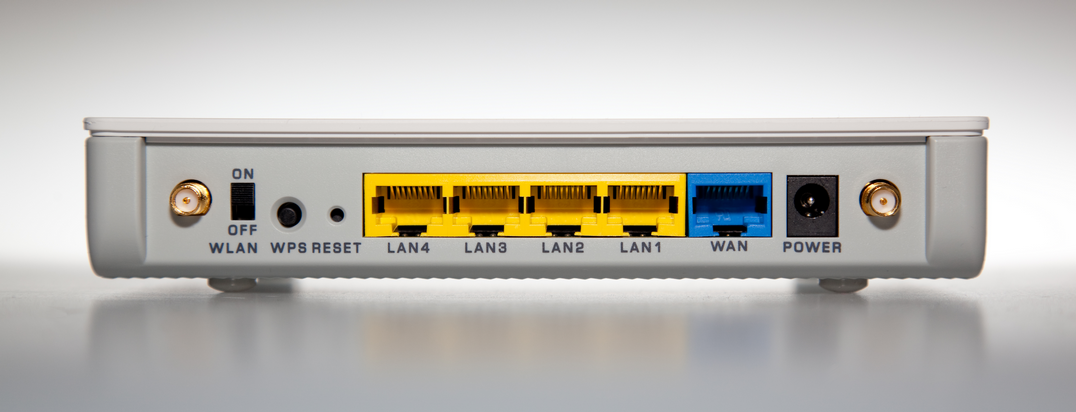
9. The blue port in this photo is where you would normally connect the Ethernet cable if you were using this as your main router. The WAN stands for Wide Area Network. Ignore it for this setup. What you want to do is connect the Ethernet cable that is directly attached to your main router to one of the yellow ports. Your colors will be different, of course, but make sure you connect the cable to one of the LAN ports, not the WAN port. Turn the router on and you’re set.
10. Since you’ve already locked the WiFi signal with a password, maybe even locked out foreign MAC addresses, all you have to do is to type in that password or passkey on any device that you want to access this particular section of your network. Go back to your Xbox 360 and use its wireless search function to find this router and log into it’s signal.
This is the second last post in the Router 101 series. Next time we will tackle setting up your Xbox to receive streaming video/HDTV from your PC. Compared to setting up your router, that will be a snap. Stay tuned!
Thanks for reading!
Why not Like us on Facebook? You’ll get good karma as well as instant updates on all of our news posts and tips. Here’s the link: Computer Made Simple on Facebook
_____________________________________
Here’s a link that might help us if you are interested in hosting your own blog with Fatcow Hosting. We’ve signed up to become an affiliate and we make a bit of money if you sign up for hosting via this link:FatCow Hosting Thanks!
Hi, I am an FBLA member from Washington State, U.S., and I am working on a business computer game which invovles technology concepts. There is an instance where the player will encounter a router, and the image you provided on this page is exactly what I need. I am asking for your permission to use this image in my non-profit game. Please understand the sole purpose of this game is for me to succeed in FBLA. Thank you for your time.
http://brianmahoney.ca/2014/01/routers-101-adding-a-wifi-access-point/
Hi Brian, thanks for commenting. We usually pick photos from manufacturer’s sites so the photo you are referring to is not ours. The photo is of a ZyXEL router which we found in a review of the NBG-419N Wireless N Home Router. Hopefully you can track them down and ask them for permission. We didn’t think it was necessary. Try ‘www.zyxel.com’. Good luck!