I’ve written about Fotobounce before. If you share photos from one social media site to another, Fotobounce is a great tool. It allows you to download complete Facebook photo albums to your computer. What you do with them after that is your business, I guess, but you really should ask for permission if you are going to share anything that isn’t your own. Here is an explanation about what Fotobounce is: Fotobounce Made Simple (The original post wasn’t named that but it sounds good, right?)
While Fotobounce is a cool app, the actual downloading of albums can get tricky because of the way the instructions are worded. In this post I’ll try to help you figure out the odd English that they use in the selection process. Before I forget, Fotobounce is available here: http://fotobounce.com/
1. Download and install Fotobounce…duh!
2. Open the program and head over to Facebook. Sign in to Facebook with Fotobounce. You’ll have to allow it access but, according to the makers, they don’t save your password. You can always remove the access after you’ve downloaded the albums that are of interest.
3. Find the album you want to download. You have to sort through your friends, your likes and your acquaintances to find the right album(s) but that’s pretty basic.
4. Once you find the album, right click it. You’ll see the ‘Download’ button. Click it and the following menu pops up:
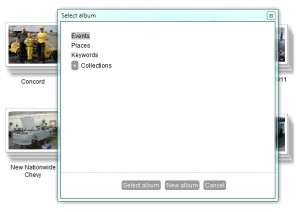
5. In this menu, you are choosing the main folder for the download. If you click ‘Select album’, Fotobounce will start the download to, in this case, Events. That’s not what I want. I want to create a sub-folder and then maybe a sub-sub-folder. Let’s do that. We’ll make a sub-folder inside of Events.
6. Click New Album. Fotobounce will show you a new album dialogue, as pictured below, and it will have the same name as the album has on Facebook. We don’t want that. We need to sort out the downloaded albums according to whose they were on Facebook, right?
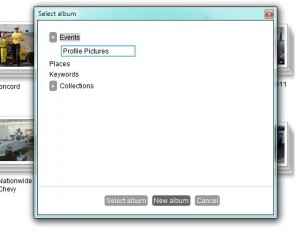
7. Instead of Profile Pictures, I want to name my new album ‘Joe Nemechek’. (Joe and I are lookalikes to the point that I get stopped in stores. If I ever headed South and wore a NASCAR jacket then I’m sure I’d eat free wherever I went.) Type in whatever name you want and hit the Enter key. A new album will be created and Fotobounce will give you a notice at the top of the page.
8. Once you’ve found your new folder, click on it and you’ll see the same menu window come up same as before, giving you the option to Select that album or make a New album inside of it. This time you can leave the name the same, if you want. The default name is the same name as it was on Facebook.
9. If that name is fine, click on the Select Album button and Fotobounce will download the album inside of the album that you just created.
This sounds pretty simple, right? It’s not. Here’s the problem, as I see it. When I see the words ‘Select album’, I expect to get a choice. Instead of the normal ‘OK” that everyone else uses, Fotobounce uses ‘Select album’ as the button that starts the download. Unless you make a folder or a folder within a folder, Fotobounce will happily download your albums into the same directory. Good luck trying to figure that out when you’ve got more than a few albums in your collection. You have to create new albums if you are ever going to figure out which album is which. Sure, you could to all of this within Windows Explorer but it should be a one-step process or the wording should be a bit clearer. That’s what I think, anyway.
Fotobounce does a lot more than simply saving albums in Facebook. Check it out. I’ve just scratched the surface here.
Thanks for reading!

