Tag Archives: Hosting

MySQL and WordPress


WordPress requires a relational database. Before you get WordPress up and running, you have to set up a MySQL database on your hosting account. Sure, this sounds complicated but it’s not. If you can make a new folder in Windows, you can create a database for WordPress. Here’s how it’s done. Pictures following are from a cPanel demo site. Yours may differ somewhat.

1. Head over to your hosting account, log in and take a close look at your dashboard or control panel. What you are looking for is ‘MySQL Database(s)’:

MySql Database Icon
This is what you are looking for.

2. Click on the MySql Database Icon. This is what you should see:
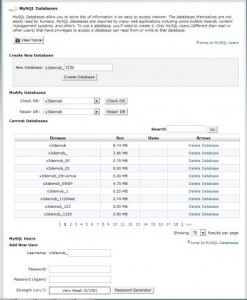
MySQL settings to add new database
Add a new database here, create a password and add a user.

3. Use this menu to create a database, create a password and add a user. You need these three pieces of information BEFORE you get WordPress up and running. When you are installing WordPress you add this information to it’s config file once. WordPress uses this database from then on. I would use the password generator but you can make up any name for the database and any user. You can name them both the same, if you want.

TIP: If your host has limited your account to only a few databases, mine has not, you can still run multiple installations of WordPress from the same database. I will show you how to do that later. I have 12 sites on the same account but I only have about 5 databases.

4. This is what the MySql menu looks like on my hosting account. Yours may be the same. :
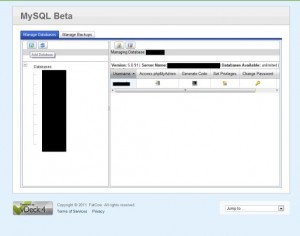
Deck 4 MySQL Menu
Same concept, different look. The button on the top left is the one you want to create a new database.

This is the only preliminary work you have to do before installing WordPress. You’ve already created the folder in your root directory, right? We did that in this POST. Once you have done these two steps, it’s OK to download WordPress, unzip it and wait for my next post.

Thanks for reading! Follow me on Twitter: @_BrianMahoney 


Basic HTML Placeholder


An HTML placeholder is a small file that shows up when someone goes to your new domain name before you have a full-fledged website set up. Consider it a virtual ‘coat on the back of a chair’ at a party. You’re going to sit in the chair, just not yet. The placeholder lets everyone know that your site exists, it works but there isn’t anything there yet. It’s live in other words, just not fully filled out.

Putting up a placeholder is very easy. Here’s how you do it:

1. Open Notepad. Don’t use Word or Wordpad or anything else except a text editor. Notepad is free, comes with Windows and is in your Accessory folder.

2. Copy this text and paste it into Notepad :

<html><head><title>Welcome to suchandsuch.com</title></head><body><h1>Welcome!</h1>

This site is under construction. We'll be up and running as soon as possible. Bookmark this url and come back later. See ya!

</body></html>

3. Type in your domain name where I have ‘suchandsuch.com’ then save the file as an .html file NOT as a .txt. file. (Click on the tiny arrow to the right of .txt and choose ‘all files’.

4. If you accidentally save it as a text file, just rename it as an .html file, ending up with index.html on your desktop.

5. Double click this file to see what it looks like. It’s about as simple as it can be but it gets the message across. You can align the text in the centre, use colors or whatever you want but this is about the simplest .html file you can make.

6. Using FTP or your host’s File Manager, upload that file to the sub-directory that you created in my last post.

7. The index.html file should be the only file there. Once it’s up, open another browser window and type in your domain name and hit enter. There it is! Your placeholder. If you don’t see it, then the file is named incorrectly. Make sure that it is  index.html   (all in small letters, no caps and with the period before html, no spaces).

Once this page is up, you can relax for a while and figure out how to install WordPress. If you want to stick to html, fine but you’re on your own there. I have moved all of my sites to WordPress just because it’s so damn simple to update.

I’ve explained the WordPress installation in previous posts. Here is a link to the first one: WordPress Installation .

Over the next few posts I will revisit the WordPress installation for you but read the old ones for now. Good luck!

Thanks for reading! Follow me on Twitter: @_BrianMahoney