Tag Archives: Facebook

How to Hide Your Likes in Facebook Timeline

PLEASE NOTE: This method is no longer valid. Please take the link to our latest update on this topic. Facebook has changed their Timeline editing system. Here is the link: 

Hiding Likes on Facebook – it’s back! 

I like many diverse things on Facebook, some of which wouldn’t fit in with some of my friend’s sensibilities. There is no reason why everything I like has to be open for my friends to see. Here’s how to hide these likes from your friends.

TIP:  This only applies to the new Timeline feature of Facebook. If you’re still on the old Facebook interface, this doesn’t apply to you.

Step One: Navigate to your own profile. Simply click on your name up on the top of your browser window, right beside the little icon which is your profile pic.

Step Two: On the far right of the word Home , you’ll see an arrow pointing down. Click it and you’ll see Account Settings. Click Account Settings to bring up General Account Settings. Basically, that’s your name, your username, email etc.

Step Three: On the left side, under the word facebook , you’ll see the words General, Security, Notifications, Apps, Mobile, Payments and Facebook Ads. Go through each of them, if you want, but what we are looking for now is the little blurb at the bottom. This is what it looks like:
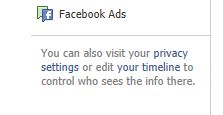
Here is how you edit your timeline.
Click on ‘edit your timeline’ to bring up an editable version of your timeline.

Step Four: Click the word timeline to bring up a non-graphical version of everything on your timeline. Again, you can view these settings page by page. The initial one is  About you. You can edit and show/hide any portion of your information. How? Look for this icon:
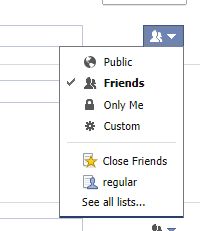
The timeline edit menu
Click on the ‘world’ icon to change your settings.

Your icon, if you haven’t set it already, will be the globe one. Mine is the two headed friends icon. Here is where you decide what to hide from the public, from your friends or, by using the custom setting, some of your friends.

Step Five: Right beside your name on the upper left, where it says About now, click on the little down arrow to show this menu:
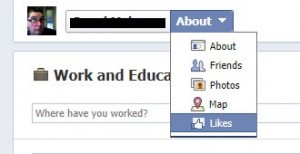
Different things to edit
This is where you choose what to edit.

What we’re doing now is editing the Likes part of your timeline so click it. Adjust the others according to your personal tastes.

Step Six: Once you click Likes, you’ll be presented with a rather blank page, depending on how much you like . The next step involves a hover button. A hover button is hidden unless you hover your mouse over it. Move your mouse around the Favorites section. It’s all white and you’re looking up on the top right. This is how it looks:
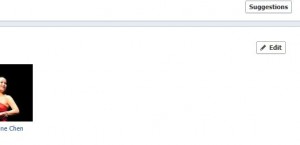
The hover button for Editing your Likes.
Hover your mouse in the white area to bring up the edit button.

Click the Edit button to, finally, edit your likes.

Step Seven: You’re almost there, don’t get discouraged. Clicking on the edit button in the previous step brings up an editable page for all of your likes. Clicking on the down arrow to the right of the globe icon, you can hide some, all or none of them. Down near the bottom is the  Other Pages You Like section. This is how it looks:
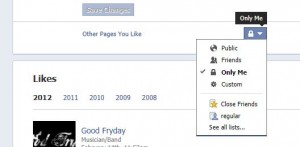
Edit your 'like pages' here
I’ve hidden my pages likes so only I can see them.

You’ll recognize the icon of the globe just to the right of the Other Pages You Like words. This is how you can adjust your settings according to your tastes. As you can see, I hid my page likes from everyone, except myself, of course. You can fine tune this setting to eliminate a few of your friends, too, by setting things up in the Custom section that you see fourth from the top.

There isn’t any reason that I can see to share all of the pages that I like. My tastes aren’t totally diverse from the norm but maybe I’m a rock musician and I happen to like Celine Dion’s Facebook page. How would that go over? I’m sure you can see why someone would want to cover up some of their likes. Now you know how to do it!

Thanks for reading. Questions and comments are welcome.


Facebook Timeline Privacy Settings – Part 1


On January 31st, 2012, you’ll be forced to accept Facebook’s new timeline profile. There are some new privacy settings that you might want to adjust. In the change from the standard Facebook interface to the new timeline interface, your previous settings won’t survive the transition. You’ll have to adjust them again.

Why is this important? For me, it’s not. For you, if you are a teenager or a single woman, for example, there are dangers to having all of your activities past and present open to the world. Ex-partners, teachers, prospective employers can now access all of your past information very easily. There isn’t much danger of me being stalked but for many people, that is a very distinct possibility.

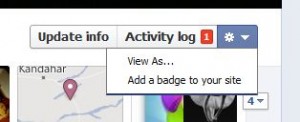
TIP: The best thing about the new timeline interface is that you can see immediately how your profile looks to strangers or to any of your friends. See the little arrow just to the right of the gear icon on your profile page? Here it is:

The View As menu on the timeline
Click on the View As line.

Once you click on the ‘View As’ line, your profile will change to show how strangers will see it. You can then change the view to show how your friends will see it, depending on your settings for each of them. You may want to hide things from some friends. In that case they will not see the same profile as everyone else.

Step 1 – Hide Your Past from Strangers: Follow these steps to ‘Limit the Audience for Past Posts: https://brianmahoney.ca/2011/09/facebook-control-your-old-post-privacy/ You must do this again, even though you may have done this in the past. Once you have done this, take a look at your profile as I have described just above this to ensure that your past is hidden from strangers/people who aren’t your friend.

Step 2 – Hide Your Friend List From Everyone: If you have family members on your friend list, it might be a good idea to hide your list from them. If you have your privacy settings wide open, everyone can see your list, allowing them to troll through it for ways to contact you. Whatever the reason, I think it’s a great idea to hide your list of friends from everyone. Here’s how you do that:

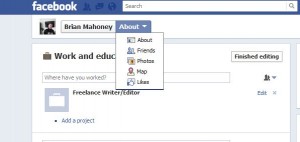
1. See the photo up above this? Click on the ‘Update info’ section. This will bring you to a page that allows you to edit virtually any part of your personal information. It also provides a link to your other personal settings. Click on the arrow beside the word ‘About’ and you’ll see this:

Settings Menu
This has links to all of your personal settings, including your friend list.

When you click on ‘Friends’, you’ll see a complete list of your friends, of course. What you are looking for now is the Edit button up on the top right. Click it and you’ll see this little menu:

Menu for your friend list
See the padlock on the right? Click it.

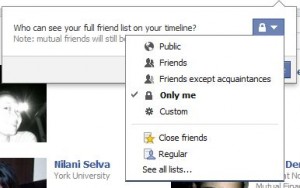
Once you click on the padlock you will see this menu next:

Locking your friend list
I would choose 'Only me' here but it's up to you.

As you can see, I have chosen ‘Only me’ for my friend list. Any friend who has a mutual friend will be able to see a list of mutual friends but that’s it. See the tip below but for now, no one can see your whole list except you.

TIP: The new timeline will not allow you to hide mutual friends from anyone on your list. Keep that in mind.

Everyone has different levels of security that make them feel safe online. I’m pretty open about most things but I don’t see why my friends have to see who I am friends with. I can further adjust these settings by grouping my friends into smaller groups. More on that in a future post.

Thanks for reading! Comments are welcome.

Facebook Data Download


Yesterday I downloaded all of my data from Facebook. It’s a relatively new feature and it’s very easy to do. Head over to General Account Settings, then click on ‘Download a copy of your Facebook data’. You will have to re-enter your password at that point, just in case you’re not the owner of the profile. Facebook will then collect some of your data, zip it up and email you when the download is ready.

My 576 megabytes of data took about half an hour or so to collect. When I got the email, I dutifully went back to my account and downloaded the data that Facebook had collected. I was, needless to say, disappointed when I discovered that the data was far from complete.

As far as I can see, all of my photo albums are there, even the ones I have deleted in the past. My notes are all there, too. What’s missing? Well, my wall is missing two years of status updates. My messages are very incomplete. The string of messages that I wanted most is totally missing. I tried to archive that set of messages to see what the effect of that would be, thinking that maybe I could download them after archiving. No luck.  The only thing I can do is to forward the messages one by one to my email address. Frustrating, to say the least.

It seems that Facebook has tried to allay some people’s fears about privacy. From the looks of the data collection system that they use, Facebook hasn’t really made me feel any better at all. Sure, I’ve got my photos, videos and notes but what happened to hundreds and hundreds of my messages? Where did the missing two years of my status updates go? Lost in a server change?

TIP: Depending on where you live, this feature may not be available to you. I’m in Canada and our government has taken Facebook to court a couple of times on issues of privacy. I know that this data download is available in Europe also but I can’t guarantee that this post applies to everyone who might read it.

I will wait another month or two before I try again. Maybe the next data download will be more complete. I am not the only one that this problem has affected. Other users have discovered the same thing as I have. What was your experience? Did you manage to get all of your data?

Thanks for reading. I’d love to read your comments.

Facebook Privacy – Apps


The last time we wrote about Facebook privacy, we dealt with the setting which controls the information that your friends bring into apps that they use. You can read that post HERE. Today, we will write about editing the settings for the apps that you use.

Facebook can be a lot of fun, right? There are many apps and games plus you can link other social networking accounts, such as Twitter, to your Facebook account. However, each app uses your information in different ways. Some apps only use a little of it, others use a lot more. Here’s how you can limit every app so that it only uses the information that it requires in order to work.

Click on the little arrow to the right of the word ‘Home’ up on the top right of any Facebook page. Choose ‘Privacy Settings’. Then choose Apps, Games and websites. What we are looking for on the next page is ‘Apps you use’ and the ‘Edit settings’ button on the right.

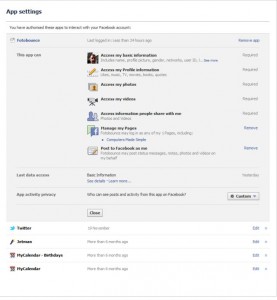
Once you click that button, you’ll see something like this:

Menu for App Settings in Facebook
This is where you can edit each app that you use on Facebook

This is the menu for the Fotobounce application. I’ve written about Fotobounce before. With this application you can download complete photo albums on Facebook as well as many other sites. Here is the post on that. 

Fotobounce needs to access some of my information in order to work. You’ll see what it needs to access on the right side where you see the words ‘required’. However, at the bottom, you’ll see that Fotobounce wants to do two more things. It wants to access my Computers Made Simple Page and it wants to have the right to ‘Post to Facebook as me’. Hmmmm. I wonder why Fotobounce needs to do this? Since I don’t want this application to do either action, at least until I know why it needs to, I will click on the word ‘Remove’. I can still use the app but it won’t be able to Manage my Pages or Post to Facebook as me. Done!

On the top right of this menu  you will see the words “Remove app’. If you have any doubt about an application that you use, clicking these words gets rid of that application for good. Give it a try. Do you really need all of those applications accessing your personal information? Think about it.

Facebook can be a lot of fun. We all know that. But Facebook also likes to use your information for their own gain and for reasons that have nothing to do with your enjoyment of the site. Facebook also won’t tell you what information it’s using. Setting your privacy limitations is vitally important. Get to know these settings and use them often.

Thanks for reading!


Facebook Privacy


The most important Facebook privacy setting is in the ‘Apps, games and websites’ section of your settings menu. Click on Home and choose Privacy Settings. From there, choose Apps and Websites: Edit Settings.

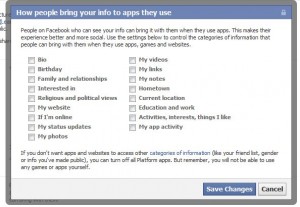
In this section, you can delete Apps that you don’t use any more, which is a great idea, but what you are interested in is the second section: How people bring your info to apps they use. Click on the Edit settings button. Once you’re there, you will see this:

Facebook Apps Settings
Make sure that nothing here is checked.

To me, everything on this menu is private. Some of these things I don’t even share with my friends. Why would I want to let Facebook spread this information around websites that my friends visit? Why are my religious and political views even part of Facebook? If you don’t uncheck everything here, Facebook has the right to tell complete strangers everything about you. Don’t let them!

By the way, the words at the bottom of this menu are completely false. They read: : “If you don’t want apps and websites to access other categories of information (like your friend list, gender or info you’ve made public), you can turn off all Platform apps. But remember, you will not be able to use any games or apps yourself.

This has nothing to do with this particular menu. Allowing an application to access your information is up to you. You choose the app, you say yes or no to letting the app use your information. Same goes with a website. That is separate from this particular menu.

This menu has to do with letting apps that your friends use access your information. It’s a blanket YES to whatever apps and websites your friends use. Make sure that everything here is not checked. Then click Save Changes.

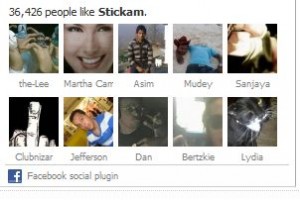
TIP: As I surf the ‘net, I see many Facebook graphics with little pictures of Facebook users on them. If you click on a user, you will be taken to their profile page on Facebook. This is whatI mean:

A Typical Facebook 'Like" graphic
Do you want your photo in graphics like this?

This is the same as trolling, in my opinion. You have no idea who is clicking on your picture and accessing your profile and reading whatever information is there. My profile is very basic, no personal information at all. Someone can send me a message, no problem. Someone can add me, no problem. Unless they do, they won’t be able to know anything about me. But, they also won’t be seeing my pic on a Facebook graphic. Why? Because I have unchecked everything in the menu above. There is a class action suit about this use of user photos in California, as a matter of fact.

I will be writing more about Facebook privacy in the next few posts. Stay tuned and stay private.

Thanks for reading!