Category Archives: Uncategorized

How to Block Spam on Hotmail – Part 1

I’ve been using hotmail for years, probably since 1998 on my main account. Did you know that HoTMaiL (the original name) was a play on HTML, the language of the Internet? Anyway, some hotmail accounts are prone to tons of spam. Depending on the size of your presence on the Internet, you could be besieged with huge amounts of unwanted email or spam.

Hotmail has always had a block list but there used to be limits on the number of addresses that you could put on the list. There might still be a limit but I can’t determine what it is but hotmail has recently introduced a very cool feature that helps you quickly and easily block spam email addresses. Here’s how:

1. Head to your junk mail folder. If you’ve set up your hotmail to send everything except email from your contacts, then you will likely have some email in your junk folder. Scan it quickly to see if any of it is important. You’ll get used to the typical spam subject lines but others, maybe some from Facebook or your bank, will look safe. Check them out first but almost all Facebook emails are spam.

2. Click on the little box to the left of every junk email. A little checkmark will appear.

3. On the menu right above your emails, click on the word SWEEP. Choose ‘Block from…’ and click OK when the little menu box pops up.

4. Wait for a few seconds before you change to another page. Hotmail will confirm that you’ve added all of those addresses to your block list. Now you can move on to your inbox or close your hotmail window.

Next time I will show you how to tune your blocking setup to prevent even more email from getting to your inbox.

hotmail visual
Hotmail junk mail box showing two junk mails selected for blocking.


blocking junk mail.
Two junk emails about to be blocked.

Force WordPress to Use Your Domain Name in the Site URL

If you’ve started a new WordPress blog, don’t forget to change the URL setting in WordPress to reflect your domain name instead of your hosting account name. I just ran into that problem and had to edit the settings to reflect each of my domain names. Here’s the problem explained and how to fix it:

1. When you sign up for a hosting account, you usually sign into the control panel using your hosting account name and password. Most shared server hosting accounts allow you to run multiple sites on the same server.

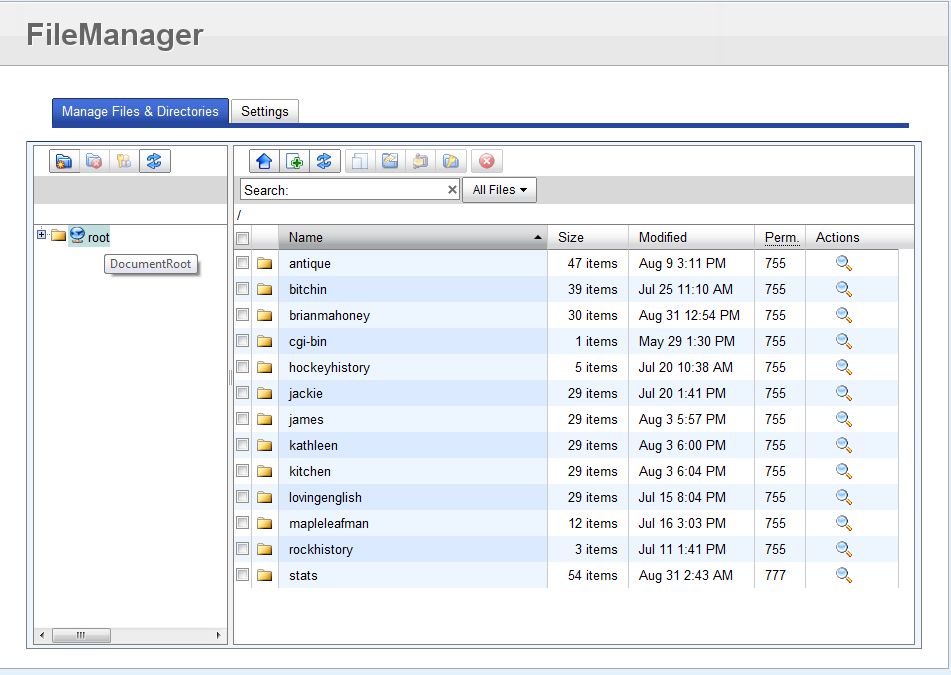
2. Once you set up your hosting account, you then have to move your domain name(s) to the site. In the root directory you will set up a folder for each site. My site looks like this, for instance : root\brian . Brian is the folder that holds everything that pertains to brianmahoney.ca. When I was setting up the site using WordPress, the install program didn’t see my site as brianmahoney.ca, it say it as myname.myhostingcompany.com\brian  and that was the name that came up in the URL window when I would browse to the site.

3. Obviously, I didn’t want to advertise my hosting company and I wanted people to get to know my domain name, brianmahoney.ca.  At first I thought this was a problem with the hosting servers. Somehow, I felt, they had screwed up the directory structure. Oooops! It was my fault all along. Here’s how I fixed it.

4. In the settings menu on the left of the screen in WordPress, the first setting is ‘General’. On the right side you’ll see two URL settings. The first is for the folder where the files are stored. WordPress has to know how to find the files even though it’s in them already, right? The next URL setting is for the Site Address. This is what I had to change to https://brianmahoney.ca

Once I changed that, the hosting company’s name didn’t show up in my browser URL any more. Relief! This is what to do in WordPress, if you use another type of blogging software, you’ll have to root around the settings to find the spot where you can change the site URL so that it reflects your domain name.

That’s it! I hope I’ve helped you a bit. I had to figure this out on my own. Ah, it pays to be smart, right? Hahahaha.

directory structure on host server
This is how the directory structure looks on the host server.

Crayon from Dryer – How to get crayon marks out of your dryer

If someone leaves a crayon in their pocket while drying their clothes, the resulting mess is both frustrating and colorful…usually. Here’s an easy way to remove the crayon marks from your dryer. This is from my experience, not something I’ve stolen from the Internet.

What you need:

1. Goof Off

2. Baking soda

While Goof Off  will remove some of the crayon marks, it doesn’t get rid of them all. Additionally, it stinks to high heaven and is probably noxious (bad) for you. Here’s what you do:

Put a good amount of baking soda in the drum. Wet a decent sized portion of a clump of paper towelling and start rubbing the baking soda. Move your towelling around the part of the drum you can reach WITHOUT turning the drum. Once the baking soda/Goof Off stops working, add some more Goof Off and continue rubbing. Make sure you clean the wing things, too. Once you’ve cleaned that third of the drum, vacuum up the remaining baking soda.

Turn the drum one way or the other and repeat the process. Start with a new clump of towelling and more Goof Off and baking soda. You’ll find that you don’t need all that much Goof Off. There seems to be a kind of reaction between the two products and the mixture really does a great job of getting rid of the crayon marks. The baking soda won’t do it on its own and the Goof Off won’t either. Together, they work magic.

Once you’re finished the whole drum, grab some more towels and use a liquid detergent/water solution to clean the drum. Do this a couple of times and then rinse the drum with just water-wet towels. I would suggest running a couple of loads of old dark clothing or second-rate towels through a few cycles to make sure the drum is shiny and clean again.

Throw out the vacuum bag, too, or the next time you vacuum the not-so-delightful smell of Goof Off will waft its way through your home.

Good luck! Remember where you heard this tip and come back now and then for other tips such as this. This isn’t hi-tech but it will safe you time and trouble.

Crayons
The culprits

How to record Internet streaming FM radio – Part 1

It took me a while to figure it all out but now I can record streaming FM radio off the Internet. Once you get the hang of it, it’s not really that difficult, just a bit confusing. Here’s a step by step on how to do it.
1. Download XMPLAY from here: http://www.un4seen.com/
2. Unzip the XMPLAY folder, preferably onto your desktop. Once you unzip it, you can keep the folder right in front of you on the desktop since XMPLAY doesn’t install itself on your computer. It just runs when you want it. You can actually run two different instances of it at the same time, more on that later.
3. If you want to record the FM stream in MP3 format, you need LAME (Lame Ain’t Another MP3 Encoder). You’re on your own if you want to use another recording format and don’t ask me how to use something else. Internet FM sounds fine in MP3 and that’s what I use on my MP3 player, hence the name.
Get LAME from here : http://support.xmplay.com/file_comment.php?id=478
4. Unzip LAME and take two files out of the folder that pops onto your desktop after you unzip it. You need the lame.exe file and the lame.dll files in the XMPLAY folder so that XMPLAY can record the stream.
5. Find a station that streams FM over the Internet. I like Dainbramage which is available here:http://www.dainbramage.com/listen/listen1.asx
but you can certainly choose any station that you like. You need the url of the feed, not something like dainbramage.com. The link above is for the actual streaming FM so find it copy and paste it into notepad. Then you don’t have to look for it every time you want to listen to that station, right?
6. XMPLAY plays lots of types of music files but what you want it to do now is to play a url so you can listen to FM radio on the Internet. How do you do that? Easy. On the XMPLAY interface (the window that opens up when you doubleclick on xmplay.exe file, look for the button on the main window that is to the right of the radio control buttons at the bottom, the one that looks like an arrowhead pointing up. That will open the Open File window.
7. Remember the url of the radio station that I asked you to copy back in step 5? Paste that link into the space at the bottom of the open file window.
8. Click Open URL just to the right of the space for the url. That’s kind of obvious but this is a step by step, right?
9. XMPLAY will take a few seconds to play, depending on the speed of your Internet connection. There you go! XMPLAY is now streaming FM radio into your computer and, if you have speakers, you can hear it.
10. You can leave it at that or you can record what you are hearing. The next few steps are for recording the stream so stop reading now if you’ve gone far enough.
11. To record, right click on the main window of XMPLAY and choose Options and Stuff. What you are looking for in this window is the last item on the left of the window, Output. Once you click on that, the right window will show Device, second word from the top. Click the down arrow on the right side of that section and choose Encoder Lame.
12. Once you have chosen Encoder Lame, and click Apply, XMPLAY will start to record an MP3 file that will have the name of the station you are recording, dainbramage.mp3 for example. The file will grow in size, depending on how long you are recording. Click the Stop button to stop the recording.
13. Now, as you may have noticed, XMPLAY outputs the stream to LAME and LAME makes an MP3 for you. Cool huh? But wait! Since the stream is going to LAME instead of to your speakers, you can’t listen to the station. Oh woe! What do you do? Next step please.
14. Open up another instance of XMPLAY and listen to the FM station through that one while record your MP3 on the other one.
15. Once you have the recording of what you wanted, you can move it to another folder to listen to or rename it to something else, otherwise XMPLAY will just record over that file the next time you decide to record the FM stream. Rename it or lose it, ok? You’be been warned.
That’s it in 15 very easy steps. If you want to record streaming FM radio from the Internet, I’ve just taught you how to do it….for free! What a guy. Thanks for reading.

Add an wireless access point – Extend your wireless coverage

If you’re like me, but who is, you’ve probably got more than one wireless router in a box somewhere. I used a DLink DIR-615 wireless router as my main unit. While the coverage is pretty good, I am often in my basement office which is down one floor and across the house from my wireless router, a distance of only about 50 feet but there is a hardwood floor and a concrete wall in the way. Sure, I can use my laptops in my office but throughput is low.

Over the years, as I’ve upgraded my routers, I’ve kept one or two. I found a Trendnet TEW-431BRP wireless router and decided to see how hard it would be to add that to my existing network to increase the range. There are some pretty good ‘how to’ articles out there and I used this one to set mine up.

The only materials you require are the second wireless router and some Ethernet cable, the length of which is up to you. My network is set up with the DSL modem in the basement, the router in my bedroom one floor up and a switch down by the modem in the basement. My main computers are linked to the router itself while the secondary computers are connected to the switch. I decided to connect the second router to my switch and, according to the smart guys at Best Buy, I didn’t need a crossover Ethernet cable. If I had connected the second router directly to the first router, I would have needed a crossover cable. Your mileage may vary in this case. Depending on the router you use as your main one, you might get by with a regular cable, check that the lights are green when you connect it and you might be OK.

Here’s how I did the actual dirty work. Again, your mileage might vary. That means that what worked for me, might not work for you. First, I connected the second router to my laptop with a short length of Ethernet cable. Since the IP address of the second router (SR from now on), I also had to turn off the wireless on the laptop in order to bring up the SR login screen.

Once I had done that, I enter 192.168.0.1 into my browser and was happy to see the splash screen of the SR come up. First things first, I had to change the IP adress of the SR to something other than what it was and to something that wasn’t within the IP range of the first router (FR from now on). Using another computer, I checked to see what the IP range of the FR was. Turns out it was 192.168.0.1 to 192.168.0.199. Thinking quickly, using my calculator and abacus…just kidding, I set the IP address of the SR to 192.168.0.251 and left the subnet mask the same as it was.

The second step was easy, I turned off the DHCP on the SR. According to my link up above, you can only have one DHCP server on a LAN. Once I had the DHCP turned off, everything was set.

The final step was to connect the SR to the switch with a length of Ethernet cable. Heading back to my wireless laptop, I typed in the new IP address of the router and was happy again to see the splash screen of the SR. Admittedly it doesn’t take much to make me happy.

Once I could access the router, I did two things. First, I had to setup a password for the router, something that everyone should do. If you don’t do this, anyone with half a brain can access your router and change the settings. Next, I had to secure the wireless network using the same encryption key that I was using on my FR.

Now I can roam the house at my leisure knowing that every corner allows me to access the Internet with my wireless laptops. Cool huh?

Thanks for reading and let me know if you have any problems.