Category Archives: Uncategorized

Record Youtube Audio From Videos – create MP3s from Youtube Videos


Freecorder is a pretty cool free app that allows you to record any sound coming from your browser. On my computer Freecorder only works with Internet Explorer, at least on my computer, and there are a couple of tricks to using it but if you stick around, I’ll explain it all for you.

Download Freecorder, install it and accept it when the installation asks you to associate Freecorder with your browsers. Freecorder installs a toolbar which has settings for recording audio and video as it plays. This blog is for audio but you can certainly use Freecorder for video, too. Actually, video is much easier to record than audio since Freecorder taps into your cache, allowing you to save videos even after you’ve watched them.

The only trick to Freecorder is when you open your browser. On my 64 bit version of Windows, recording will only work when I run the 32 bit version of Internet Explorer using the ‘Run as Administrator’ setting. To do this, find the Internet Explorer shortcut in your ‘All Programs’ list, right click it and choose ‘Run as Administrator’. The 64 bit version is clearly labelled 64 bit. Don’t use that one.

Once Explorer is running, you’ll see the Freecorder toolbar across the top of the window. Click on the little wrench and this menu will pop up:
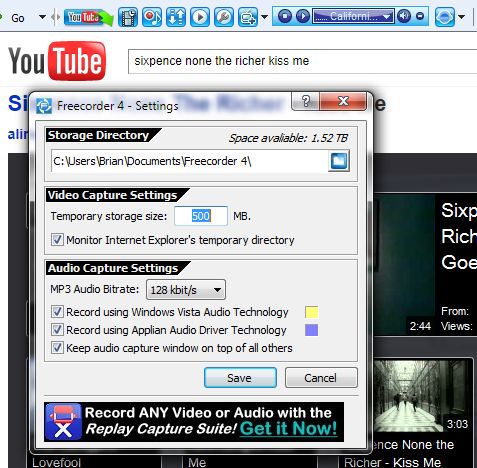
Freecorder Settings
This is where you choose your Freecorder settings.

The storage directory doesn’t need setting unless you want to move it somewhere else. Temp storage is fine at half a gig but you can make it larger if you have a huge hard drive. The audio capture settings should be set to something similar to mine. I use 128bit simply because I don’t think that increasing that will do much good. I have checked both ‘record using’ boxes, just in case.

Save those settings and head over to Youtube. Find your favorite video and click the button with the red dot and musical note on it. The Freecorder recording window will pop up. Click play on the Youtube video and you should see some jaggies on the horizontal line in the recording window. If the video is playing and you can’t see any jaggies, stop the recording and reload the page. Any problems with the recording have been fixed by reloading the page and then starting the recording before the video. Once you see the jagged lines, you’re all set.

You can record audio files separately by clicking the ‘Stop Recording’ after each video or you can record complete playlists of videos on Youtube (and other sites, too). Don’t worry about running back to the computer after the song. When the video ends, so does the recording, even though the window stays open. Freecorder senses the end of the song and saves the recording as an MP3 files automatically. Once you close the recording window, you confirm that the recordings are saved. Just make sure you click stop recording and then click OK when you see the verification window.

Now, recording a whole playlist is fine but you’ll have to rename each MP3 later. Same for individual recordings but they are a bit easier to remember, right?

That’s it, hopefully this is clear. Using this technique you’ll soon have a nice library of tunes for your MP3 player – not as high quality as ripping a CD but pretty good…for the price.

Thanks for reading!


Follow me on Twitter: @_BrianMahoney


Password Security the Easy Way


I’m sure you know by now how important your passwords are. Keeping your profiles secure on all of the sites that you interact with on the Internet is sometimes a big job. Think about how many passwords you use every day. I would bet that the number is at least ten and probably more. Here’s an easy way to change your passwords and keep track of them at the same time.

If you haven’t installed Dropbox yet, make sure that you do. Dropbox is absolutely the best way to keep your information accessible when you are running from computer to computer. I use three computers on a regular basis and all of my current stories, passwords, etc. are available through Dropbox. There are some alternatives but I haven’t tried them yet so for now, I will recommend Dropbox.

Next, find your way to Notepad. Notepad is free with every Windows-based computer. It lives in Accessories (Start/All Programs/Accessories). You can create a shortcut on your desktop, too. I use Notepad many times a day to record thoughts, passwords and all kinds of information, even if it’s just a place to put a log entry until I am sure that the entry has been published. (Ever been in the middle of writing a long message in Facebook and then have it disappear in front of you? How frustrating! Write it in Notepad first, then copy and paste it into Facebook.)

I’ve used Messenpass to save many of my passwords to a text file. Messenpass reads your cache memory and sucks many passwords up and pops them into a .txt file for you. Keep that file in your Dropbox folder. Don’t title it Passwords! You can encrypt it if you want but Dropbox is already encrypted. If you put your banking passwords in your Dropbox, it might be better to encrypt them, now that I think of it.

Once you have the Messenpass text file saved, many of your passwords are there for you to refer to when you need them. If you’ve been using easy to remember but easy to hack passwords, now is the time to change them. Twitter, Facebook, Hotmail; they’ve all been hacked many times. Now is your chance to secure your accounts.

Keep the password text file open and browse to Twitter, for an example. Enter your current password then head to the “change password’ section on your profile page. Once you’re there, enter your current password in the slot then start typing about fourteen letters of gibberish in Notepad. Something like this : !14Ghtnr&*(<>).  I think that’s fourteen. The number is irrelevant and twenty is better than fourteen but you get the point. Then, leave some spaces and type something that will remind you that this is your Twitter password. ‘W O T’ might do nicely, as in Waste of Time! 🙂

Once you’ve got that done, copy the password you’ve just created and paste it into the new password spot. Don’t do this for both slots. Take the time to type the new password in the second slot. This ensures that you’ve copied and pasted the password correctly and it only takes a minute. If you lock yourself out of your account, you have to waste more time retrieving your acount from Twitter, right.  Once the two passwords match, you’re done…for now.

If you use more than one computer, you can simply copy and paste the new Twitter password from the .txt file to the password slot. It’s up to you if you want to have your browser remember your password or not. I am the only person using my computers but if you use a shared computer, it might be better to copy and paste the password every time you log in to Twitter and your other social networking sites, email, bank, whatever.

When it comes time to change your passwords, and you should do that once a month or so, it’s a simple matter to copy and paste the passwords after you type them into the text file. Remember to save the text file every time and make sure that it ends up in Dropbox, not somewhere on your computer. You can also send the .txt file to yourself in an email now and then, just in case.

I know that there are free programs such as KeePass etc. Personally, I find them a bit too cumbersome and certainly no more secure than my system. It’s up to you to choose which works for you but whatever you do, keep your passwords safe!

Thanks for reading.


Follow me on Twitter: @_BrianMahoney
Tweet


Facebook Privacy Settings – my final word (for now)


Facebook tags are the new bugaboo. Since Facebook changed its and your privacy settings, it seems that when you tag a photo with a friend’s name, everyone who is a friend of that person can see and comment on your picture. Initially, I thought this wasn’t the case but it seems that it is. I have three Facebook accounts and I’ve tried all the different combinations. There is only ONE setting that eliminates this problem and it’s completely out of your control. The only way that a stranger can be kept from seeing and commenting on your post is if your tagged friend has her or his privacy set to ‘Only me’ in one key place. Let me explain.

No matter what your share settings are on anything you post on Facebook, even if you have a photo that is only open to one friend, once you tag someone in it, every one of your tagged friend’s friends can see your post and comment on it…depending on what settings your tagged friend is using. Read that again, I’ll wait.

Scenario 1: I have a photo that is shared with ‘friends only’. I tag my friend Sven in it. Sven and his friends can see that photo and comment on it. The tag may or may not show up on Sven’s wall, depending on whether he has accepted or ignored the tag review prompt. If the tag is not shown on Sven’s wall, then none of his friends can see or comment on my pic unless  they are also friends of mine, obviously.

Scenario 2: I  have a photo that is shared with only one other person, not Sven. For whatever reason, I tag Sven in that picture. Even though my share settings are set to Custom to share the picture with one friend only, Sven and his friends can now see and comment on that picture. It’s as if the original share status is ignored once the item is tagged.

Scenario 3: I have a photo that is shared with the ‘only me’ custom setting. I tag Sven in it. Sven doesn’t get notice of the tag, his friends can’t see the photo nor comment on it. Of course, only I can see it. Why this is different from using the custom share setting with only one friend on it is anyone’s guess.

There are many other scenarios possible, I’ve tried them all, believe me. I guess the lesson from all of this is that tagging is getting to be a real big pain in the butt. Once you tag someone, you open up your posts to complete strangers IF the taggee has ignored their privacy settings. It’s out of your hands unless everyone sets their privacy settings to ON in the Profile review section of How Tags Work. If you want to keep your stuff private DON’T TAG ANYONE. 

It’s hard to believe that Facebook has opened itself up to losing even more users. Tagging used to be fun, now it’s a security loophole. Facebook better fix it or they risk losing users in droves.

Thanks for reading. Questions, comments, shouts, etc. are welcomed.


Follow me on Twitter: @_BrianMahoney
 

Free batch resizing for Facebook and other social networks

With the preponderance of mega-pixel digital cameras these days, many of us are faced with long wait times when we’re uploading albums to Facebook and other social networking sites. Unless you’re going for HD (high definition) albums, here’s a simple technique to save you time and bandwidth.

1. Download Irfanview here.  Don’t use the Cnet site, use Brothersoft or Tucows. Download the plugins while you’re at it.

2. Install Irfanview first then the plugins. It only takes a minute. (You can delete the downloaded files to save space on your drive.)

3. Choose to associate ‘image files only’ during the install process. You can always right click an image if you want to edit it with GIMP or Photoshop.

4. Find a folder on your computer with a bunch of large images that you want to resize. Open one of the images by double clicking on it. (I know this is a duh moment but I get all kinds of visitors and some don’t know the basics.)

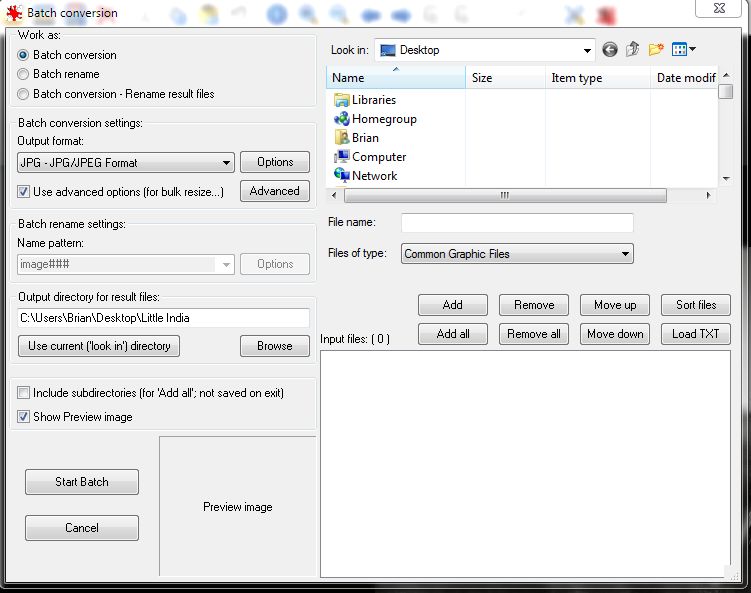
5. Click on ‘File’ at the top left and choose ‘Batch conversion/Rename’. The window that opens up is shown here:

Batch processing menu
This is the batch processing/rename menu in Irfanview.

6. This is where you can choose the images that you want to process. Find the folder in the upper right section and ‘add’ the ones you want to convert/rename/resize.

7. Choose an output directory in the middle left section. I use DESKTOP all the time and make a new folder, as you can see. I name the folder according to the main subject of the photos. (This time it was Little India, a very cool part of Toronto.)

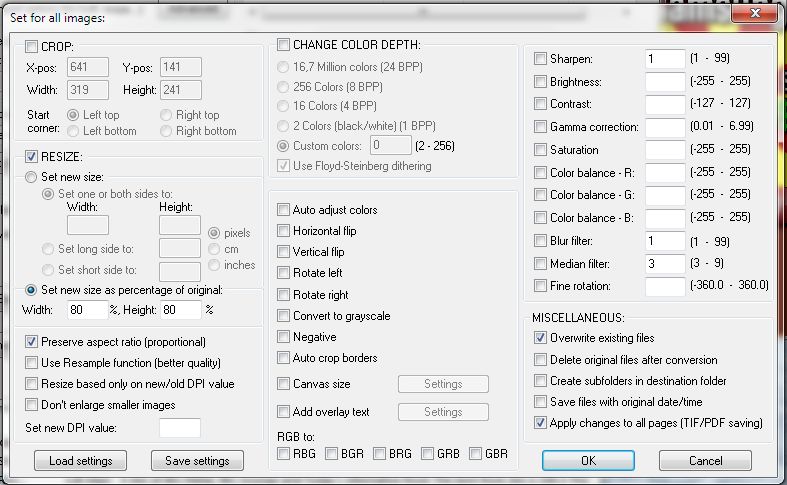
8. Now you’ve got the pics ready and a place to put them but what are you going to do with them? Today, we’re going to resize them. Make sure that everything in your menu is the same as mine (if you want .jpg output). Then click on the ‘Advanced’ button. This is the menu that pops up:

advanced menu for batch processing
This is where you fine tune your 'advanced' conversion settings.

9. Don’t be intimidated by this menu. It’s full of settings but don’t worry, most of them are not for you right now. You will see that I have set the menu up for ‘Set new size as percentage of original’ with a width of 80 percent and a height of 80%. Make sure you put a check beside ‘Preserve aspect ratio (proportional)’. This prevents your photos from looking skewed after you resize them.

10. Nothing else is checked except for the ‘Overwrite existing files’. I use that setting in case I have to do this twice but I would uncheck it if I was putting the resized pics in the same folder as the large ones. Make sure that you put the new, smaller pics in another folder marked ‘such and such small’. I archive the large pics then delete the small folder after I have uploaded them to Facebook or renren (the Chinese version of Facebook.)

11. Click OK and you will be back to the previous menu.

12. For safety’s sake, make sure you have the output directory (folder) somewhere else besides the directory where the original large pics are. Make sense? Hope so. Click ‘Start Batch’ and Irfanview will make each one of your chosen images 80% smaller than it was before.

13. One of my cameras is a Fuji HS10 which has a 10 megapixel CMOS. If I use the .JPG setting (as opposed to the RAW setting) my pics are around 4 megs each. Way to much for Facebook, right? The new 80% smaller pics are all under a meg, usually, and upload time is a fraction of what it was before.

With this easy and quick (and FREE!) setup, you can drastically reduce your upload times when you’re sharing your pics on Facebook and other social media sites.

Thanks for reading. If you have problems, comment below and I’ll answer your queries right away, usually.

Follow me on Twitter:  @_BrianMahoney


Create PDF Files Using Irfanview – Free is Good!

Irfanview is one of the best little programs out there for quick editing of photos as well as batch resizing and renaming. You can use it for timed screen captures and many other things. Recently, I discovered how to create PDF files with Irfanview. Here’s how to do it.

I was faced with the problem of sending a fax using one of those free online services. Since the fax service only allowed me to send one page and my fax consisted of three photos, I had to figure out a way to create on page. After a bit of searching, I learned that I had all the tools I needed right there in Irfanview. Here’s how to do it:

1. Scan the documents into your computer. The format doesn’t matter but a TIFF file or a JPEG is normal (.tif or .jpg)

2. If you don’t have Irfanview, download it and install it AND download and install the Irfanview Plugins after you install Irfanview. Both downloads are available at the Irfanview site here:

http://www.irfanview.com/     (Tip: Don’t use CNET for the download because it installs a downloader program that you don’t need. Choose either Brothersoft or Tucows.)

3. Once you have installed Irfanview and associated image files with it, which I recommend, open one of the images with Irfanview.

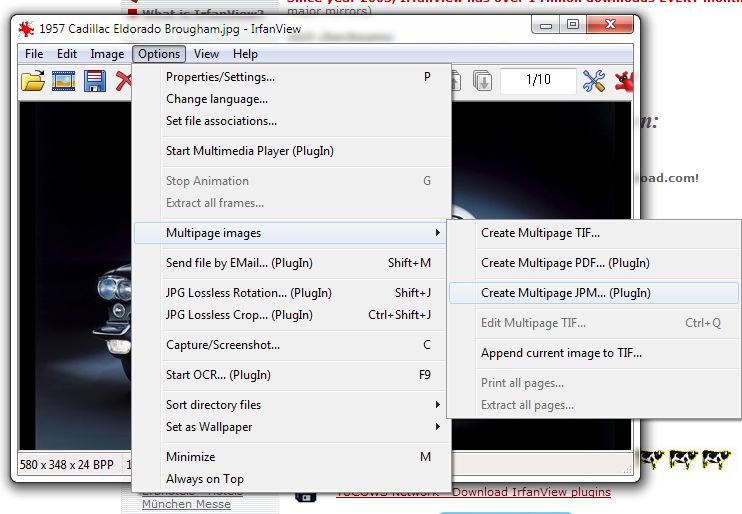
4. Across the top of the window you’ll see Options. Click it and then click Multiple Images then click Multipage PDF …(Plugin).

Irfanview Menu
This is the multipage PDF menu in Irfanview

5. In the next window menu, drag and drop all of the files that you want to put into the PDF file. Arrange them up or down to put them in the proper order. Choose a file name and then choose where you want the file to end up.

6. Click the Create PDF image button. In about one second your PDF is created.

That’s it. A real simple way to complete a tough task. Well, it would be tough using anything else besides Irfanview.

Lastly, Irfanview can be used to many things. From timed screen captures through Optical Character Reading to Lossless Cropping, this little beauty has it all. I’ve been using it for many years, since the late ’90s, and I still discover new things that it can do.

Thanks for reading.

Follow me on Twitter: @_BrianMahoney