Category Archives: Facebook

Facebook 101 – Part 1 – Opening a new account


This is the first post in a new series about Facebook. Over the next few weeks, we will post entries on everything about Facebook, from signing up for a new profile to editing your privacy settings. We’ve already discussed many of these settings in detail but this time we’ll concentrate on Facebook from beginning to end, with everything set up the way you want it, not the way Facebook wants it.

Here’s how to set up a new Facebook account. Why should we post something this simple? Believe it or not, some people aren’t as computer aware as you might think. To some, Facebook is a complete mystery. Some people just don’t get it. That’s why Computers Made Simple is here. We’ll clear out all the uncertainty and, hopefully, make the path to enlightenment as simple as possible.

Step 1: All you need to start a Facebook account is an email address. After that, it’s just a matter of how much information you want to give to Facebook. If this account is for you to interact with your friends, you’ll have to use a familiar name or a nickname in order for them to realize that it’s you. Starting at this page: http://www.facebook.com/ , this is what you’ll see.
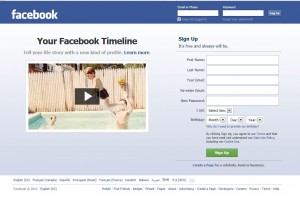
The first step in getting a Facebook profile
Name, email and password. Select sex and birth date as well.

This is where you signup. Choose your name, it doesn’t have to be your real name, and then choose which email address you want to use (you will receive a LOT of email from Facebook to start but we’ll tell you how to change the settings later) and make up a password. Choose a password that is unique to Facebook and one that is difficult for anyone to guess. People will try to hack your Facebook account sometimes.

Next, choose your sex and a birthday. Obviously, you can lie about this, the birthday part anyway, but you don’t have to do that because we will show you later how to hide your age from Facebook.

If you have some time, read the Terms and the Data Use Policy shown in fine print at the bottom. If your language isn’t English, Facebook offers pages in many other languages.

Step 2: Once you click on Sign Up, Facebook will send you an email which you will use to confirm that you applied for a new account. Go to your email account now and look for an email from Facebook. If there isn’t a new piece of mail in your inbox, make sure to check your Junk Mail box. Here is what you’ll see when you find the email:
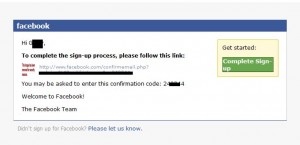
The email that will confirm your new Facebook account.
Click on the words 'Complete Sign Up'

Step 3: Once you click on the words Complete Sign Up, Facebook will send you yet another email which tells you that everything is cool. You can see how this is going to go, right? Facebook loves to keep in touch with you, to the point of almost spamming your email account with endless new messages. Next time, we’ll let you know how to stop the email madness.

Step 4: The next screen you see looks innocent but avoid filling out your email details just yet. Facebook wants to send an invitation to all of the people on your email contact list to join you on Facebook. Personally, I don’t want all of my email contacts on Facebook. I also don’t want to give Facebook my email password, even though they say they will keep it safe and only use it once. Right, I’ve heard that kind of thing before. Ignore the Skip this Step warning (twice) and ignore the rest of the set up pages. You can do all of this later when we get to editing your personal information.

For now, take some time to think about who you want to join you on Facebook. Think about how much information you want to share with them and with Facebook itself. Do you want everyone to know how old you are? Really? Facebook will use this to tune ads which are directed at your particular demographic group. Is that the kind of thing you want?

That’s enough for now. You’re signed up, that’s a start. Next time we’ll talk about how to dress up your profile.

Thanks for reading!


Why is Facebook hiding its Timeline Help Page?


As I was researching a post on hiding your likes from the new-ish Facebook Timeline, I came across a little Facebook secret. It’s a bit like an Easter Egg but it’s not totally hidden. You can see it but just for a fraction of a second. As of this moment on May 11, 2012, the link is just a flash on the screen. Lucky for our readers, my hand is about as quick as my eye. Here are the steps to see the secret link that Facebook, for some reason, wants to keep hidden from its users:

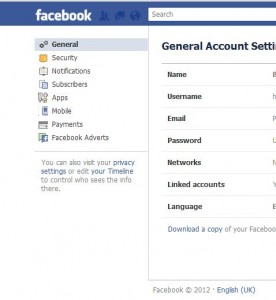
1. Go to Account Settings (top right, click the down arrow to the right of Home and choose Account Settings).

2. Click the Edit your Timeline on the left side of the screen, at the very bottom of the left column. Here is what you are looking for:

Click on 'your Timeline' to edit your preferences.

3. Close the default open Basic Info box by clicking cancel or Save, if everything there is as you want it.

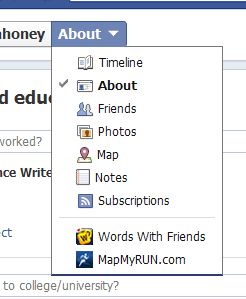
4. Click on the down arrow to the right of the word About and choose Timeline, as shown here:

Click the Timeline to edit it
Click the word Timeline to edit your preferences.

5. You’re almost there. Click on the words ‘Activity log’. Watch the top of the next page very carefully. As the page is loading, you will see the following link appear then disappear: 

Watch for this hidden link as the page loads.
This line appears only for a fraction of a second before it disappears.

6. Depending on your Internet connection, the time that this menu appears may vary. If you’re lucky, or quick, you can click on the words ‘Learn More’ and find information about how to edit your own Timeline to share or not share some items. In case you are slow, here is the link:

https://www.facebook.com/help/activitylog

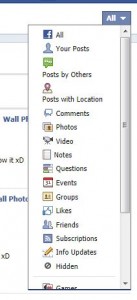
7. As you click your way through the following menu, the hidden link will appear for a very short time then disappear. Here is the menu which shows the link:

Edit your timeline choices on this menu.
Here is everything you can share on Facebook. Edit each one to your preferences.


While this may be a glitch in the Facebook page coding system, I have used three browsers in researching this anomaly and each one has shown the link for only a fraction of a second.


Why would Facebook hide this link from its users? As I said, it’s either a glitch or it’s done on purpose. If it is done on purpose, then it might be because editing your shares, likes, subscriptions, Etc., defeats the purpose of Facebook. Facebook is all about sharing, right? If you can hide some or all of the things you interact with, what fun would Facebook be? Well, that’s their own point of view, perhaps, but we all know that Facebook wants to know EVERYTHING about you. First, they make it tough to find this activity page, and second, they only display the link to their own help page for an extremely short time.   This virtually insures that it’s all out there, everything you do while you’re on Facebook. Well, thanks to Computers Made Simple, you can take control of your own timeline, no matter how hard Facebook tries to make it.

Thanks for reading!


How to hide your likes from Facebook timeline – updated


This post is out of date. Please go here to see the latest version of ‘The Ultimate Facebook Likes Guide – as of April 23, 2013’

TIP: Please read the words just above this. Facebook is constantly changing. Please take the link to our more recent post: This is the NOT latest way to hide your likes from your Facebook timeline. We wrote about this a few months ago but Facebook has changed since then. One of my readers pointed out that the old way of hiding your likes doesn’t work now.

TIP: The word ‘like’ here means public pages that you click ‘Like’ on in Facebook or Subscriptions that you’ve chosen. If you click ‘Like’ on some hot guy or girl’s public page, you can hide that from your timeline. Unfortunately, if you click ‘Like’ on one of the photos or videos on that same page, everyone will know about it. You can hide the pages you like but you can’t hide the fact that you ‘liked’ a photo or something else that someone has shared. Get it? The only way to hide your individual photo likes is to ‘unlike’ them. 

Here’s how you can do it as of May 2012:

1. Go to your profile page, as opposed to your HOME page. Click on your own name up on the right side of your screen.

2. Now is a good time to see what your friends can see. Click on the small arrow just to the right of Update Info/Activity Log. Click on the words View As. Your profile will load again but this time you will see these words at the top: ”

This is how your Timeline looks to the public.

Use this tool to see how your Timeline appears to a specific friend or the public. Remember: you can always change who can see any post that appears on your Timeline.”

Just below these words you’ll see a space where you can ‘Enter a friend’s name’. Pick any friend and you’ll be able to see what they can see. If there are things that you want to hide, follow these steps. Oh, keep that page open. When you make changes, hit reload on this page and you’ll see the new, updated settings as your friend sees them. Right click your name and choose ‘open in new tab’. That way you can work on one tab and check your changes in the other.

3. On the new page that you’ve opened up,  on the very top right, click on the down arrow and choose ‘Account Settings’. Once you’re at that page, look for these words on the bottom of the left column: ‘You can also visit your privacy settings or edit your Timeline to control who sees the info there.’

4. Click on the words ‘your Timeline’.

5. An editable version of your profile page will come up next, with your basic info already open. Make sure you are sharing only the things you want to share there, then close it down. Check the settings in the other areas such as Work and Education, Contact Info (do people really need to know your email address?), etc. This is where you can edit your ‘Favorite quotations’ or the ‘About you’ section, as well.

6. On the top left to the right of your name, you’ll see the word ‘About’ followed by a down arrow. This tells you that you are on the “About’ page, the arrow indicates that there is more to edit. Click on the arrow and choose Timeline. This is where we’ll hide our likes from the Facebook Timeline.

7. Once your page reloads, you’ll see your profile page again, this time with places where you can edit what you share and what you don’t. Around the middle of the page, you’ll see the words ‘Activity Log’. Click there.

8. Once you click on ‘Activity Log’, all of your current activity is shown. You can sort through these one by one, choosing to share it with some people, none or hide it from your timeline completely. The only thing you can’t stop from being shared is your ‘likes’ on photos or videos, individual items in other words. All you can do with these is to ‘unlike’ them.

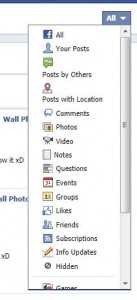
9. Up on the top right, you’ll see the word ‘All’ with a down arrow to the right of it. Clicking on that will make a menu scroll down that contains all of the available activities. Here is what is looks like:

Editing your Timeline
This is where you can edit each thing you want to share.

10. Clicking on each word brings up that set of activities in its own timeline. Here you can hide each one, depending on who you want to share things with. Maybe you want to share some of the pages you like but not others. Here is where you can scroll through them and choose who sees what. Beside each Public Page or Public Figure you’ll see a small circle. Click on that circle and choose either ‘Allowed on Timeline’ or ‘Hidden from Timeline.’ You can also choose to Unlike that page which will, of course, keep it off your Timeline.

11. Sort your way through all of the activities that are presented in the menu shown above. You can hide the fact that you have befriended someone, for instance, or you can actually highlight that fact, for some reason. You can also ‘unlike’ or ‘unfriend’  from this menu. As for Subscriptions, you can hide them also. At some point in the future I will go through all of these choices one by one but, for now, see what’s here and choose what you want to share and what you want to hide.

Thanks for reading!


TIP: I’ve just discovered a hidden menu in Facebook. My next post will be about that. If you’re asking yourself, “Why doesn’t Facebook tell me how to hide my likes on my Timeline?”, my next post will give you the answer. Facebook does tell you how to do it. They just hide the link!


A Problem with Fotobounce?


I’ve written about Fotobounce before, here are a couple of links to my older posts: here (Fotobounce explained) and here  (Download a whole Facebook album)

Fotobounce is fairly simple to use and does the job quite well. If you’re into downloading photo albums on Facebook, Fotobounce is pretty much the only way to do it but it does have one limitation that I’ve just discovered. Here’s the problem. When, and if, I get things sorted out, I’ll post an update on this.

The Goal: One of my friends has one album, Wall Photos, that has thousands of images in it. Many of these images are spectacular and I would like to archive them for my own inspiration and enjoyment.

The Problem: Fotobounce cannot download this album. It tries, sometimes for hours, but it can’t seem to get past the spinning wheel that indicates Fotobounce is working on something. Once, just once, Fotobounce got halfway through downloading the album, then got hung up before the job was done. I tried as recently as this morning for one full hour with nothing else running on the computer and Fotobounce failed again.

My Solution: Although I am not a programmer, I have noticed that Fotobounce does not work like other downloaders. I’m not sure why but Fotobounce seems to cache the photos it is downloading in a temp folder somewhere. Yesterday, I deleted my old Fotobounce installation and installed a fresh version. During the installation process, I changed the ‘save to’ directory to one that I made on my desktop. I wanted to keep track of what Fotobounce was doing and this desktop folder is a lot easier to find than the default directory in My Documents.

After Fotobounce was installed, I tried to download the problem album yet again. To test my theory, I also downloaded a smaller, but still sizeable, album at the same time. As Fotobounce was working, nothing was showing in the desktop folder. As soon as Fotobounce declared that one of the jobs was finished, that album popped up in the desktop folder. Even though Fotobounce worked for hours on the massively larger album, nothing ever showed up in the folder. Where are the images that we partially downloaded? I can only assume that they are in a temp folder somewhere.

The computer that I use Fotobounce on is pretty much the latest and greatest you can get. I built it myself and it’s not a slug, believe me. Lots of storage, 3 terabytes, lots of RAM, 8 gigabytes, and a pretty fast quad processor (i5-2500K @3.3 Ghz) plus Windows 7 Ultimate 64 bit OS. I doubt that my rig is the problem here. Even if Fotobounce caches the images in RAM, there should be enough room. I am pretty sure the album, although it’s large, isn’t 4 or 5 gigabytes in size.

If you are downloading a torrent, your torrent client writes directly to your hard drive, it doesn’t cache your download. It may use a temp folder but the folder is right there in the directory where you have chosen to put the torrents. Sometimes, if you are downloading photos, you can actually look at some of the photos or play the avi file long before the download has completed. No such luck with Fotobounce. Nothing shows until it’s finished the job and, when the album is too large, it seems that nothing is written at all!

As a writer/experimenter/tech guy, I look at problems such as this from a different point of view than most users, I think. It’s a challenge. Once I find the solution, I write about it. If I don’t find a solution, I write about that, too. This particular setback may not have a solution. It’s frustrating but sometimes these things can be that way. We’ll see what happens. If I discover an answer, you’ll be the first to hear.

Thanks for reading!

Fotobounce – downloading a Facebook photo album


I’ve written about Fotobounce before. If you share photos from one social media site to another, Fotobounce is a great tool. It allows you to download complete Facebook photo albums to your computer. What you do with them after that is your business, I guess, but you really should ask for permission if you are going to share anything that isn’t your own. Here is an explanation about what Fotobounce is: Fotobounce Made Simple   (The original post wasn’t named that but it sounds good, right?)

While Fotobounce is a cool app, the actual downloading of albums can get tricky because of the way the instructions are worded. In this post I’ll try to help you figure out the odd English that they use in the selection process. Before I forget, Fotobounce is available here: http://fotobounce.com/

1. Download and install Fotobounce…duh!

2. Open the program and head over to Facebook. Sign in to Facebook with Fotobounce. You’ll have to allow it access but, according to the makers, they don’t save your password. You can always remove the access after you’ve downloaded the albums that are of interest.

3. Find the album you want to download. You have to sort through your friends, your likes and your acquaintances to find the right album(s) but that’s pretty basic.

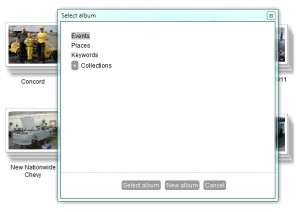
4. Once you find the album, right click it. You’ll see the ‘Download’ button. Click it and the following menu pops up:

Choose where you want the album to be downloaded.
I've selected Events by clicking on it but I haven't started the download.

5. In this menu, you are choosing the main folder for the download. If you click ‘Select album’, Fotobounce will start the download to, in this case, Events. That’s not what I want. I want to create a sub-folder and then maybe a sub-sub-folder. Let’s do that. We’ll make a sub-folder inside of Events.

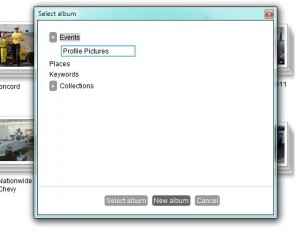
6. Click New Album. Fotobounce will show you a new album dialogue, as pictured below, and it will have the same name as the album has on Facebook. We don’t want that. We need to sort out the downloaded albums according to whose they were on Facebook, right?

Make a new album in Fotobounce
Type the new name of the album in the box and hit Enter.


7. Instead of Profile Pictures, I want to name my new album ‘Joe Nemechek’. (Joe and I are lookalikes to the point that I get stopped in stores. If I ever headed South and wore a NASCAR jacket then I’m sure I’d eat free wherever I went.) Type in whatever name you want and hit the Enter key. A new album will be created and Fotobounce will give you a notice at the top of the page.

8. Once you’ve found your new folder, click on it and you’ll see the same menu window come up same as before, giving you the option to Select that album or make a New album inside of it. This time you can leave the name the same, if you want. The default name is the same name as it was on Facebook.

9. If that name is fine, click on the Select Album button and Fotobounce will download the album inside of the album that you just created.

This sounds pretty simple, right? It’s not. Here’s the problem, as I see it. When I see the words ‘Select album’, I expect to get a choice. Instead of the normal ‘OK” that everyone else uses, Fotobounce uses ‘Select album’ as the button that starts the download. Unless you make a folder or a folder within a folder, Fotobounce will happily download your albums into the same directory. Good luck trying to figure that out when you’ve got more than a few albums in your collection. You have to create new albums if you are ever going to figure out which album is which. Sure, you could to all of this within Windows Explorer but it should be a one-step process or the wording should be a bit clearer. That’s what I think, anyway.

Fotobounce does a lot more than simply saving albums in Facebook. Check it out. I’ve just scratched the surface here.

Thanks for reading!