Category Archives: Facebook

Facebook 101 – Part 5 Facebook’s social plugin glitch


As with almost everything about Facebook, what follows is a cautionary tale about Facebook’s use of social plugins to connect people on the Internet. We see this as a potentially dangerous flaw which opens everyone’s Facebook profile to virtually everyone on the Internet. This glitch is easier to illustrate than it is to explain in words. We’ll run you through it step by step:

1. Sign out of your Facebook account or open the following links in another browser.

2. Head over to each of these sites:

http://www.theepochtimes.com/

http://mashable.com/

3. Look on the right hand side of the page in the column with links and ads in it.

4. You should immediately see a difference between the two pages when you locate the Facebook social plugin box or, as it is sometimes called, the facepile. In the Epoch Times facepile, there are ten Facebook profiles shown, each with a link to that person’s Facebook profile. If you click on one of the faces, you should be taken directly to that person’s Facebook profile, even though you aren’t signed in to Facebook. Depending on that person’s privacy settings, you might be able to scout around their profile, see their photos and find out their activities and interests. Not only have you probably not ‘liked’ that page, you’re not even signed-in to Facebook! 

5. On the Mashable page, you should see only a small blurb that says ‘900,000 (+ or – ) people  like this.’ There is a ‘Like’ button with a thumbs up icon that, if clicked, brings up a Facebook sign-in page.

6. In the same browser you are using for the two sites mentioned above, open another tab and sign-in to Facebook.

7. Head back to the two tabs which show the above links. Refresh each page.

8. Nothing has changed on the Epoch Times page except that now when you click on one of the profile photos, you are taken directly to that person’s full profile page or their timeline, complete with everything that they have decided to share with strangers such as yourself.

9. On the Mashable site, you might see a few photos of your friends, depending on whether any of your friends have liked the Mashable site. This is how the social plugin is supposed to work, as far was we can tell. We are in the process of emailing the webmasters involved to see if they can help us spot the glitch here.

With this quick experiment in Facebook privacy, we hope you can see the danger in all of this. The whole point of the social plugins is to share content between friends, to make the vast Internet a bit smaller. In reality, the social plugin has opened up Facebook user profiles to the whole Internet. As we have shown in the above example, you don’t even have to use Facebook to be able to see Facebook profiles. Seeing a profile is as simple as clicking on a profile photo on a website.

We know, of course, that you can also search Google for someone’s Facebook profile. The difference here is that searching on Google takes a few steps. It’s not as simple as clicking on a photo. You could theoretically search for everyone named Bob, for example, and click your way through the profiles until you came to an interesting one. With this particular glitch, stalking someone is as easy as clicking on a photo of someone who looks interesting.

Lastly, if you think that this doesn’t work to anyone’s advantage, consider the fact that we’ve added people to our friend list simply by clicking on their profile photo on a site and then clicking ‘Add Friend’. Of course Facebook asks us if we know the person, and we don’t, but they accepted our invitation anyway. We hope you can see how this carries many inherent dangers, especially where young Facebook users are concerned.

We are working on a way to change our privacy settings to eliminate this glitch but, until then, check out what pages your young children might have clicked ‘like’ on. Remind them not to accept friendship invitations from strangers.

Thanks for reading. If you have any inside knowledge about this, please let us know.


Facebook 101 – Part 4 – Keep yourself out of ads


The biggest danger on Facebook isn’t spending too much time there, believe us when we say that. The biggest danger is that your profile photo could end up supporting some company halfway across the world without you even knowing about it. While privacy settings in Facebook are important, we think the settings in this post are the most important.

To keep things short and sweet, follow us to the page you want to focus on:

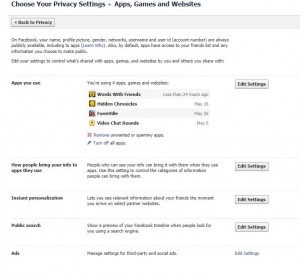
1. From any Facebook page, click on the down arrow to the right of the word ‘Home’ and choose ‘Privacy Settings’. When you get to the next page, look for ‘Ads, Apps and Websites’. To the right, click on Edit Settings. That will bring you to this page:

Opt out of Facebook ads on Internet sites
This is where you opt out of the Facebook ads that are everywhere on the Internet.

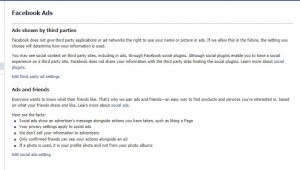
All of these settings are important, don’t get us wrong. But we feel the most important one is the last one, Ads. Click on the words ‘Edit Settings’ on the bottom right. That will bring you here:

Choose  your Facebook ad settings here.
You're not there yet but you're a bit closer. Read all of this stuff for your own edification.

The important words here are: Facebook does not give third party applications or ad networks the right to use your name or picture in ads. If we allow this in the future, the setting you choose will determine how your information is used.

Facebook is telling you that, for now, they don’t let other people use your name and photo in ads. For now. If that changes, this is where you can choose to NOT be in those ads…ever. Anyone who chooses to be in those ads is visible anywhere on the Internet on any site that they have liked or commented on. You’ve seen the little Facebook ads, right? Here is one, just to give you an idea of what we mean:

This is where your profile photo might end up.
Do you really want your face to appear on pages like this?

Each of these photos is a direct link to the people shown. See someone that looks interesting (read: cute, sexy, interesting, stalkable)? Well, just click the photo and there you are at her/his Facebook profile. You may be OK with all of this but if you have children, how would you feel about seeing their photos in an ad? We think it’s something to protect yourself from.

Look for the words ‘Edit third party ad settings’ and click them. In the middle, make sure the words ‘No one’ are there. If they aren’t click the black arrow and choose ‘No one’. Make sure you click Save Changes next and you’re safe.

Click Save Changes and you’ll be back to the previous page. Perform the same actions for ‘Ads and friends’ in order to make sure that your profile pic isn’t used in ‘social ads’.

You’re done. Good for you. You can relax and enjoy the many other non-threatening parts of Facebook. This particular advice is more important for teens (and sub-teens) we think. While you are supposed to be a certain age to join Facebook, everyone knows that many young people have accounts. It seems a bit dangerous to us for these kid’s profile photos be be spread all around the ‘net. We’ll also add that getting to this particular privacy setting sure isn’t intuitive. It seems that Facebook might have hidden them, just a guess.

We’ve discussed the other privacy settings in another post. Read about them here: Facebook privacy settings  We hope you find what you’re looking for there. Let us know if you can’t figure it out. We’ll help.

Thanks for reading!


Facebook 101 – Part 3 Games!


One of the best parts of Facebook, depending on how much time you have to spare, is the games that you can play. Facebook games are everywhere it seems. Once you get some friends added to your list, they will very likely start to send you invitations to join them in their favorite online games. We’re not going to explain each game here but they run the gamut from intelligent word games through silly cooking games to amusing ‘I spy’ ones. Some are copies of board games you know while others are designed specifically for Facebook.

When it comes time to add a game on Facebook, the process is deceptively simple…on the surface. There are some things you should be concerned with, however. We’ll run through the process for you and, hopefully, make it as painless as possible. We’re not against the games that are everywhere on Facebook, we’re just a bit concerned about the way they reach out to your other friends and pretty much spam the heck out of them. We’ll help you avoid the traps.

TIP: Part of the game experience on Facebook is building your own neighborhood or network in each one. Some games are more dependent on the number of friends that you play or interact with than others. Some of your friends are more interested in games, to the point of becoming fanatical about them, than other friends who don’t even play games. Remember to limit yourself at the start to friends who you know  play games and enjoy being added to your own field of play. If you’re not careful, you’ll start to lose friends simply because of the game spam that is possible on Facebook.

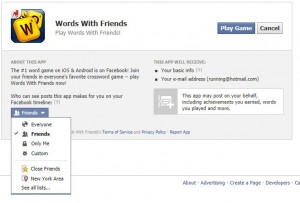
Here’s what you see when you want to start playing a game. Facebook wants you to know what the game will know about you and how it interacts with you, that kind of thing:

Adding a game to Facebook
This is where you say yes and get to play, or no and don't get to play.

Here you see some details on how the game is going to work with you, or against you, on Facebook. In order to play the game, you have to accept this agreement. You can change the email settings later, we’ll show you how, but for now, there is only one part that you can change. Do you really want your friends to know you are playing this game? If you’re OK with that, and in most cases it’s fine, look down on the bottom left and choose your level of openness.  You can change your setting here before you click Play Game. Where you see the word Friends in this photo, click on the little arrow to bring down this menu:

Sharing settings
Choose who you want to share your game posts with here.

This is where you decide who gets to see your actions in the game, your successes, your scores and if you beat someone badly. Take note of the last one. If you cream somebody in Words With Friends, do you think they would like everyone to know about it? Ah, the pleasure and dangers of games on Facebook, right? Take note of this menu because you can use it in other places as well as here. The last one on the top list is ‘Custom’. That is where you choose to share with some friends but not others. Keep that in mind when you are sharing certain kinds of things. It might come in handy.

OK, so once you’ve set all that up, click on Play Game and have some fun. What follows is fairly self-explanatory. The rules are there, the scores, everything you need. All the games will try to push you to spend money but DON’T! There is no need at all to spend anything on Facebook. Don’t even think about giving Facebook or a game your credit card information!

Once you’re comfortable with the game, head back to your main page and set some privacy settings for that game. Click on Facebook up on the top left of the page then click on the arrow to the right of the word Home on the top right of that page. On the menu that pops down, click on Account Settings. Then, on the top left again, click on the word Apps.

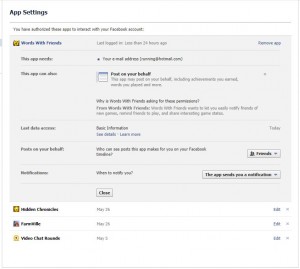
The game you just added should be there on that page. This is the menu that you want to see:

Choose your privacy settings here.
Sort out everything here before you forget.

If you don’t want the game to email you, click on the words ‘The app sends you a notification’ and choose ‘Never’. That way your email inbox won’t be full of stuff from the game, right? Then choose who can see the game’s posts on your timeline and you’re all set. Click ‘Close’ and you’re done!

Next time we’ll discuss how to opt out of appearing in Facebook ads all across the Internet. Believe it or not, it’s possible that your profile pic could be seen by millions of people all over the world without you even knowing about it. Next post, folks. Be there!

Thanks for reading. Comments, questions, they’re all welcome.


Facebook 101 – Part 3 Control your shares


On Facebook, you can control who sees the things that you share. The different settings are: everyone, just friends, friends except acquaintances, only me (you), custom or close friends. As you can see, if you want to adjust the privacy controls, you can actually fine tune them to match quite a few of your preferences. Some things might be fine for everyone or for friends. Some other things might only be suitable to close friends and not acquaintances. Obviously, in order to differentiate between friends, close friends and acquaintances, you have to sort out your list of friends.

Right now, let’s work on sharing something. Last time, we asked you to put up a new status message. Let’s share a photo. Here are the steps:

1. Before you begin, find out where the photo is on your computer. We like to keep things on our desktop, or in My Documents, but on the desktop is preferred. Why?  My Documents is simply a link to a folder inside the Windows folder. To access the things inside of it, you have to sort through a list of folders to find the one you want. We prefer to make a new folder on the desktop, name it My Stuff, and plunk everything in there. Then, when it comes time to back up the computer, we just burn that folder to a DVD. Anyway, find a pic somewhere on your computer. You can download one from the Internet, too. Usually downloads are saved in a Downloads folder, right?

2. On your main Facebook page, the one you get to when you click Facebook up on the top left, look for the ‘What’s on your mind?’ slot at the top of the page. There are three choices there. Click on ‘Add photo/video’.

3. The next box that pops down will show ‘Upload photo/video’/Use webcam/Create photo album’. Right now we are only uploading a single pic. Click ‘Upload photo/video’.

4. The next little menu asks you to ‘Say something about this…’. You can do this later so for now, click on the Choose File button. What pops up now is a map, more or less, of a folder on your computer. On the far left, at the top, look for Desktop or Downloads. Click on a folder, depending on where the photo is. When you see the photo you want to share, click on it then choose ‘Open’ down on the bottom right. Truth be told, you aren’t actually opening the picture. All you’re doing is saying to Facebook or Windows “This is the photo I want.” That menu will close.

5. You’re back on your Facebook page now but to the right of Choose File should be a bunch of letters or numbers that end in ‘.jpg’. That’s the file name, if you don’t know already. Write some words in the space above it, something like ‘This is me when I was five’ or whatever it is you want to describe the photo.

6. On the lower right of that box, look for the word ‘Post’. You can’t miss it. It’s in blue. Just to the left of it is a little down arrow. It probably has the word ‘Public’ in small letters. Click on the arrow and choose who you want to share the photo with. Choose Friends. Then click the word ‘Post’.

7. There you go! You’ve just shared a photo on Facebook. At this point, that photo is only available to your friends. You can customize that setting by choosing the Custom option and typing in people you want to hide the photo from or open up the photo to Friends of friends. Once you figure out the settings, it’s easy to adjust your privacy settings to your own level of security. It’s far better to do it now when you’re learning about Facebook.

TIP: This is a caveat about tags and tagging.  Keep this in mind constantly when you are using Facebook. While you may not know what a tag is, anyone who is ‘tagged’ in a photo or note or video can see the shared item, no matter what your privacy settings are. Unless you adjust your settings, friends of people who are tagged can also see the post (the thing you shared).

Tip: Tagging someone means that you highlight their name in the photo or video by typing in a menu. That person will get a notice that they have been tagged and will, probably, come and see what that thing is that they’ve been tagged in. It’s another way of saying, “Hey! Take a look at this!” You can’t prevent tags but you can adjust who sees the item after it’s tagged.

Last Tip: Facebook is all about sharing. To a certain extent, you can control who sees what you share. If you don’t want people to see something, don’t share it. It’s as simple as that. Facebook changes its policies all the time. Get used to that. What isn’t shared today might be shared tomorrow. If you post something, someone at Facebook may see it. No matter what you put on Facebook someone will see it, even if that someone works at Facebook. Forewarned is forearmed. Don’t post something that you wouldn’t want your friends…or family…to see. But Facebook is fun, so relax and enjoy it.

Thanks for reading!


Facebook 101- Part Two – your profile picture


Once you’ve set up your new Facebook account, it’s time to decide what face you want to present to the world. Do you want an old photo of yourself so that your high school friends can find you? Do you want a recent photo so your friends at work will recognize you? How about a family pic from a few years ago? Now is the time to decide who you will interact with on Facebook. Your profile photo will be visible to everyone, if you have your privacy settings set up that way, or it will only be available to friends, again depending on your settings. We will get to those later.

In the new Facebook, you actually have two profile photos. One is thumbnail size and the other is larger. Think of the larger one as a background image, something that illustrates your interests or your hobbies, maybe scenery that you love. You don’t really want your ‘Cover’ photo to be too personal. Keep it pretty but impersonal.

Your profile pic can be anything you want, but if you are young or female, you might not want to put a knockout profile photo up. There are stalkers who troll Facebook for attractive women. A generic photo that is only available to your friends makes a lot of sense unless you are trying to simply meet people. In that case,   you’re on your own.

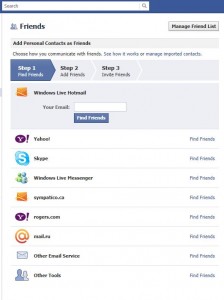
Once you have your photos set up, it’s time to look for friends. You can search them out yourself or you can send them an email with the link to your Facebook account in it. Sound difficult? Well, if you know your friend’s email address, Facebook will send them an email which includes a link to your profile. Quick as a wink, your friend is added. There are many ways to add people but you can rest assured that Facebook takes care of it all. You can search for old friends at school or work or even in your own neighbourhood. All of these search choices are available from your profile page. Just click on the Find Friends link on the top right side. Here is what you want to see:

Click on any link on this page to find friends.
There are lots of choices here to look for friends on Facebook.

While we would prefer you to email your friends using the Facebook system described above, you can also sign into each of the listed social networking applications and send messages to your friends that way. Why don’t we advise that? Simply, trusting your account password to a third party, even if it is Facebook, seems risky to us. If you decide to go this route, make sure you change your password immediately afterward.

Once you start to add friends, you can start to interact with them. For now, type a light-hearted message in the ‘What’s on your mind’ box on the main page of Facebook. In this box you can also share a link or a photo or video or just ask a question. To share a link, simply copy the link from the top of your browser window and paste it into the box. Facebook finds the site, gives a short description of it that is visible to your friends and then chooses a small photo from the site. Sometimes you can choose which photo to use, sometimes it’s only a single choice. Then, at the top of the box, say something about the link. Then click Post and you’ve officially shared something on Facebook. Pat yourself on the back!

Next time, we’ll get into privacy settings. With Facebook, you get to choose who sees your stuff. More on that next time.

Thanks for reading!