Category Archives: Facebook Tricks

Facebook Likes – The Ultimate Guide – Part Four


This post is strictly for your Likes, the ones that your Like box is linked to. Go to your Facebook timeline and click on the Like box. This is that page that will pop up:
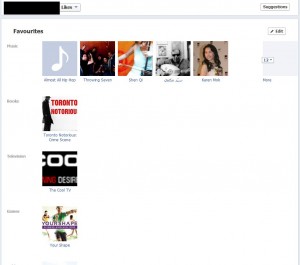
Photo of Like editing page
See the word Edit up on the top right? Click it.

The next page, after you click the Edit button, looks like this:
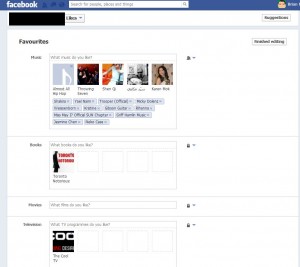
 

Photo of Editing your Likes 2
This is where you choose what to show and what to hide.

This is a long page, starting with your Favorites. (The photo reads Favourites because we’re in Canada and use the British spelling.) Your page of Likes is made up of both your favorites as well as the pages you like. The pages are all at the bottom.  Right now, let’s look at the Music box. You can do two things with each favorite. You can show it or hide it. If you decide to show it, you can choose who you want to see it or who you want to hide it from, the same as if you post a photo on Facebook.

Once you decide who you want to share this favorite box with, you’re left with showing them every type of music you like. You can’t break up this box into pieces, say Techno being one piece that you don’t mind showing and Andy Williams being another piece that you don’t want to show. If you show your music to anyone, they see all of the music you like. If you want to hide old Andy, you have to hit the X beside their name to delete it.

The same applies to all of the topics that Facebook thinks should be listed as Favorites, whether they be books, TV, movies or whatever. If you want to hide your Favorites from someone or only show them to a group of friends, click on the icon on the right. That will bring up this menu:
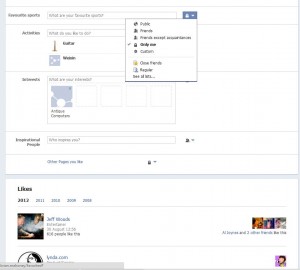
Photo of Favorite share menu
Sort out this menu as best you can. This applies to the particular favorite you are working on, not every single one of them.

You can see from the photo above that you can hide a particular favorite from some people but you can’t hide only one of those individual items unless you hide the whole group of favorites. Get it? If you like Madonna in your Music favorites and you show your Music favorites to your friends, you can’t hide the fact that Madonna is in that group.

Useless Favorites Tip:  These favorites are really useless in the whole scheme of things to share on Facebook. The only reason they are even on your timeline is to open yourself up a bit to your friends. You may have an acquaintance who knows a bit about you but they didn’t know that you like Bladerunner (a movie). Once they find out that you like something, they have a fuller picture of you as a person and, possibly, might feel better about chatting with you about similar interests. Having a favorite in this group doesn’t mean that you’ll get inundated with offers or emails or updates on anything. These favorites are just there in order for people to get to  know you better.  Hide them, show them, it doesn’t matter.


Let’s move on to items that actually get updated every now and then, Facebook pages. As you know, Facebook pages are full of information, updates as well as photos and links, all pertaining to the person or company that created the page. Virtually every star, celebrity or company has a Facebook page. If they don’t, they’re missing the boat.

Facebook Page Likes – Options Available

As far as Facebook page likes go, you can hide them or show them as a group. Yes, you can show or hide them all to whatever group of friends you choose but you cannot hide one of the pages and show the others. This is the same as your other favorites, it’s all or nothing. All means every page you like will be shown to whoever you show any page you like. You can’t pick and choose what to show.

If you like a page, only you will see the updates and information that this page feeds out. No one else will see anything that a page feeds out to you unless they follow the same page.

TIP: There is no reason to show anyone what pages you like. Why not hide all of the pages you like? That way you won’t slip up. Close friends, relatives, employers and employees don’t have to know what pages you follow, do they? Instead of tripping up at some point as you try to keep track of who can see what, why not just shut out everyone? Makes sense to us. Once you lock your page likes from everyone, you are free to be yourself. We advise you to set your Page Likes to this setting:
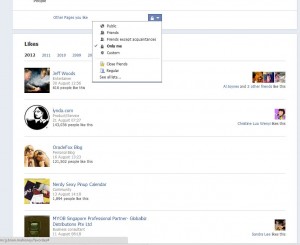
Photo of perfect privacy setting
Set this page to ‘Only me’ and feel free to ‘like’ any page you bloody well want to! Yay freedom!


We’re done. Over the last few posts we’ve tried to sort out everything about Facebook like boxes, Facebook likes and, finally, Facebook page likes. We hope things are a bit clearer now for you. Questions, comments, all are welcome. Good luck!

Thanks for reading!


Facebook Likes – The Ultimate Guide – Part Three


To review, we know now that you can’t hide likes or comments on someone else’s post, no matter what kind of post or share it is. Next, lets take care of our ‘likes’, those  bits of personal information that Facebook feels are vitally important to share with your friends. They are contained in one of those little boxes under your cover photo. You can choose to show whatever boxes you want in that row that Facebook has termed ‘Favorites’. There are a total of eight possibilities for your Favorite boxes.

Not to confuse the issue even more, Facebook has two concepts of ‘Favorites’. The first has to do with which boxes you choose to show to the right of your profile photo. The ones across the top row are your ‘favorite’ boxes. The other boxes, if there are any, are available by clicking the little arrow on the far right of the row.

The second kind of favorite is used to describe your ‘favorite’ likes such as your favorite movie, your favorite TV show and so on.

The Boxes: 

The boxes to the right of your profile photo could show one of eight things. All boxes are links to whatever one of those eight things you decide to put up there. The eight things could be a link to your friend list, your photos, your likes, your notes, your subscribers (if you have chosen to allow subscribers), your maps, etc. It has occurred to us that there may be more than eight boxes available or your choices may very. Everyone’s Facebook timeline might be a little different.

The bare minimum seems to be two boxes, those being friends and photos. Even if you hide your friend list from everyone, there will be a box that shows any mutual friends that you and the viewer have. Here is a shot of the skimpiest timeline you’ll ever see:

Photo of a streamlined Facebook timeline
Only two boxes, one of mutual friends and one linked to photos.

This is the least amount of information that Facebook allows you to show on your timeline. The Like box is gone, as are the rest of them. Let’s add the Like box back and see what we can do with it:

Photo of adding boxes
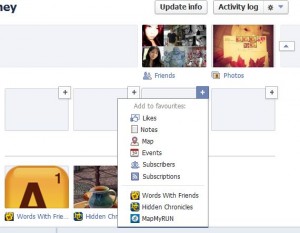
Two boxes are standard, click on a + sign to add more.


If you click on the + sign on the top row, remember that they are termed ‘favorites’ by Facebook, you will get a different menu than if you click on one of the bottom boxes. Here’s what you see on the top:

Photo of top box menu
Everything seems to be here but ‘Likes’.

No Like box yet. Click on one of the bottom boxes to bring up this menu:

Photo of bottom row of boxes
Likes is there. Click the words Likes to add that box to the bottom row.


Seeing as how we only have two boxes on the top row, Facebook automatically adds your new ‘Likes’ box to the top row when you refresh the page. If you had a full row of boxes on the top, you’d be able to choose which ones you want to make your ‘favorites’. Hover your cursor (mouse) on the top right of the Like box and this menu will pop out:

Photo of swap box
‘Swap position with’ means you can arrange the favorite boxes as you wish.


Right now, we can only swap our Like box with Gamer Friends since we have removed all of the other box choices from our favorites.


Next time we’ll get deeper into sorting out our likes. This is enough information for this post. Play around with these settings until they are second nature to you.


Thanks for reading!

Facebook Likes – The Ultimate Guide – Part Two


Let’s take a look at our Facebook Likes and see what we can do with them. When someone visits you on Facebook, they see your timeline, of course. What we’re going to do is take a look at what they see, not what you see. You can hide things from your friends but you can’t hide things from yourself. (That’s actually quite a pithy statement, isn’t it?)

Tip: To get the most out of our articles, set yourself up with another Facebook account. Do that now. Add yourself as a friend and open the new account in another browser (not the same browser you are using now). Go to your timeline in your new profile where you are a friend and get used to using the refresh button to see what affect the changes you make on your other profile have as your friends see it. You are editing one account in one browser and checking out the results in another account that is open in another browser. Get it? Yes, you can use the ‘view as’ button but that isn’t as fast as using a separate Facebook profile.

Here is a perfect example of what we’re talking about. The first photo is from the original person’s profile. The second one is how a friend sees the same profile. Note that the ‘Likes’ are different.

Photo of likes menu
The two ‘likes’ show in this photo are hidden from everyone but are visible to the profile owner.


Photo of Likes menu
Innocuous likes such as Mickey Dolenz and Triumph are fine, right? You may want to hide the fact that you like Andy Williams, however.


Now that you can see why it is valuable to have two profiles, let’s get back to work. The next step is to show you the difference between sharing and allowing things to be seen on your timeline. So far, all of this has to do with YOUR stuff and YOUR actions. We’ll get into your various interactions later.


Your Facebook timeline is a constantly evolving record of what you do on Facebook. As long as you stick to simply sharing things, you can hide that from others, all or some or none. As we showed you in our last post, you choose whom you want to share your own stuff with. That post is here: Ultimate Guide Part One . Today, we’ll deal with your timeline and show you how to use its edit feature.

There are two ways, at least, to keep things off of your timeline. Let’s deal with your Activity log first. Head to your own timeline, click on your profile pic up on the top right then click on Activity log. The next page that opens is a long list of things you’ve done recently. Each of those things can be edited, depending on what it is. Two more pics will explain this better.

Photo of Activity log
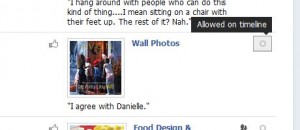
This item is something that someone else posted. Hovering our cursor over the circle icon, we can see that it is allowed on our timeline.

In the photo above, there is a comment on something that was posted on someone’s profile. It is allowed on the timeline. How do we get it off the timeline?

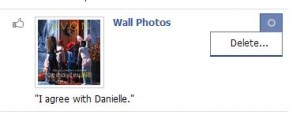
Photo of Activity log 2
Because we commented on someone else’s post, we can ONLY delete the comment. That is the only way to get it off of our timeline.


We can only delete the comment. Yes, this is going over the same stuff as our last post but we feel that we have to reinforce this concept. Let’s deal with something that we did. Facebook is more forgiving with things that you post yourself.


Photo of a photo
This album is, for now, allowed on the timeline.


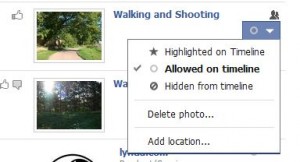
Photo of another photo
If you click on the circle, you can perform several actions as far as your timeline is concerned.


If you put something up on Facebook, you can hide it from your timeline. It sounds simple but we think it gets a bit confusing (and frustrating) for some of you.


TIP: When you share something with some of your friends but not all of them, the former can see it on your timeline but the latter can’t. If you hide something from your timeline, you are hiding it from EVERYONE. More on this in the next post.

Thanks for reading!

Facebook Likes – the Ultimate Guide


By far, our most popular posts are on Facebook likes and how to hide them. We’ve decided to work on an ultimate guide to help you figure out what you can hide and what you can’t. Here we go!

Things you can hide from some or all of your friends: Anything that is yours, meaning anything that you post can be hidden from some or all of your friends. These items include photos, status updates, notes, things that you share that have been posted by others, etc. If you upload anything from your computer, that can be hidden. If you like a page either on Facebook or on the Internet, you can hide that after the fact , unless you want to hide all of your personal likes, such as music, movies and pages, completely.


Things that you can’t hide from anyone: Comments on anything that isn’t your own. You cannot hide a comment on something that is posted by someone else. Even if you like something that is posted by someone else, you can’t hide that from anyone. If it is a post by someone else, you can’t hide your like for it. If it is a Facebook page, no problem, you can hide the fact that you like it.


TIP: If you want to make a comment on something that isn’t yours and you don’t want your friends to see that comment, you can always send a message. However, if the person that you send the message to doesn’t like your comment, they may choose to ‘out’ you to the world, including any mutual friends you may have. We’ve seen many instances where people who are insulted or offended by a message, post that message on Facebook for all to see. Is it really worth your reputation to make that comment? Think about it.


Those are the basics of hiding your likes on Facebook. If you put it out there, you can share it or hide it, whatever you want. If someone else put it out there, you can’t hide your likes or comments.

Here is step one of hiding something that you want to share with some people, but not all of your friends. While this example is for something that someone else shared, once you share it you can set your audience. The same process works for photos, notes, videos and so on.

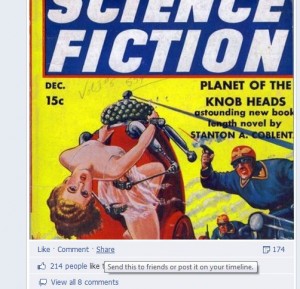
Photo of a Knob Head.
This is what we want to share. Planet of the Knob Heads! How can we not share that?


Photo of more Knob Heads
See the share button? This shows up when you hover on it.


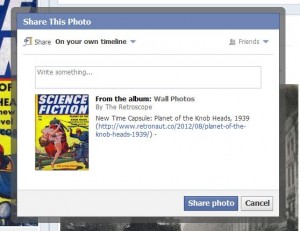
Photo of a Knob
The sharing dialogue opens up. Right now, it’s set to be shared with friends.


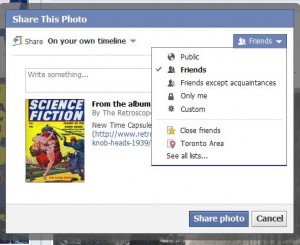
Photo of a semi-Knob
Choose your audience or click on ‘Custom’ to select an even narrower audience.


Photo of menu
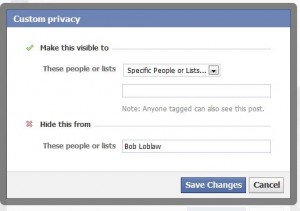
Choose Specific People or list to make it available to them ONLY.


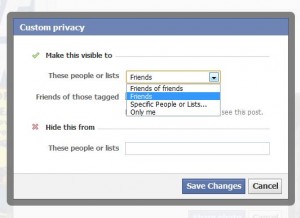
Photo of another menu
You can also choose who to hide the post from. Start typing a name and Facebook will show you the choices you have.


Warning/Tip: Don’t get confused here. You can choose two things in this menu. Choose who you want to see it or who you don’t want to see it. Make sure that you are clear on that. It’s pretty self-explanatory but a mistake here could cost you a friend or a relationship or, worst case scenario, a job. You’ve been warned.


OK, first post done. You now know how to hide what you put up on Facebook. Open the post to some people but not others, or hide it from some people but not others, it’s the same thing but don’t get confused. Next time, we’ll get into how to hide your likes. Stay tuned.

Thanks for reading!

Hide ‘Trending’ from Facebook


In our last post we explained the dangers of using third-party apps in Facebook. One of the apps we mentioned advertises that it gets rid of the new trending updates on Facebook. Here’s another way to do the same thing yourself.

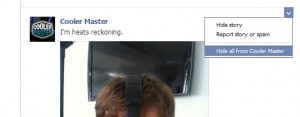
1. On any of the trending news stories that appear on your Facebook feed, hover your cursor just to the right of it and find the little arrow . Click on the arrow. Here’s what you will see:

Photo of Facebook menu
Hover then click ‘Hide all from ‘such and such’.

(The photo above shows the Cooler Master feed but this is used as an example. We don’t want to hide anything from Cooler Master.)

Use this for any trending story that you want to hide from your timeline. You can also use the ‘block’ list in your privacy settings but this way is much faster and easier. We’ve hidden every trending news story that popped up so, for this example, we had to show you how to do this on a Cooler Master post, one of the pages we have ‘liked’ in the past. We will not hide the updates from Cooler Master, that’s for sure.

Obviously, you can also use this technique for your more active friends, the ones who post a bunch of useless things all the time. You don’t want to ‘unfriend’ them but you also don’t want to be inundated with those posts. When they settle down, you can unblock their updates in your account privacy area.

Thanks for reading!