We just ran into a situation at Computers Made Simple that looked like helpful topic for a post. One of our laptops died. It wasn’t a slow death either. One day it worked, the next it appeared dead. Nothing showed up on the screen, the Caps Lock key blinked slowly and the normal boot-up noises just weren’t there. After a few minutes of trying to get it to boot, we decided to simply buy a new laptop. Here’s how we rescued the information from the old hard drive.
1. Most laptops allow you to get at the hard drive bay quickly and easily. Find the model number and search on Google using terms such as ‘CQ42 remove hard drive’. That worked for us and in a matter of minutes, the hard drive was out of the laptop. Since most hard drives have moving parts inside, they shouldn’t be dropped or bumped, specially when they are being used.
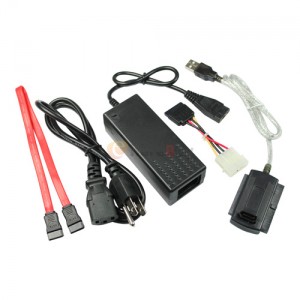
2. We have quite a selection of computer tools in the office but one of these tools is absolutely essential if you’re going to attempt to recover information from a hard drive. Here’s what this tool looks like:

Ours isn’t exactly like this but they are all pretty much the same. There is a power supply that connects to the power connector on the hard drive. The other connectors, in this case the red one, connects to the data port on the drive. Once that is in place, the unit is linked to the computer through a USB port. Two separate things are going on here. The first is a power feed to the drive. The second is a data stream. Once you get this set up properly, the hard drive will appear in Windows Explorer, allowing you to sort through the information on it. At that point you simply copy and paste that information onto your computer.
3. When you find the drive in Windows Explorer, click on it. If the old laptop had a password, Windows detects that you’re probably not the owner of the drive. A menu pops up that says something like ‘you don’t have access (or permission)’ to complete this action. It will have a Continue button, just press that.
4. Windows will slowly open the drive which allows you to see the contents of it, just be patient. All of this depends on which version of Windows you are using. If your old hard drove had Windows Vista on it, the process is much more complicated. This post is about Windows 7 and/or Windows 8. Vista requires you to change the permission for each folder and sub-folder, a daunting job even for an expert.
5. Once you can see the old hard drive in Windows Explorer, right click the icon of a folder down on your taskbar and choose ‘File Explorer’. This will open another instance of Windows Explorer. Navigate to your desktop, then right click in the open space on the right side of your screen and choose ‘New Folder’. Give it a name, something like ‘Files from Old Laptop Drive’ or something similar. Hit enter to set the new name then hit enter again to open the new folder.
6. Your job now is to copy and paste your data from the old hard drive to the new folder. Remember that you can search for files using universal parameters, we’re talking about ‘*.jpg’ for instance. If you type *.jpg into the search slot, Windows will find every jpg file (photo file) on the drive or folder you are searching. *.doc or *.docx works the same way. The asterisk represents ‘any’ and the letters after the period represent the type of file you want to search for.
7. Alternatively, you could copy complete folders from one drive to the other. The problem with number 6 above is that Windows stores some files in two places. Inside of Windows/File Explorer files with the same name will appear. In any other folder in Windows, you cannot have two files of the same name; separate folders yes, same folder no. If you copy all of your photos from the old drive, you will most likely run into a filename conflict. In that case choose to keep both files but let Windows rename one. If there are hundreds, and there often is, put a check in the little space that reads ‘do the same for the next 300 conflicts’. That will save you lots of time, believe us.
8. If you think about where you store data on your computer, it is easy to find that data and transfer it. There are some key files to look for: photos, documents, music and video. Remember that all of these types of data may have different file types. You may be searching for MP3s thinking that all of your music is in that format. iTunes, however, stores its music as MP4s. If you’re not sure what you’re doing here, get some help or simply ask Google ‘where are my music files in iTunes’, for example.
Good luck! Remember that we are always here to help. Use the form below to ask questions. We usually get back to you in a day or two.
Lastly, this whole post assumes that your old hard drive is still functional. We’ve written other posts on what to do if the drive itself is dying and/or dead. Our next post will tell you how to diagnose laptop problems. Stay tuned for that and thanks for reading!

One thought on “How to Rescue Your Hard Drive”