Tag Archives: security

Ten Ways to Spot a Scam

Photo of Stop Scams photo
If you’re smart, you won’t get cheated by the many criminals out there.

We’ve noticed so many new kinds of scams lately that we thought we’d update you with some tips on how to spot one. Off we go:

1. If it sounds too good to be true, it most definitely is. Just as you know you didn’t already win the Publisher’s Clearing House millions, you didn’t win the Yahoo/Microsoft email contest either. Oh, and about that money held in escrow in England after that guy died? Nope, not going to happen.

2. Most banks, if not every bank or financial institution will never email you about a sketchy transaction or suspicious activity. They’ll either call you on the phone or simply suspend your access until you both can sort it out.

3. Anyone you do business with already knows your name and account information. If someone calls you and asks you to verify anything with them, tell them no, then call the bank/company/whoever yourself, just to check. They will know immediately from their records whether they have contacted you recently.

4. Do not answer polls on the phone, specially ones about home security, no matter how legitimate the person may sound. While you are answering the questions, you’re also giving the caller all kinds of information about your home, your current state of security as well as the hours when you’re there.

5. Never give money to anyone who is going door to door in your neighborhood. Even if they say they are from the Children’s Wish Fund or the Heart and Stroke Foundation, don’t give them any money. Why? Most of the time these people are scammers. Even if they aren’t, they are making money from the money that you hand out. In most cases, they are paid reps not volunteers. Give directly to the charity, and choose the charity carefully. This ensures that the money goes directly where you want it to, not into some scammers pocket.

6. Never donate a dime to the folks who hang around just outside the grocery store collecting for children’s charities or pet adoption outfits. We’ve checked dozens of these and not one has ever been associated with a registered charity. The money you give goes directly into someone’s pocket, not to a charity.

7. If you get a message on your answering machine and you don’t know who called, don’t call them back if you don’t recognize the area code. The 1-800 series of numbers are usually OK but there are numbers out that that will cost you hundreds of dollars a minute in charges. You’ll get a big surprise on your next home phone or cell phone bill. Look at it this way. If it’s important, they’ll call you back, right?

8. Don’t add unknown apps to your mobile phone. Some of the horoscope or trivia apps will send you text messages every day or several a day, all the while charging you money for them. Getting out of these charges is next to impossible. This goes for some Facebook apps too. In the signup process the charges will be hidden in the fine print and, if you’re like everyone else in the world, you never read the fine print. Getting a daily horoscope just isn’t worth $2.50 per text message, is it?

9. Check emails for spelling mistakes. That goes for websites, too. If you happen to get directed to a website that looks legitimate, check for misspelled words, bad English, etc. Scam or spam email is known for grammar errors and words that are misspelled. ‘Informations’, with an s, is a popular mistake that you will see over and over again.

10. Update your technology regularly. Windows updates itself whenever a new exploit is detected. This goes for your mobile devices as well. For us, a new version of WordPress is installed as soon as we find out about it. These updates help you avoid identity theft. By the way, if you get a notice of an update that comes from an unexpected source, let’s say while you’re on a website, stop what you’re doing, close the site and restart your browser. Chrome, for instance, updates itself every time you start it. Internet Explorer doesn’t but that in itself is a great reason to switch to Chrome, isn’t it?

Stay safe out there. If you have a security concern, talk to us about it. If you have found a new scam, let us know so we can spread the word. Do it in the comments below or Like our Facebook page and tell us there. Here is the link: Computers Made Simple on Facebook

Encrypting Your Stuff – Zip or Container?

Warning: Lots of discussion in this post but we think it’s worth the time it takes to read it. These are the basics of encryption, things you should know. (But dull, unfortunately!)

Encryption week continues, this time with a discussion of a containers versus zip files and encryption in general. Here are some definitions with explanations:

1. If you use a password to log on to your computer, you can’t say that your computer is encrypted. Yes, it is locked but it’s not necessarily encrypted.

2. You can lock your computer with a password and encrypt the hard drive. That’s not difficult to do, Windows can do this by itself, but you run the risk of losing ALL your data if something screws up. With Windows, that is a distinct possibility.

3. If you encrypt something, you have to use a password. That may seem obvious but this site is for beginners, right? Go back and read number one then read this one again. Passwords don’t automatically mean something is encrypted but everything that is encrypted requires a password.

4. You can have a zip file that is not encrypted. Almost all zip files don’t require a password. If you’re confused about what a zip file is, think of a suitcase. You can pile socks, T-shirts,hats, gloves, etc.,  into that suitcase, packed as tightly as possible. The suitcase goes on the plane/train/car with you. When you get to your destination, you usually unpack that suitcase. The things that were in it can then be put into drawers, on to hangers, and so on. A zip file is a suitcase. It’s smaller than the original file but everything is still there, nothing has been removed. To use the stuff inside a zip file, you have to unpack it.

Photo of Zips and Containers   1
A zip file icon.

5. Whether a zip file is password protected or not, you need a program to unzip it. Windows can do this on its own, as long as the zip file is just that, a zip. (There are other types of ‘compressed archive’ files but, for now, we’ll deal only with zips.)

6. A container is more like your house. Your house has a lock on the door, a container has a password, same thing. Your password protected computer could be termed a container. In our world, containers are much larger than zip files.

Photo of Zips and Containers   2
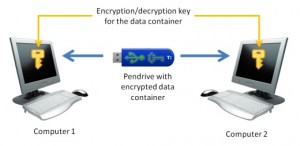
An encrypted container can be put on a flash drive.

7. An encrypted container is something like a glass house where the windows are actually mirrors or they are smeared with petroleum jelly. You might be able to see inside but you can’t see what’s there. If you have the key to the lock, you can see everything. Without the key, no such luck.

Tip: A container can be a file or a folder but it could also be an encrypted flash drive or hard drive. In this post and in the future posts on encryption, we are discussing files and folders, not flash drives.

8. Using a program such as Notepad, you are able to look into any computer file. If you open a .jpg file, you’d be able to read the file header and know it was a .jpg. You wouldn’t be able to see the picture itself but you would know what type of file it is. If you open an encrypted file or folder in Notepad, everything inside it is illegible, nothing can be interpreted. Once the file or folder is unlocked, however, everything inside it becomes readable.

9. Nuts and bolts now. Use a zip file to send to someone via email. Use an encrypted zip file to protect passwords, personal documents, financial data from anyone who might intercept that file, on a flash drive or external hard drive, for instance. Use an encrypted container to store your files on your computer and online, in the Cloud. If you keep a copy of the container on your computer, you can simply upload it again and again, replacing the online one with the new, updated one.


Now you know a bit more about zip files and encrypted containers. In our next post we’ll show you how to encrypt a container using TrueCrypt. Finally, you may be asking yourself, “Why should I even bother to encrypt my stuff?” Here’s why.

Anything you put into an online storage facility, whether it is DropBox or Microsoft’s SkyDrive, is open to viewing by employees of that facility. If you think that these companies don’t go through your stuff, you’re mistaken. They do sift through your stuff on a regular basis. Your own and other government officials go through your files too but that’s not the point of our articles. We’re here to help you keep your personal data safe. 

Thanks for reading! How about heading over to our Facebook page and clicking Like? Sounds like a good idea to us! Here’s the link:  Computers Made Simple on Facebook
Security Questions – Don’t tell the truth!

Besides a good password, security questions are another way to keep your different online accounts safe. This is a good thing, isn’t it? Well, it is a good thing if you select the answers to those questions carefully. Remember, you don’t have to tell the truth when you choose an answer. Lie a little.

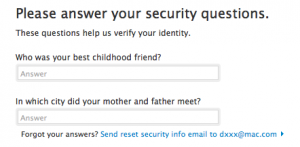
Here’s an example that you might see on the Internet when signing up for a new service:


Photo of Security Questions
Anyone who knows you might be able to answer these questions.

These are typical security questions. Before you simply plunk in ‘Benji’ and ‘Sheboygan’, think about it. Who knows where your parents met? You and anyone that you’ve told the story to.  Maybe your childhood friend is still a friend. Maybe he’s your husband! Here’s where you can lie a little, just to keep your accounts a bit safer.

For any security question, use completely different answers, ones that aren’t guessable. For your first car, you could put the answer as ‘123’. Mother’s maiden name? Tokyo. First pet’s name? Smith (assuming it wasn’t named Smith!).

When you use a series of numbers or names or words that don’t match any of the questions, your account is completely secured from anyone who happens to guess your password. Sure, they may have your password solved but they won’t be able to get past your security questions.  We showed you last time how to create a strong and secure password using mnemonics. This technique is somewhat similar, using easy to remember words that have no relation to the questions being asked. There are no rule books as far as security questions go. You’re dealing with a computer, not a real person, so you can say anything you want. Lock up your accounts with a good password and crazy answers to security questions and you’ll be a whole lot safer online. Good luck!

Thanks for reading! Why not like us on Faceboo? Here’s the link: Computers Made Simple on Facebook 
Protect Your WordPress Site

Here’s a quick and dirty way to keep your WordPress site safer from hackers. While you may never be able to fully protect your site, take our advice and perform these steps now. Hackers are very good at what they do but the harder it is to break into your site, the safer you are.

Everyone knows that the default user for every WordPress site has the username admin. With the username and the proper password, anyone can gain access to any WordPress site. Do you see the shortcomings of using the default name for the primary WordPress user? If you leave that name in place, hackers already have 50% of what they need to control your site. Here’s how to protect yourself:

1. Open your WordPress site by logging in with the current admin username and password. When you install WordPress, you are assigned a fairly decent password. We’d suggest making that password a bit tougher but the standard one is not too bad. Whatever you do, change your admin password on a regular basis.

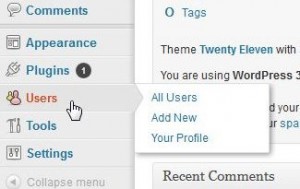
2. Once you’re in, look for the word ‘Users’ on the left pane:

Photo of WordPress Security   1
Users, click on All.


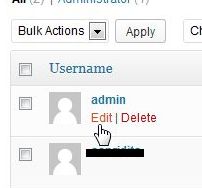
3. On the default menu, there is only the ‘admin’ user. That user has full admin privileges. That’s not what we want. We want to remove the admin user or take away their roles. In the following menu, there are two users:

Photo of WordPress Security  2
Hover over the word ‘admin’ and select Edit.


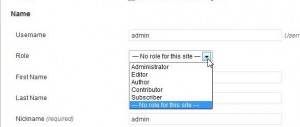
4. Once we click Edit, we can change the role of the admin. In the previous photo, you can see that you can also Delete that user but, remember this, you can only do that if you have another user that you have assigned the role of admin to. Makes sense, right? You can’t administer a WordPress site with an admin to do it. For now, this photo shows what we want to do. Later on we will delete this ‘admin’ user, after we have assigned the role to another user.

Photo of WordPress Security  3
We want to choose ‘No role for this site’ for the user named admin.


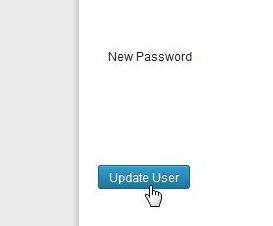
5. Once you set that menu to ‘No role for this site’, make sure you scroll down to the bottom and click ‘Update User’:

Photo of WordPress Security  5
Update user or your work is for nothing.


TIP: For extra security, don’t assign usernames that are actually the names of the users. If, for instance, you assign the admin role to a person whose real name is Bronwyn, don’t use Bronwyn’s real name. Choose something like Lana or Ralph or a set of numbers. Whatever you do, don’t allow hackers to guess the username. Why? As we said before, if they know the username, they are halfway there to getting access to your site. No matter how much time they spend trying to figure out your password, they’ll spend the same or more time figuring out the admin’s username. Please keep that in mind when you’re setting up or changing your WordPress site.

6. We figure that you’ll know how to add another user and assign them the admin role so no need to confuse the issue. Once you set another user as admin, you are free to delete the original ‘admin’. For your own security, WordPress will not let you delete the default admin unless you have assigned that role to another user. Don’t worry, they think of just about everything.

That’s it for today. Hackers are actively targeting WordPress sites. Keep yours as secure as you can.

Thanks for reading!

Encrypt your Dropbox folder with TrueCrypt


In our last post, we encrypted a text document. Here’s that article in case you missed it: Using Notepad ++ to Encrypt a Text File  This post is a continuation of that theme, keeping your cloud files safe from prying eyes. Whose prying eyes? The employees and management of the various cloud companies, that’s who. Now that Microsoft has banned photos containing nudity in their SkyDrive folders, you can be certain that employees/managers/bots scan your files for offending data. Hell, your government is probably scanning those folders as well.

TrueCrypt is free. You can get it here: TrueCrypt  . Once you download TrueCrypt, install it. While it is a very powerful program, Truecrypt is mostly based on passwords. If you lose your various TrueCrypt passwords, you’re totally out of luck so anything you do with this program must be done using a password that you won’t ever forget. You’ve been warned.

The concept of this whole thing is to make an encrypted folder on your computer which will become your Dropbox folder. Since that folder is synced with your online Dropbox folder, it is automatically encrypted.  TIME OUT! In the middle of writing this post we discovered that the guide we were using simply doesn’t work. We managed to encrypt the Dropbox folder on one of our computers but not the online Dropbox folder. We’re back to square one here but we’ll update this post a.s.a.p. Yes, this is a short post but it’s been three days since our last one and we didn’t want anyone to think we’re sleeping on the job. We’re not. Things get in the way every now and then!

We’re back! 

OK, we figured it out. Although the system we started to describe is in different places all over the Internet, it does not work. What follows is the only way to secure your Dropbox contents from prying eyes. You can use the same technique on other cloud services, SkyDrive for instance, and rest assured that no one but you can access your material there…provided you remember the password.

Before we get into the how-to section of this post, we want to explain some principles about what we’re going to do here. You have to know how Dropbox works before you can understand this whole thing.

The Basics

1. There are as many Dropbox folders as there are computers that access the same account…plus one. There is one folder on the Dropbox site itself plus the same folder, more or less, on every computer that you use for the same Dropbox account.

2. If you put a file, let’s say a photo or a video, into your Dropbox folder on one computer, that computer uploads the file to your online Dropbox folder.

3. When you turn on another computer that has access to the same Dropbox account, the file that was just uploaded to the online Dropbox folder is downloaded to the current computer’s Dropbox folder. If you change a fileThis is what syncing is all about, right?

The Problem: 

1. When you change a file, Windows notes the change by telling us that the file was modified at such and such a time/date. If you modify a file, Dropbox notices this and updates that file all by itself. The next time you start your other computer(s), Dropbox sees that the version of a file isn’t the same as the one that it has in its online folder. As soon as it sees the discrepancy, Dropbox downloads the newer version of the file to whatever computer you are currently using.

2. When you are using Truecrypt, any folder you open is hidden, more or less, from Windows. In effect, that file is open only in Truecrypt, as if it was another operating system. You open Truecrypt then open the encrypted folder, add or subtract data from it and then close it before you close Truecrypt. When Truecrypt closes the folder (called dismounting), it does not update Windows on what changes have been made. As far as Windows knows, nothing has changed.

3. Do you see the problem? If Windows doesn’t tell Dropbox that the folder has changed, Dropbox doesn’t know to sync that file with either its own online version of that folder or the other versions of the same folder on any other computer that you use. Ah, there’s the rub.

The Solution: 

1. There’s only one step to this solution. Instead of letting Dropbox sync your encrypted folder by itself, you have to send the folder to Dropbox each time you add or subtract anything from it. Basically, you copy and paste the changed folder into your current computer’s Dropbox folder. Only then will Dropbox feed the newly changed folder up to your online folder. In theory, this is how it should work. While you’re mulling all of this over, we’re trying to check that this is exactly what happens. Next post, we’ll let you know if our theory worked. Wish us luck!

Thanks for reading!