Freecorder is a pretty cool free app that allows you to record any sound coming from your browser. On my computer Freecorder only works with Internet Explorer, at least on my computer, and there are a couple of tricks to using it but if you stick around, I’ll explain it all for you.
Download Freecorder, install it and accept it when the installation asks you to associate Freecorder with your browsers. Freecorder installs a toolbar which has settings for recording audio and video as it plays. This blog is for audio but you can certainly use Freecorder for video, too. Actually, video is much easier to record than audio since Freecorder taps into your cache, allowing you to save videos even after you’ve watched them.
The only trick to Freecorder is when you open your browser. On my 64 bit version of Windows, recording will only work when I run the 32 bit version of Internet Explorer using the ‘Run as Administrator’ setting. To do this, find the Internet Explorer shortcut in your ‘All Programs’ list, right click it and choose ‘Run as Administrator’. The 64 bit version is clearly labelled 64 bit. Don’t use that one.
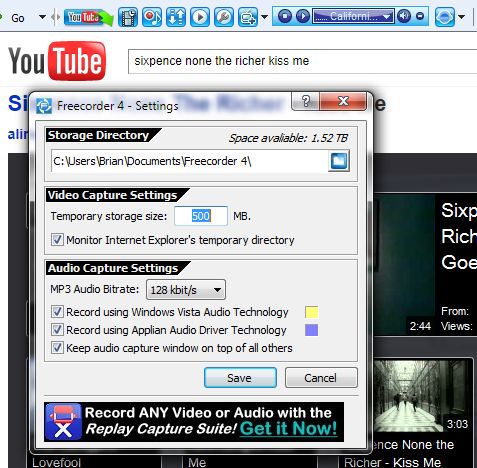
Once Explorer is running, you’ll see the Freecorder toolbar across the top of the window. Click on the little wrench and this menu will pop up:

The storage directory doesn’t need setting unless you want to move it somewhere else. Temp storage is fine at half a gig but you can make it larger if you have a huge hard drive. The audio capture settings should be set to something similar to mine. I use 128bit simply because I don’t think that increasing that will do much good. I have checked both ‘record using’ boxes, just in case.
Save those settings and head over to Youtube. Find your favorite video and click the button with the red dot and musical note on it. The Freecorder recording window will pop up. Click play on the Youtube video and you should see some jaggies on the horizontal line in the recording window. If the video is playing and you can’t see any jaggies, stop the recording and reload the page. Any problems with the recording have been fixed by reloading the page and then starting the recording before the video. Once you see the jagged lines, you’re all set.
You can record audio files separately by clicking the ‘Stop Recording’ after each video or you can record complete playlists of videos on Youtube (and other sites, too). Don’t worry about running back to the computer after the song. When the video ends, so does the recording, even though the window stays open. Freecorder senses the end of the song and saves the recording as an MP3 files automatically. Once you close the recording window, you confirm that the recordings are saved. Just make sure you click stop recording and then click OK when you see the verification window.
Now, recording a whole playlist is fine but you’ll have to rename each MP3 later. Same for individual recordings but they are a bit easier to remember, right?
That’s it, hopefully this is clear. Using this technique you’ll soon have a nice library of tunes for your MP3 player – not as high quality as ripping a CD but pretty good…for the price.
Thanks for reading!
Follow me on Twitter: @_BrianMahoney

2 thoughts on “Record Youtube Audio From Videos – create MP3s from Youtube Videos”
Comments are closed.